Frontify DAM connector
Digital asset management (DAM) Tier 1 Incubator FRONTIFY Magnolia 6.4 compatible[1]
The Frontify DAM connector provides a connector to Frontify to use assets form this service. It incorporates Frontify Media browser widget that allows users to select assets to be included in the website.
Installing with Maven
Maven is the easiest way to install the module. Add the following to your bundle:
<dependency>
  <groupId>info.magnolia.external.dam</groupId>
  <artifactId>frontify-dam-connector</artifactId>
  <version>3.0.1</version>
</dependency>
Configuration
To use this module you need to have exiting account with Frontify. From your frontify account you need below information:
-
domain(please use full url) -
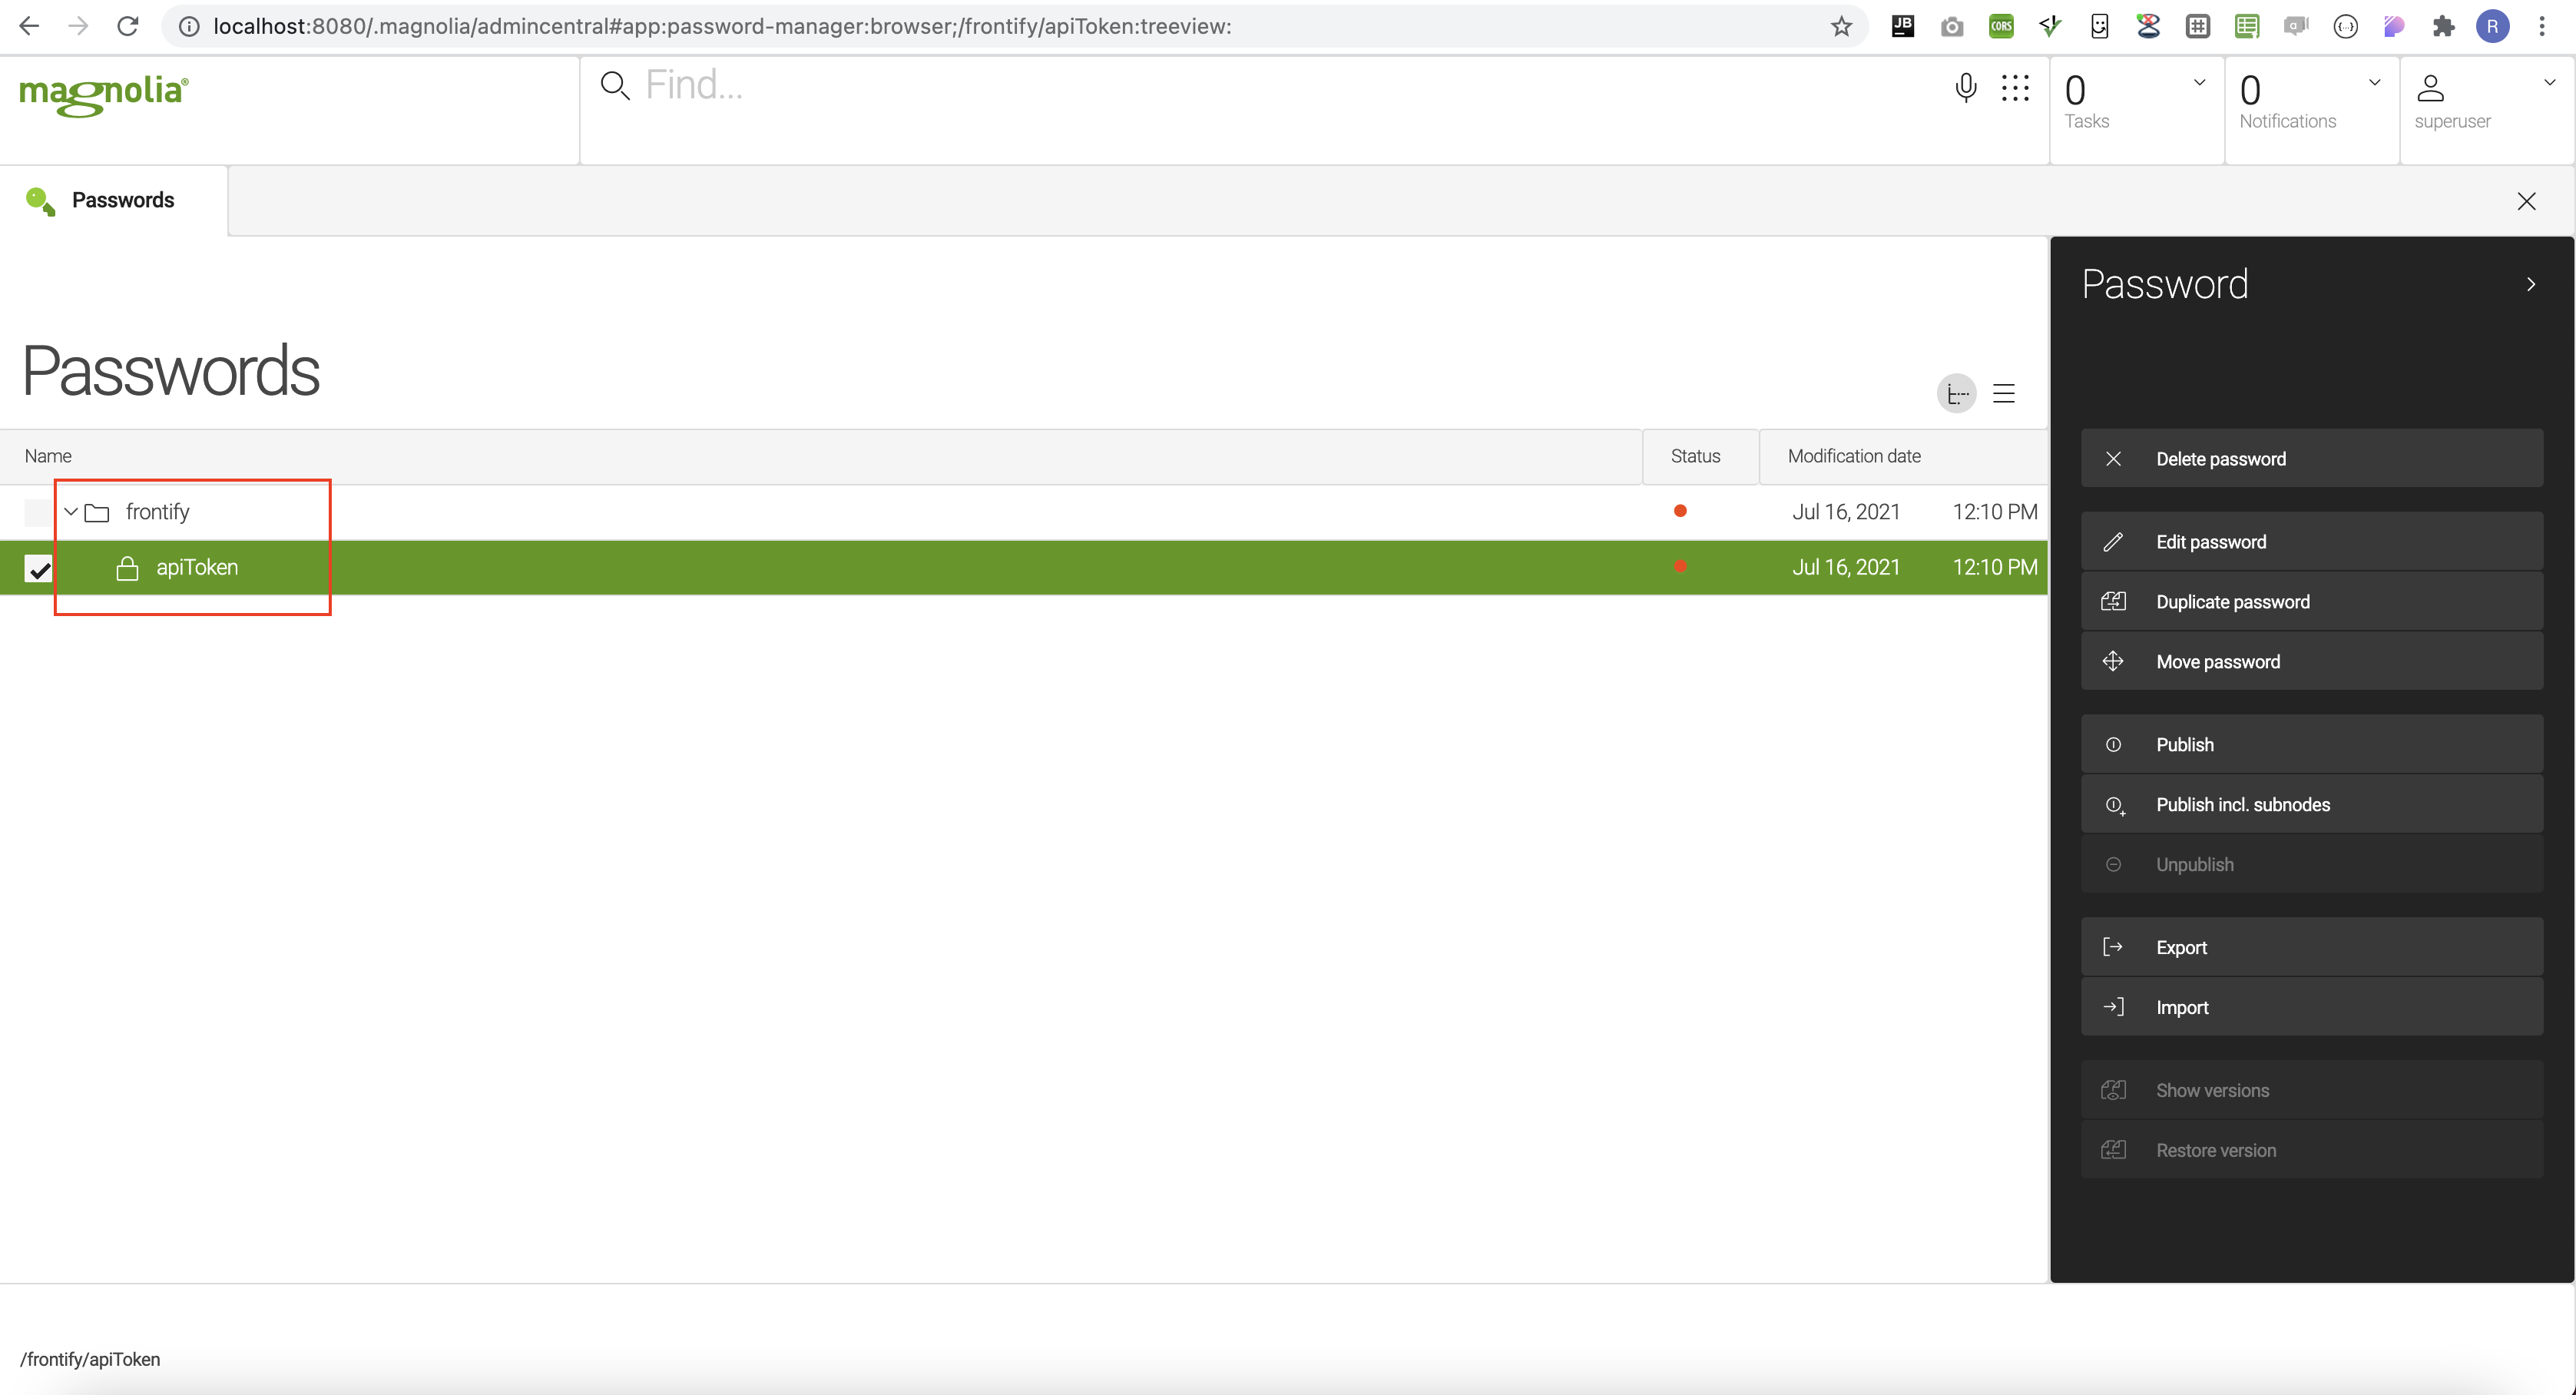
apiToken -
projectId -
clientId -
publicUrl- Additional you need to provide public url under which magnolia is accessible. This url will be used to register Frontify webhook callback. -
executeCreateEvent- Optional flag to enable or disable the execution of the create asset event webhook. (Default value: true) -
executeUpdateEvent- Optional flag to enable or disable the execution of the update asset event webhook. (Default value: true) -
executeDeleteEvent- Optional flag to enable or disable the execution of the delete asset event webhook. (Default value: true) -
filterByLibraryIds- Optional field to specify one or more libraryIds for filtering in the Frontify Finder.
This information needs to be entered in module configuration and passwords app. Please check screenshots below:
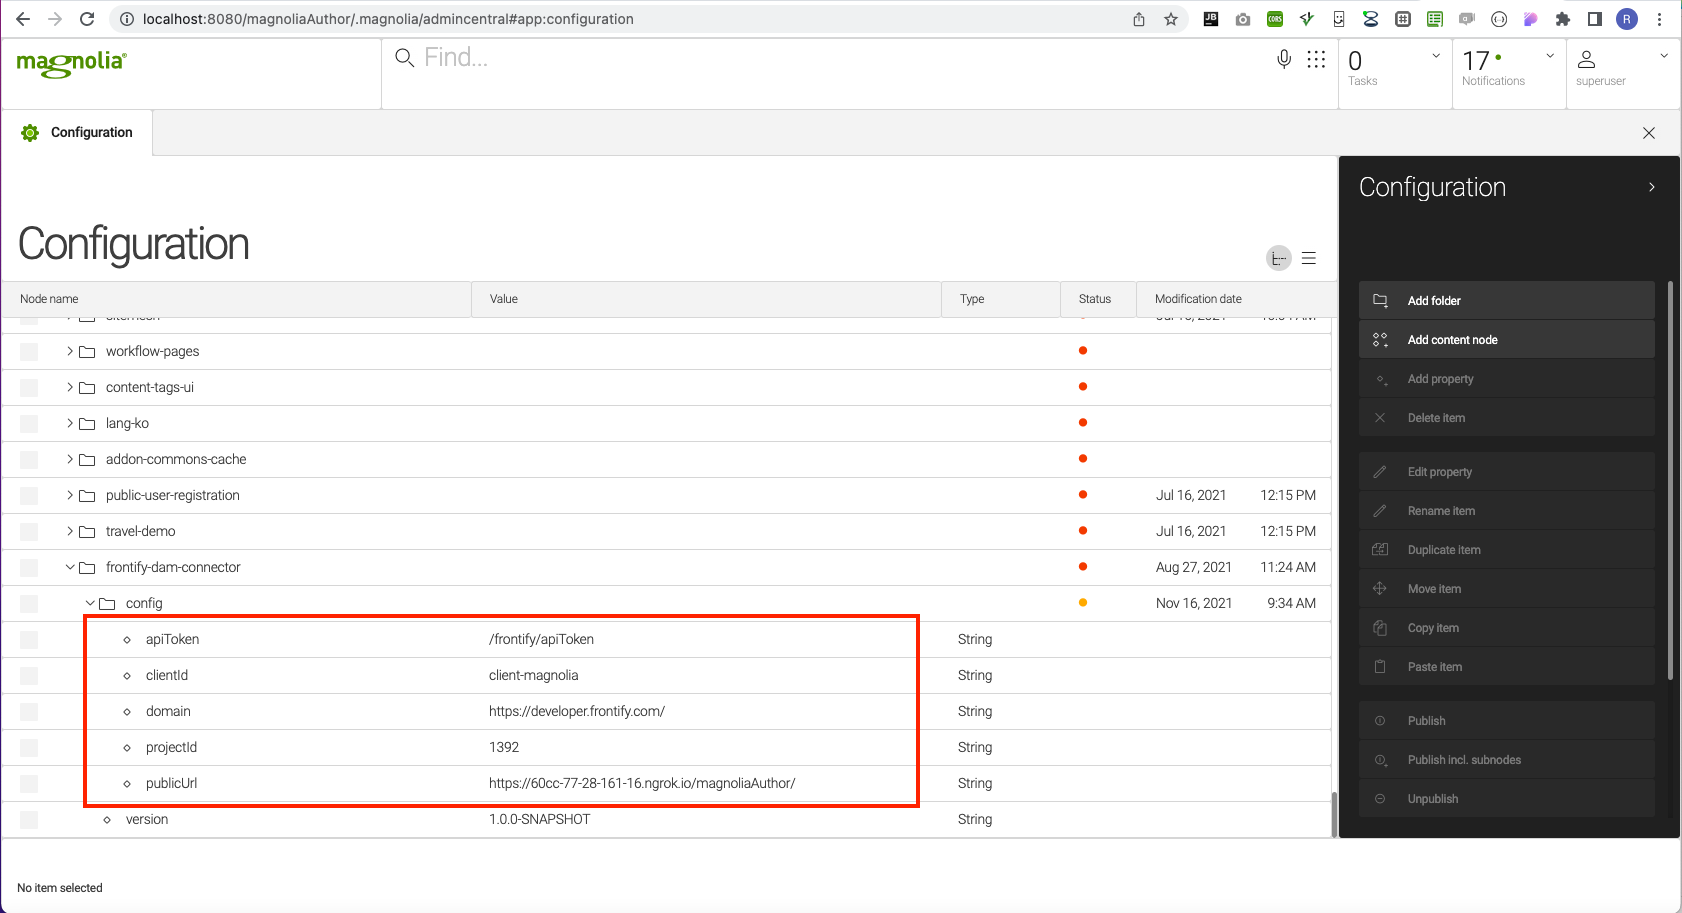
Magnolia will try to register Frontify webhook when this module starts. Webhook registration on module start should happen only if frontify webhook is not registered previously.
Alternatively magnolia will listen for any change in the module configuration folder (/modules/frontify-dam-connector/config) and in the defined apiToken path (keystore workspace). For any change in these folders magnolia will register new Frontify webhook.
Webhook registration is done only on author instance. So, only author instance will get notifications from Frontify for the file updates.
These notifications include:
-
create
-
update
-
delete actions.
| For each notification that author instance receives, frontify JCR cache will be updated and this JCR changes will be propagated (published) to public instance(s). |
Each http request that magnolia author instance receives from frontify is checked to make sure that request comes from Frontify.
This security check is done based on secret token that is received from Frontify when webhook is registered. This webhook secret is saved in the "frontify-media" workspace.
Make sure you have a valid value in config/server/defaultBaseUrl.
|
Usage of the frontifyWidgetField
You can use magnolia field in any dialog:
form:
  implementationClass: info.magnolia.ui.javascript.form.FormViewWithChangeListener
  properties:
    image:
      label: Frontify Image
      $type: frontifyWidgetField
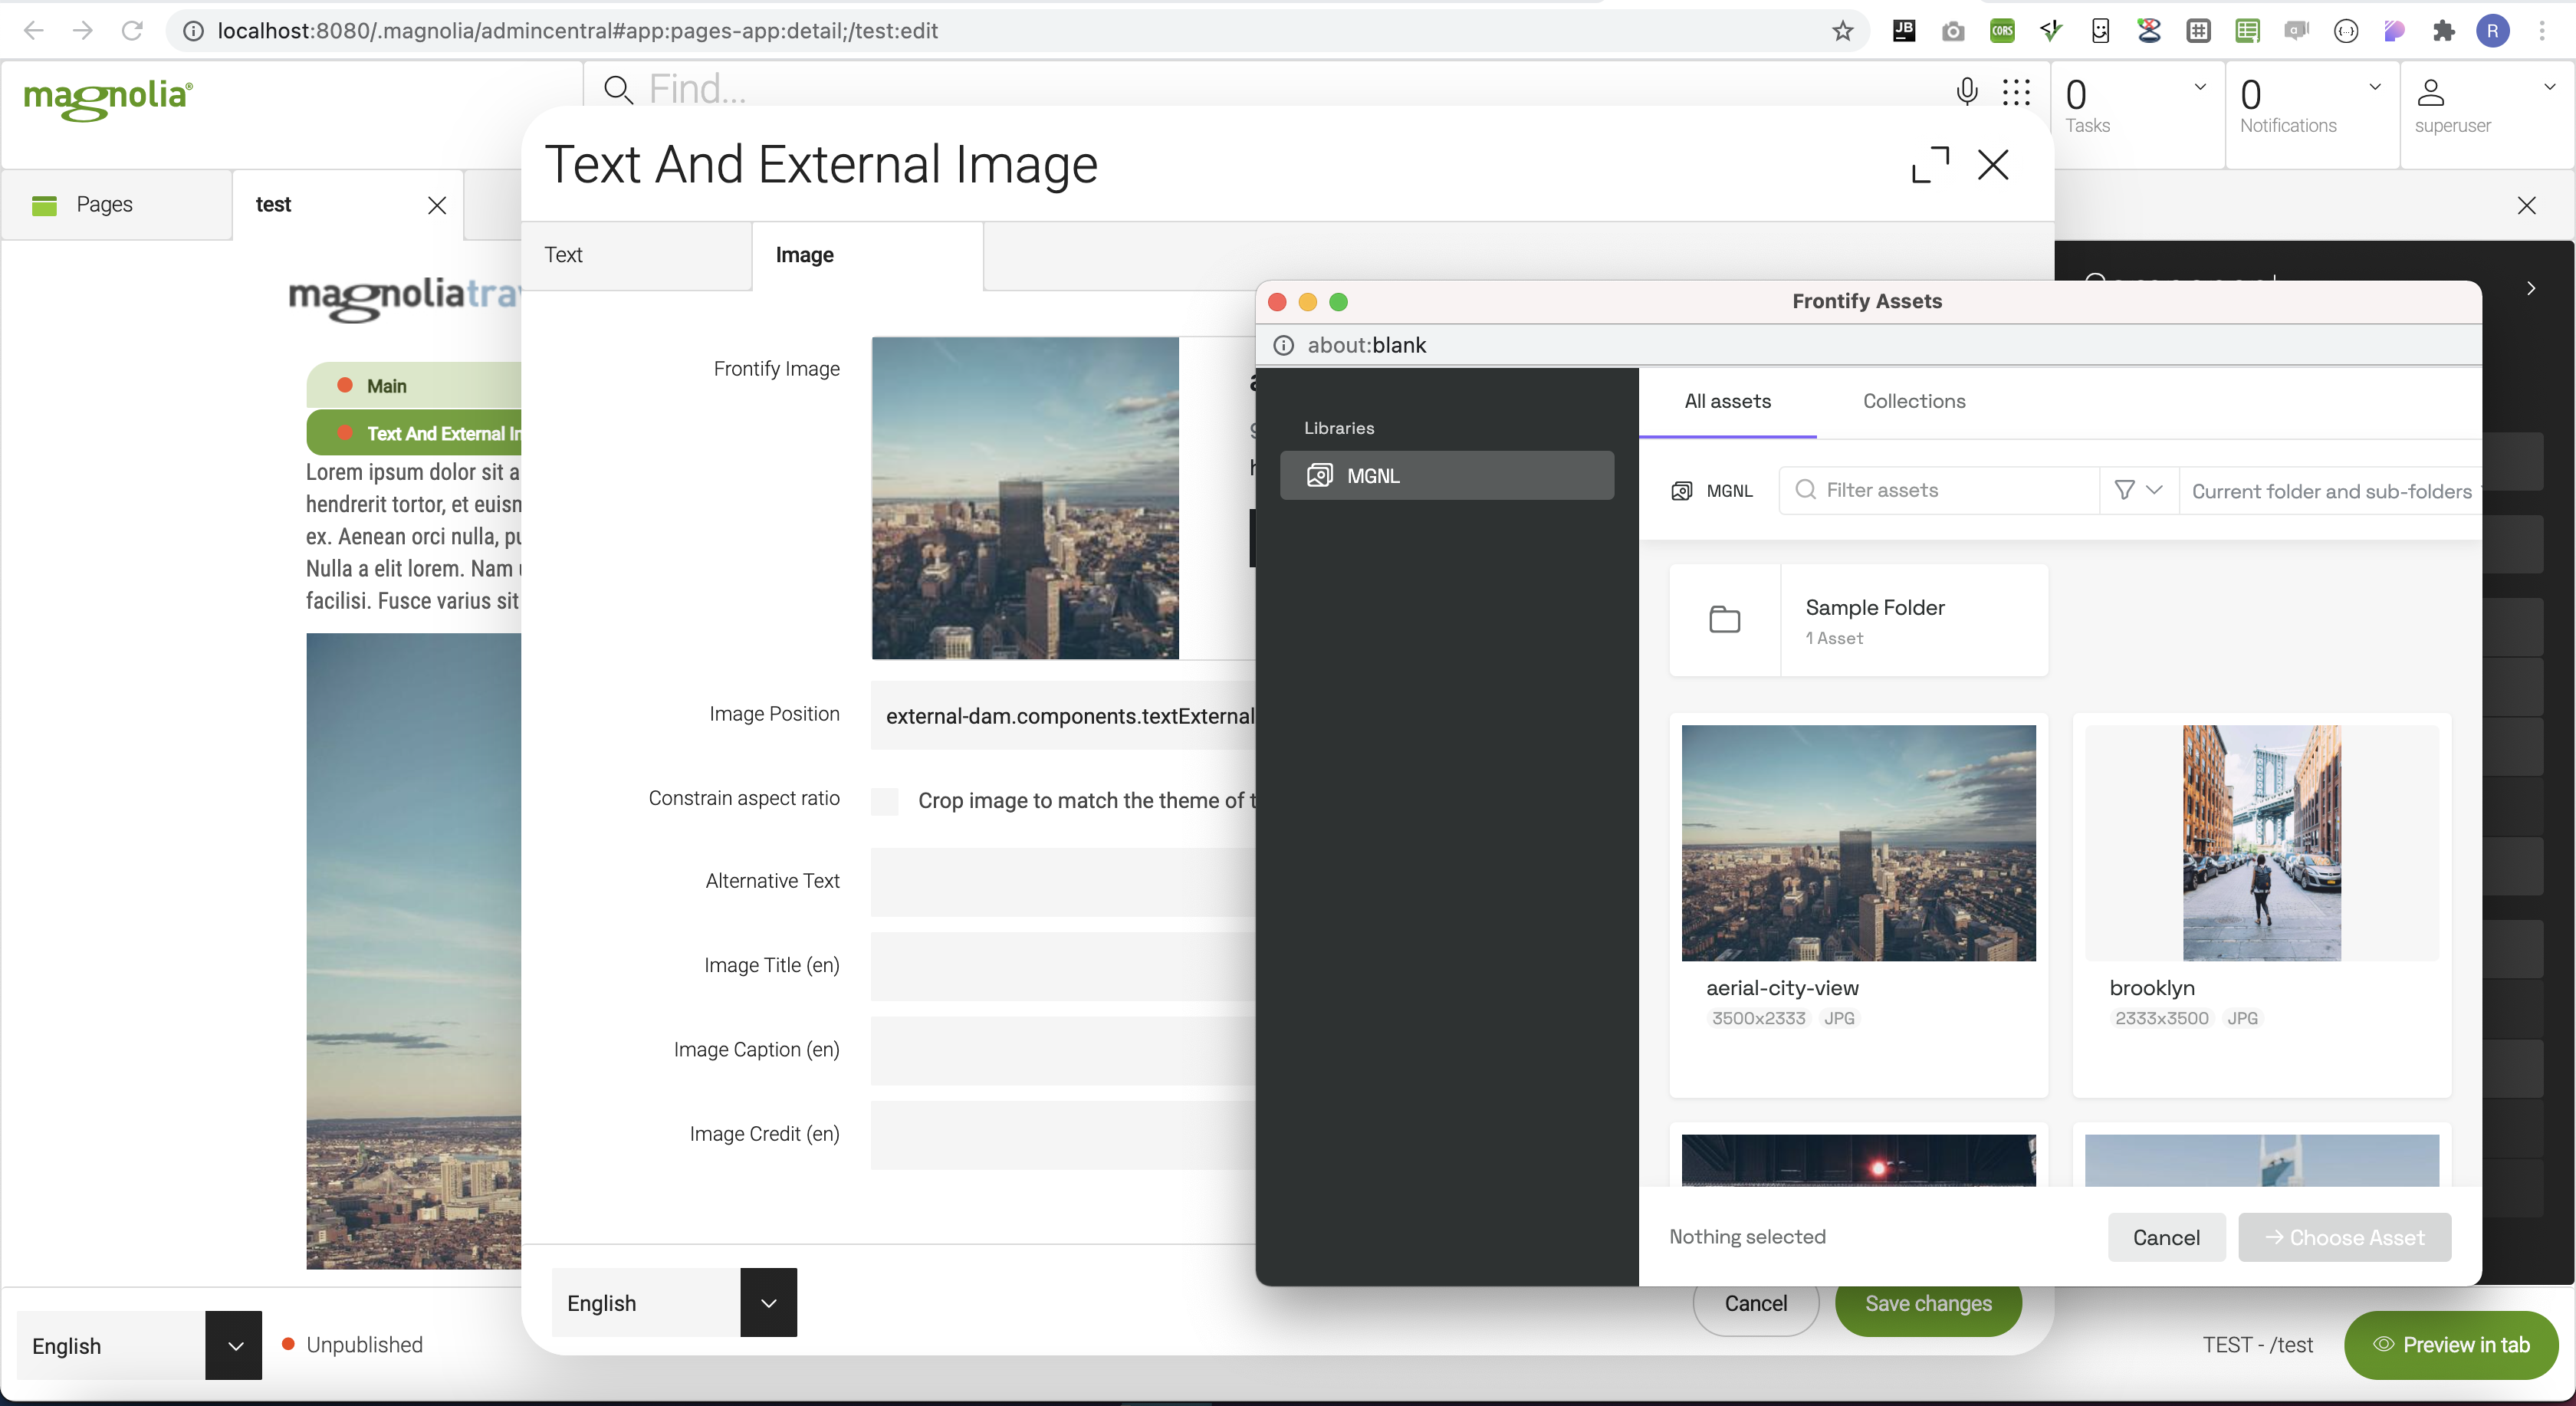
After opening magnolia dialog and clicking on select image button, you should be presented with frontify widget select dialog. Please check the screenshot below:
Usage of the frontifyRichTextField
|
As of now, this field is implemented only for Magnolia |
Renderer
The Frontify DAM connector uses it own renderer class:
info.magnolia.external.dam.frontify.renderer.FrontifyAssetRenderer
This renderer works with the FrontifyAsset object to generate rendition-specific URLs, such as previews or thumbnails.
Additionally, the FrontifyAsset object provides direct access to properties like downloadUrl.
The previewUrl provides a link to a preview or thumbnail rendition of the asset.
This URL is generated by the FrontifyAssetRenderer, which modifies the base asset link with parameters (e.g., width and height) to create a specific rendition.
Example: If you have an asset with a base link, the renderer might append ?width=300&height=200 to produce a thumbnail.
Use the damfn.getAssetLink method to call this property and generate the preview URL.
The downloadUrl provides a direct link to download the full, original asset.
Use the damfn.getAsset method to retrieve this property.
You can retrieve other properties (e.g., title and description) from the FrontifyAsset object using damfn.getAsset.
downloadUrl can be empty in some cases (if the asset has download protection). The link will appear as usual (showing the file name), but it will NOT be clickable.
|
Getting the API Token
To enable the api token, from within one of your Frontify Libraries, look for the cogwheel on the Power Bar and go into the Integrations section.
Click on API Access Token, toggle it on, and save.
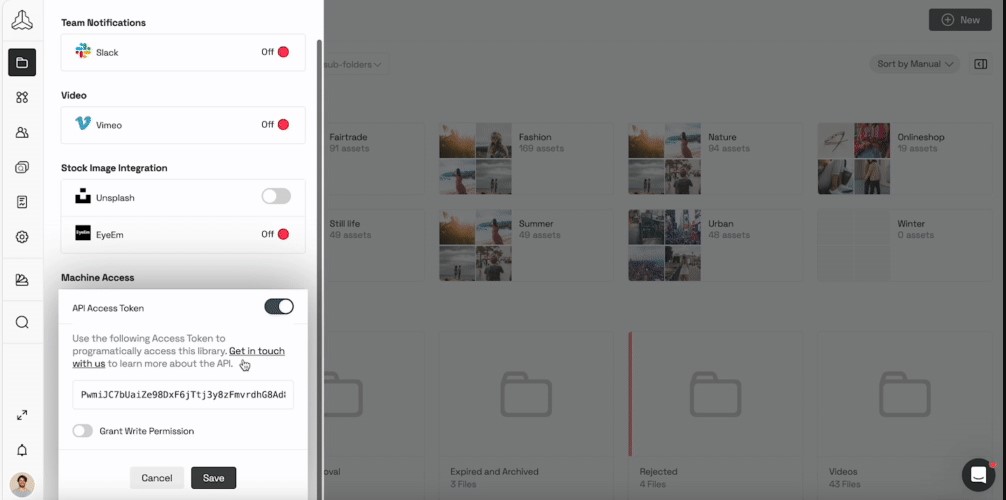
After toggling it on, the alphanumeric access key will be displayed on the very same fly-out. If needed, you can also toggle the write permission.
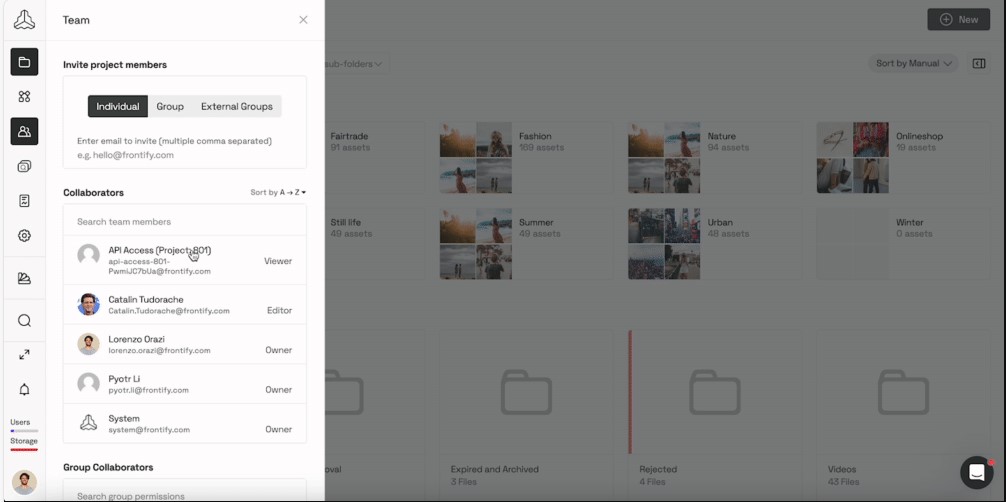
You can set the API token only at the backend view of the libraries; this is a backend-only functionality, not available in the front view of the libraries.
Getting the Client Id
1
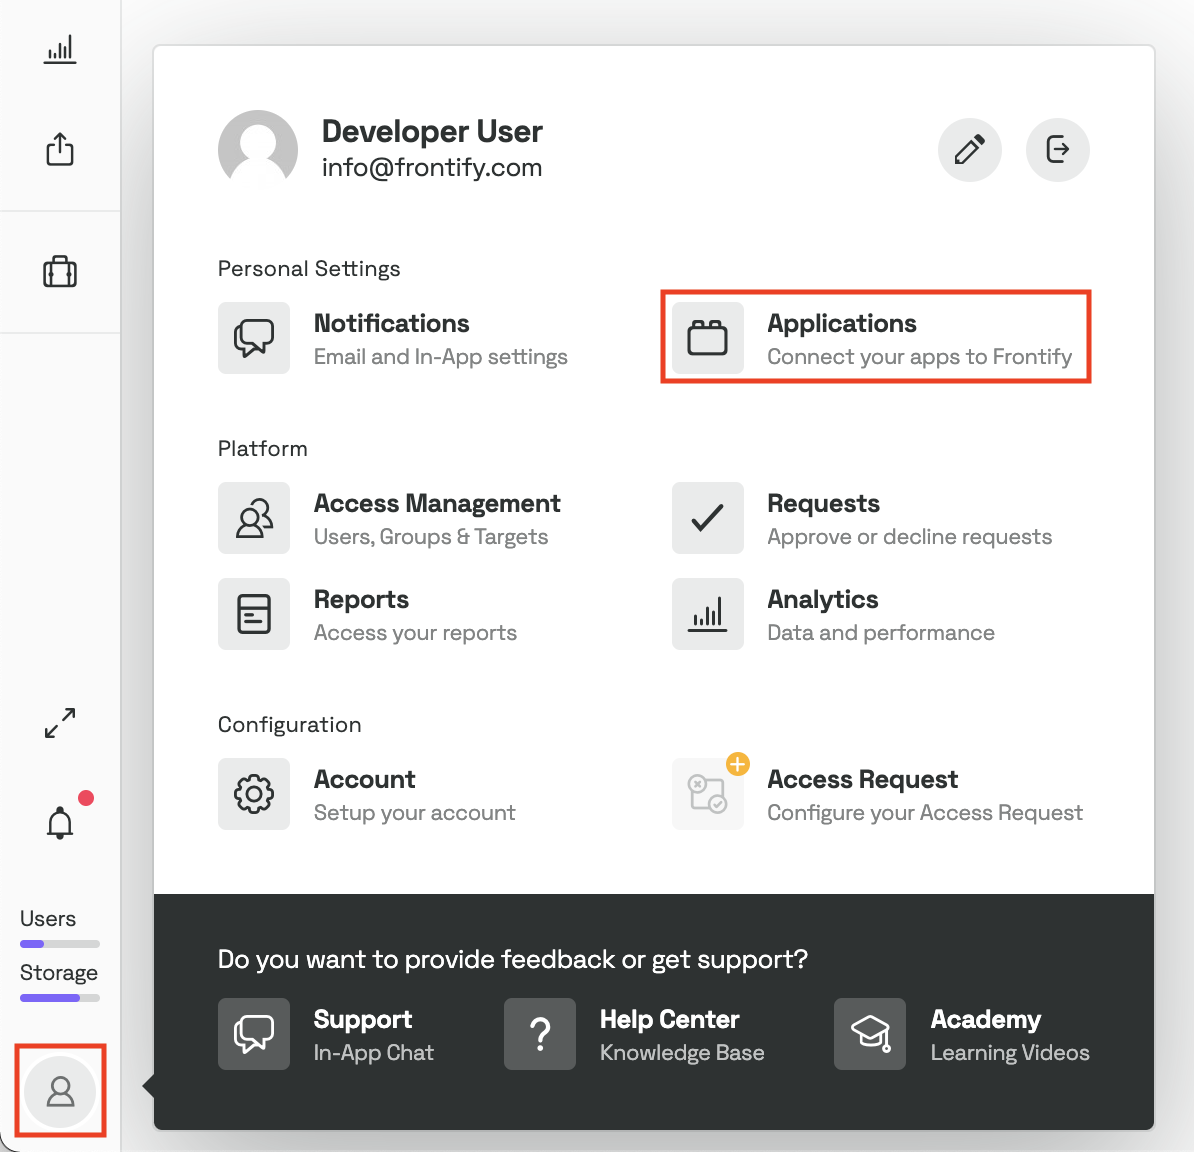
Go to Frontify and open the applications setting.
Important: This is only possible for Frontify Admins. If it is not visible for you, please contact your Frontify Account Admin.
2
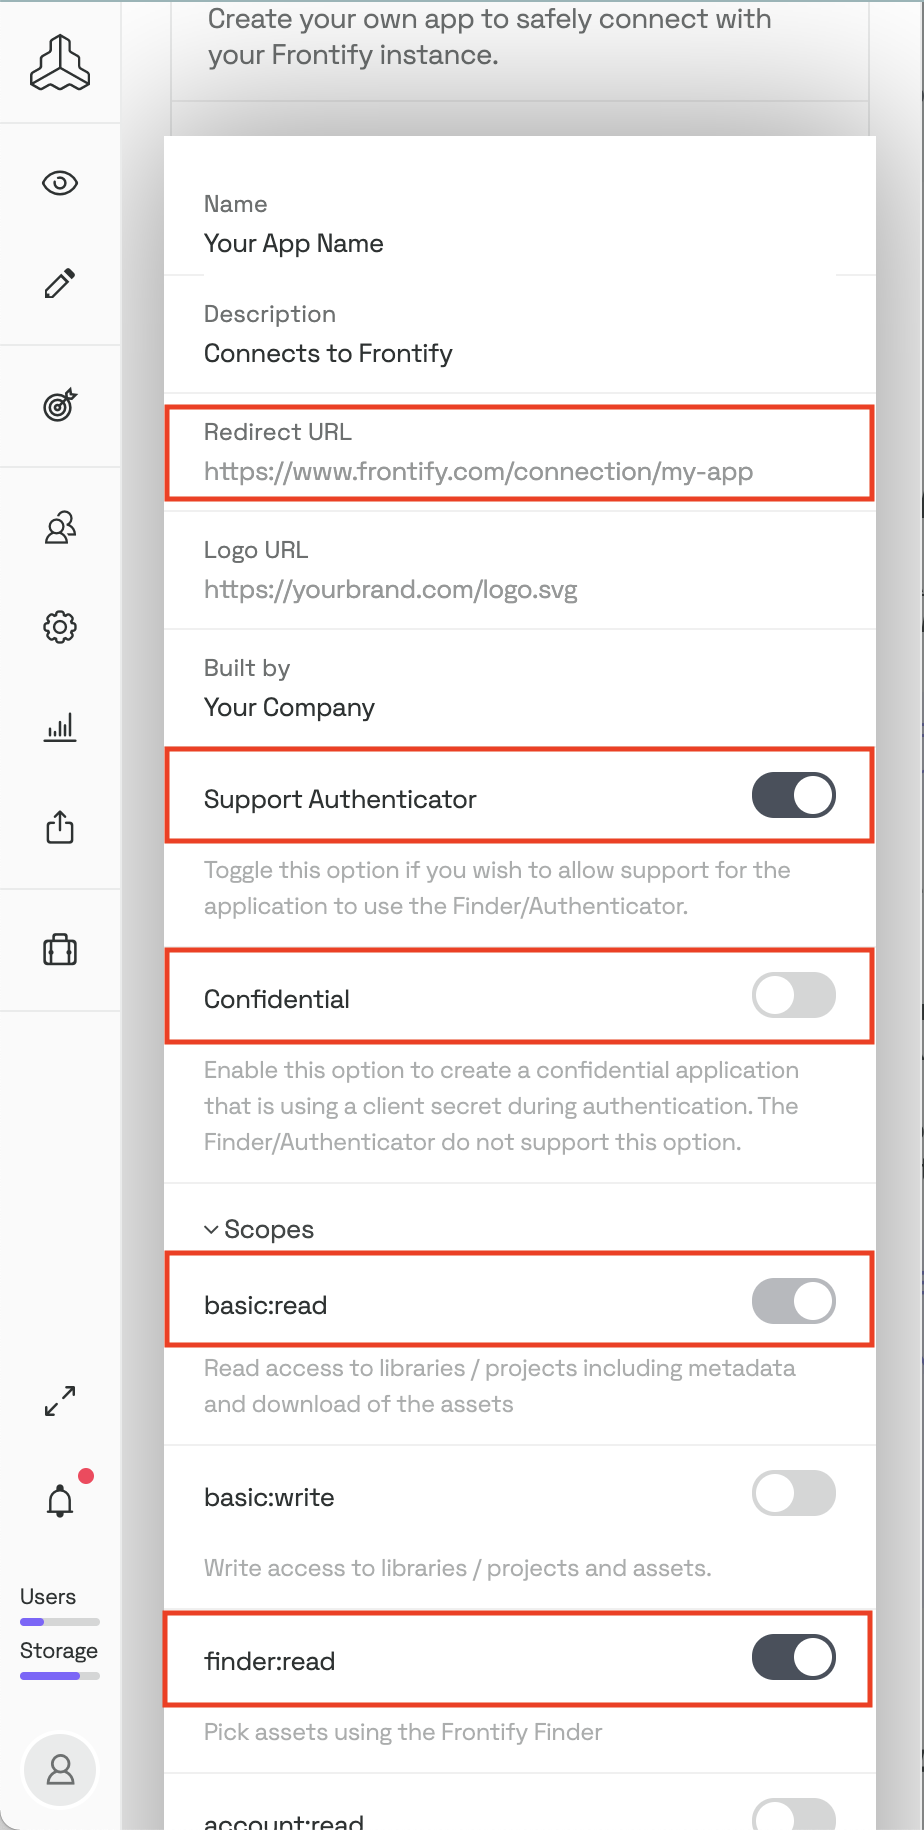
Add a new application with the following configuration options:
[ON] Support Authenticator
[OFF] Confidential
[EMPTY] Redirect URL
Scopes: basic:read, finder:read
The redirect URL is generated automatically, no need to enter one.
3
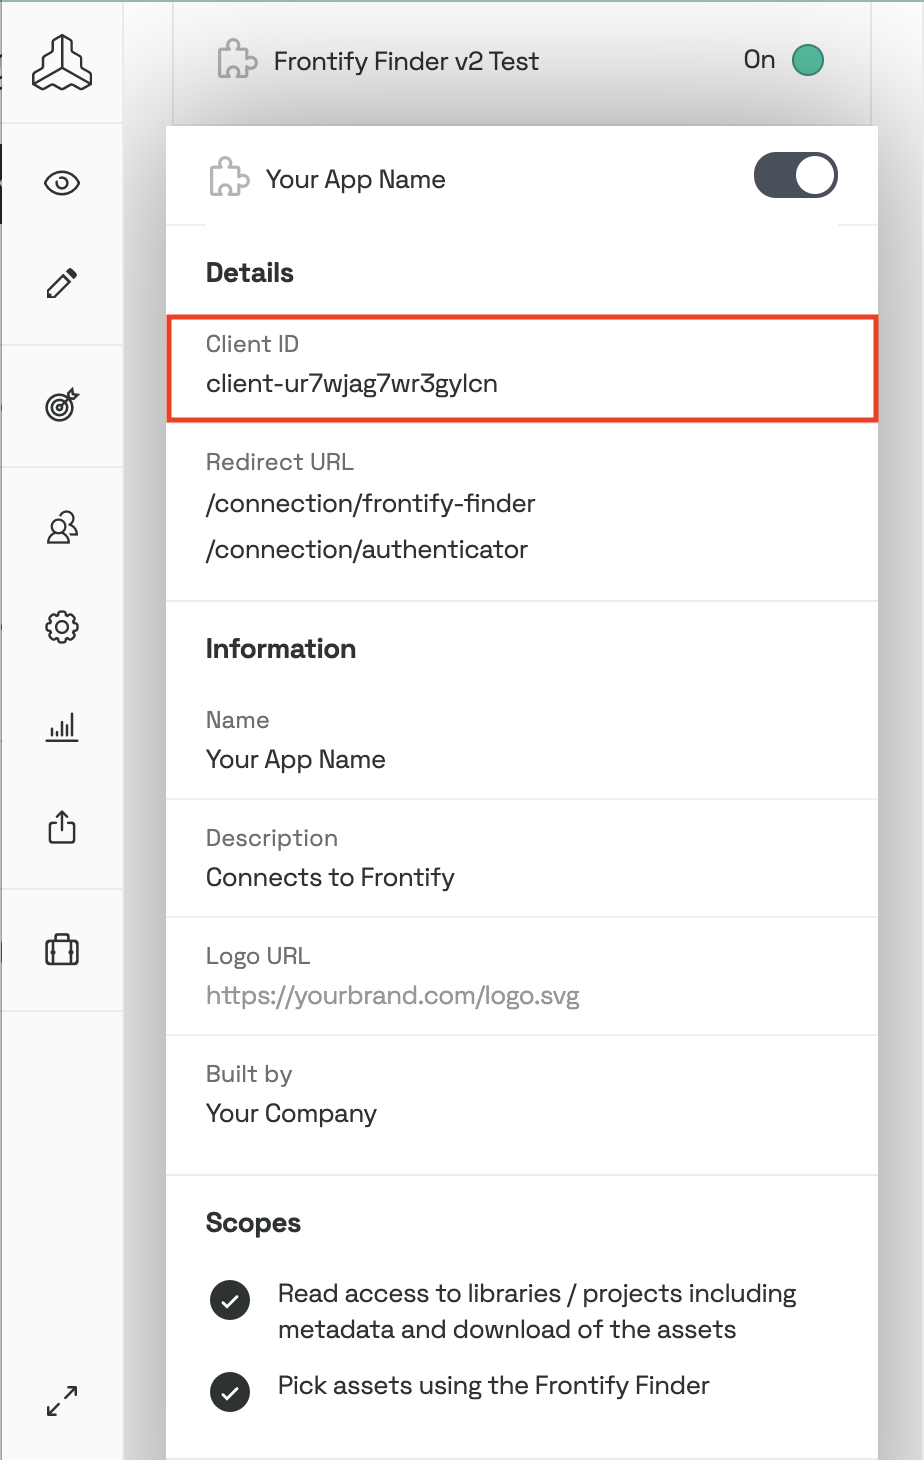
By saving, you get a valid OAuth Client ready for use. Click on your newly created Client to get the necessary data.
Troubleshooting
Webhook issues after config or token change
If you see webhook request has not valid signature errors in the Magnolia logs, the webhook secret used for validating incoming Frontify webhook calls may be stale or invalid.
This typically happens when the Frontify configuration or API token has changed, or when old webhooks are still present in the Frontify project.
If config/token is changed:
When updating domain, apiToken, or other Frontify configuration:
-
Remove existing webhooks from the Frontify project.
-
Update the config or token in Magnolia (either in
/modules/frontify-dam-connector/configor in the keystore workspace).
This will automatically:
- Re-register the Frontify webhook
- Set a new webhookSecret
- No instance restart is required
If config/token is not changed:
If you have not changed the configuration but are still experiencing signature validation errors:
-
Remove existing webhooks from the Frontify project.
-
Manually delete the
webhookSecretentry from thefrontify-mediaworkspace in Magnolia. -
This will auto-trigger webhook re-registration and set a new webhookSecret. No instance restart is required
This forces webhook re-registration using the existing configuration.
|
It is recommended to clean up invalid or stale webhooks regularly to avoid unnecessary noise or errors in Magnolia logs. |