Part I - My first content type
In this tutorial, you learn how to create and use content types, how to create a content app based on a content type, how to adapt the app defaults and how to localize it. All the features developed within the tutorial will be part of a Magnolia light module.
The tutorial is suitable for beginners. However, if you are completely new to Magnolia, we recommend you try the Hello Magnolia tutorial first.
Use the Magnolia Content type definition to specify a content type.
A Magnolia content type is a formal definition for a type of content in Magnolia including the properties the type may contain and its relationships to other types of content. A content type is configured in a content type definition that includes the data source definition and model definition.
Content type items can be managed by a content app. The content can be embedded into web pages or served via REST in a headless approach.
Use case
Magnolia Travels is a travel agency that employs many tour guides. The marketing department of Magnolia Travels wants to promote their popular tour guides on their website as well as on other channels. They decide to record the following information for each tour guide:
-
Name
-
Birthdate
-
Gender
-
Short biography
Your tasks
To begin, you need a Magnolia bundle where you will create a new light module to contain your code.
You will then configure a content type definition to map the given use case. Then you will create a content app, referring to the content type definition, to manage data for the tour guides.
Getting Magnolia
For development and testing you need a running
NOTE: instance of
Magnolia. In this tutorial, we suppose that it is installed in a
directory called magnolia.
If you don’t have Magnolia installed and running, go to the page called Installing Magnolia through npm CLI and complete the steps described on it. Then, return and proceed from here.
Creating a light module
The light module serves as a container to which you will add the definitions for content types and for the apps based on those content types.
-
Use the shell and change into the
light-modulesdirectory of your Magnolia installation. -
There, create the following folder structure:
content-type-examples/
    ├── apps/
    ├── contentTypes/
    └── i18n/
The files you create in the following sections will go into these three subfolders.
Alternatively, you could use the following Magnolia CLI command to create the light module:
mgnl create-light-module content-type-examples -P comprehensiveHowever, as this command creates more folders than required for the purpose of this tutorial, we recommend that you create the folder structure manually as shown above.
Defining a content type for a tour guide
In this step, you create the content type definition.
|
Create the file /content-type-examples/contentTypes/tourGuide.yaml.
The file must be in the light module subfolder contentTypes. Magnolia
scans
this directory for content type definitions. If the file is
syntactically correct, Magnolia registers the defined items.
A content type definition requires a model and a datasource.
Defining the model
Start with the model definition. In the model, you define the properties of a content item.
Following our use case, add this snippet to the
tourGuide.yaml file:
model:
  nodeType: mt:tourGuide
  properties:
    - name: birthday
      type: Date
    - name: gender
      options:
        - value: female
          label: Female
        - value: male
          label: Male
        - value: other
          label: Other
    - name: shortBio
type: richText-
Add one entry to the
propertieslist for each characteristic of a tour guide. Each entry should start with aname. Thegenderproperty will be rendered as a select field. -
Specify property types. Possible types are:
String(default),Boolean,Decimal,Double,Long,Date,richText, or another content type or submodel. -
WARNING: Note that we have not defined a property named
nameeven though our use case states that we should store the names of the tour guides. We capitalize on a feature that automatically creates anameproperty for the app to manage the content type. -
Ignore the
nodeTypeon the second line for the time being.
Defining the data source
The data source definition defines how content type items are persisted.
The Magnolia content type framework is data source agnostic, but Magnolia’s default implementation uses JCR to persist the data. That’s why you should be aware of a few basics concerning JCR.
Understanding JCR basics: node type, namespace, and workspace
Storing data in JCR requires: a registered workspace; a defined and registered node type; and the node type may use a namespace that must be registered too.
-
Workspace. The workspace is a container which stores JCR nodes in a tree-like structure. A workspace has a name. See Workspaces for a list of some predefined Magnolia workspaces.
-
Node type. A node stores an item of a certain type. Nodes contain properties. A node type defines the nature of a node, it has a name, which typically starts with
namespace:. See Node types for a list of some predefined Magnolia node types. -
Namespace. The namespace indicates a certain domain. Node types that belong to the same domain share the same namespace. The namespace
ntis used for node types provided by the JCR implementation,mgnlis the namespace for most of the Magnolia-specific node types.
A Magnolia bundle comes with several predefined and registered workspaces and node types. However, in most cases, we recommend you use:
-
Different workspaces and node types for different content types.
-
A different namespace for different domains of your content types.
Defining a namespace, node type and workspace for the tour guide content items
Define a distinct namespace, node type definition and workspace for the use case.
Note that you can define and register namespaces, node types and workspaces in different ways.
In this tutorial, we will define them in a single YAML file: the content type definition file. This approach is fast and suitable for many use cases.
Namespace |
|
Stands for Magnolia Travels. Use this namespace for all items related to the domain of Magnolia Travels. |
Node type name |
|
The name of a node to store the data for a tour guide. |
Workspace name |
|
The workspace to store the |
Now we define the data source:
datasource:
  workspace: tourguides
  namespaces:
    mt: https://www.magnolia-cms.com/jcr/mgnl
autoCreate: true-
workspace– The name of the JCR workspace to store the content items. -
namespaces– A list of JCR namespace names. -
autocreate– If set totrue, both the workspace and the namespaces will be registered by the system, if they have not been registered yet.
The complete content type definition
This is the complete content type definition with both the model and
the dataSource:
/content-type-examples/contentTypes/tourGuide.yaml
datasource:
  workspace: tourguides
  namespaces:
    mt: https://www.magnolia-cms.com/jcr/mgnl
  autoCreate: true

model:
  nodeType: mt:tourGuide
  properties:
    - name: birthday
      type: Date
    - name: gender
      options:
        - value: female
          label: Female
        - value: male
          label: Male
        - value: other
          label: Other
    - name: shortBio
type: richText-
Line 8,
nodeType: The name of the JCR node type for storing an item of the given content type. IfnodeTypeis not provided,mgnl:contentis used by default.
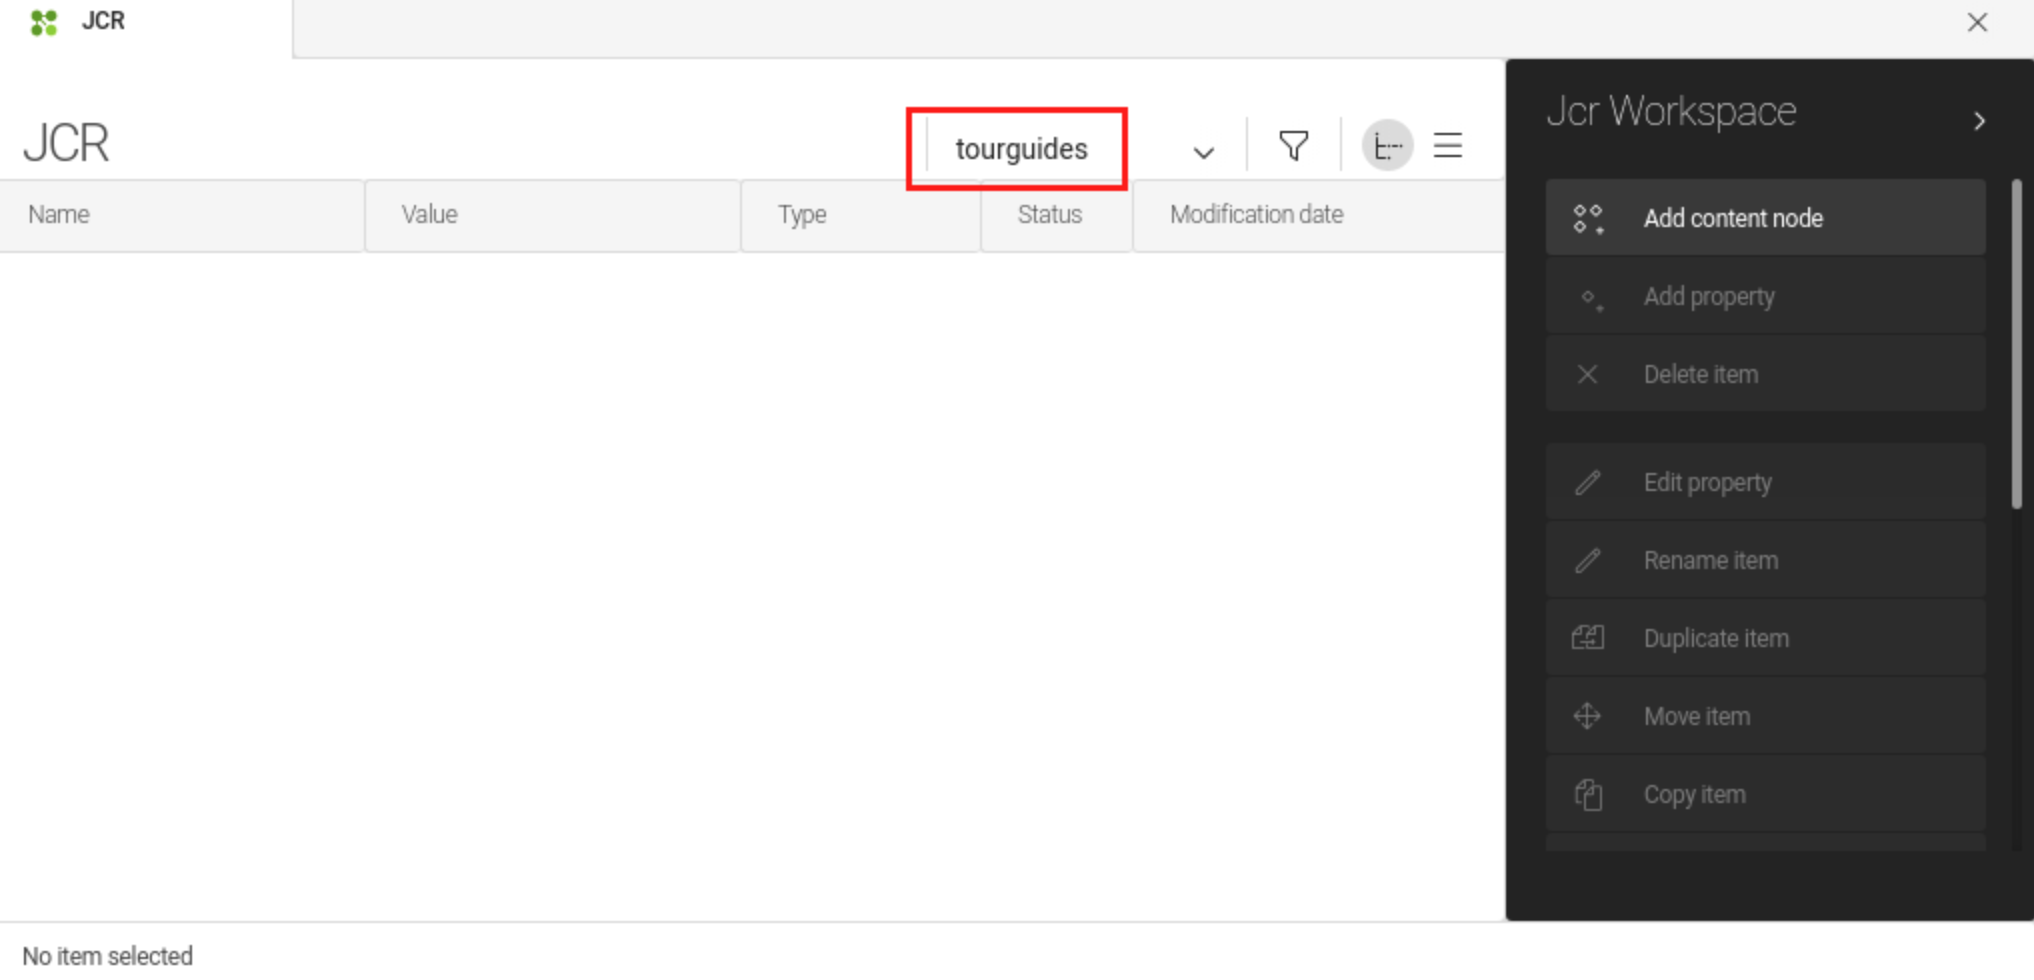
Checking the content type definition in the Definitions app and the workspace in the JCR app
If your Magnolia instance is still running and if you have added the content type definition file in the correct location in a light module known to Magnolia, you can check the content type in the Definitions app.
If you open the JCR Browser
app, you can see that the workspace pulldown lists also the
tourguides workspace.
Editing content type definitions
You can edit content type definitions while Magnolia is running. The system detects the changes and updates the definition.
|
Be careful when editing:
|
Creating a content app based on the content type
With just a content type definition, you cannot manage content items of the defined type. In this section, you create a Magnolia content app to create, edit, and delete tour guide items.
Content app
A Content app is a specialized app type for managing structured content. The content app user interface consists of a browser subapp and one or more detail subapps. Content apps make it easy to enter items such as products or events. Many native Magnolia apps such as Tours and Contacts are content apps. Because this app style is used often, the framework provides convenience classes to make building a content app faster.
Referencing a content type from an app descriptor
A content app is configured with an app descriptor, sometimes also referred to as the app definition.
-
Switch to the
/content-type-examples/appsfolder. -
There, create a file called
tourGuides-app.yaml– the app descriptor. -
Edit the descriptor to contain the following two lines:
/content-type-examples/apps/tourGuides-app.yaml
!content-type:tourGuide
name: tourGuides-app
When you reference a content type definition by name, the Magnolia UI
framework generates a virtual app descriptor and registers the app with
the app name. In the above case, the app is registered with the name
tourGuides-app.
There is no way to see the generated app descriptor in a file but you can analyze the structure of the generated app in the Definitions app.
Starting the app
Magnolia adds a tile for your new app to the App launcher automatically when registering the app. However, to make the tile appear in the App launcher, you must first restart your Magnolia session once by logging out and logging in again. For further details see App launcher layout.
To see the list of the app tiles, click the app launcher icon to the right of the Find Bar.

To start the app, click the app tile in the App launcher:

Adding translations
The app does not have any user interface labels yet. To fix this, add a messages file to the i18n folder.
Create the file
/content-type-examples/i18n/content-type-examples_backend-messages_en.properties:
#
# app "tourGuides-app"
#
tourGuides-app = Tour guides
tourGuides-app.default.label =
tourGuides-app.default.name.label = Name
tourGuides-app.default.birthday.label = Birthday
tourGuides-app.default.gender.label = Gender
tourGuides-app.default.shortBio.label = About
tourGuides-app.browser.label = Tour guide
# actionbar
tourGuides-app.browser.actionbar.sections.root.label=Guides
tourGuides-app.browser.actionbar.sections.folder.label=Folder
tourGuides-app.browser.actionbar.sections.item.label=Guide
# actions
tourGuides-app.browser.actions.addItem.label=Add guide
tourGuides-app.browser.actions.editItem.label=Edit guide
Close the app and open it again. UI labels are now displayed:

Overriding the auto-generated app descriptor parts
The generated app structure provides a standard starting point that you can adapt.
|
You can override the definitions in the app descriptor. If you make a typo or another error, the Definitions app Problems tab indicates the error. If you have to fix an error:
|
In the second part of the tutorial, an example of overriding is the
vehicleType property in the tourVehicles-app. The property is a
select field, which could be tentatively defined directly in the model
using the options property, but for illustration purposes, it is
configured (overridden) as a select field in the app descriptor using
the fieldType property.
Default app creation patterns
With the minimal app definition shown above, the generated app has a default set of features. The precise generated structure can be seen in the Definitions app.
Here is an overview of what is generated:
-
Two subapps:
browseranddetail. -
The
editorof the browser subapp has a single form with one tab nameddefault. -
The editor displays a field for each property in the content type model. Depending on the attributes of a model property, the form renders different fields:
| Model property attribute | Editor displays |
|---|---|
|
|
|
|
|
|
|
|
|
|
|
|
|
|
If The value given to the name property is also used to deduce a feasible JCR node name. Example:
|
Congratulations.
You have just created your first content type and built a customized app to manage the content type items.
- Next
-
Create a few tour guides before you proceed with Part II - Complex content types and security set up.