Hello Magnolia - Headless
In this introductory headless tutorial, we are going to:
We received the UX from our design team, but they still haven’t decided on the details yet. However, the content from our travel packages is already defined and we do not want to hold our marketers back from writing their content.
Install the demo project
To jumpstart our project, we will install our demo project. The easiest way to do this is to clone our git repository.
-
Clone the Git repository.
git clone https://bitbucket.org/magnolia-cms/basic-headless-demos.git -
Switch to the
basic-headless-demosfolder:cd basic-headless-demos
Install Magnolia
-
Change directory to
magnolia.cd magnolia -
Start
magnoliainstallation.mgnl jumpstart -
Choose
2) magnolia-community-webapp:? What Magnolia would you like to install? 1) magnolia-empty-webapp 2) magnolia-community-webapp 3) magnolia-community-demo-webapp 4) magnolia-dx-core-webapp 5) magnolia-dx-core-demo-webapp Answer: 2Once the installation is finished, you will see an output similar to this on your console:
info Magnolia has been successfully setup for light development! info You can now open a new terminal tab or window and start it up with the CLI command 'mgnl start' info Magnolia will be ready after a few seconds at localhost:8080/magnoliaAuthor. Username and password is superuser -
Now, pick up some handy configuration and sample images.
From the
magnoliadirectory, run:cp -rv ./_dev/content-to-bootstrap/* ./apache-tomcat/webapps/magnoliaAuthor/WEB-INF/bootstrap/common (1)xcopy .\_dev\content-to-bootstrap .\apache-tomcat\webapps\magnoliaAuthor\WEB-INF\bootstrap\common\ /E/H (1)1 This copies all files inside /magnolia/_dev/content-to-bootstrapinto/magnolia/apache-tomcat/webapps/magnoliaAuthor/WEB-INF/bootstrap/common. -
Start Magnolia.
mgnl startWhen the terminal shows
Server startup in […] milliseconds, Magnolia is up and running. -
Open http://localhost:8080.
-
Click
Run the Web update on the author instance. -
Login with:
-
username:
superuser -
password:
superuserHelp is here. Are you having any trouble with starting Magnolia? Ask for help on our Google group, and we’ll get you setup!
-
What are we going to build?
We are going to build a Travel Website SPA promoting travel packages. Marketers can add new navigation items. They can create new pages and arrange the content freely with pre-defined content blocks.
What is a Headless CMS?
When talking about Headless CMS, we are typically talking about something we call "Form-Centric or API first Approach".
You want to create a technology and layout agnostic way for marketers to create content, and for developers to consume the content and use in any way they want, and whatever tools they want.
- What will we do next?
-
-
Create a Content Type
-
Create a Magnolia app
-
Define a REST API endpoint
-
Defining a Content Type
After talking to the design and marketing team, we know that our Travel Packages can have the following information: name - description - featured - image - tour types - location - date - duration - tour operator - body, some rich text to describe the travel package.
What we have just described is our Content Model. It’s the contract between developers and marketers to create their website.
With Magnolia CMS, we describe the model of content with something we call "Content Types". Implementing content types is very developer-friendly: just describe the type in a YAML file.
When creating YAML definition files, make sure the file extension is .yaml, not .yml.
|
-
In our
hello-magnolia-headlessfolder, we will go intocontentTypesdirectory:cd ./basic-headless-demos/magnolia/light-modules/basic-tours-lm/contentTypes -
Create a file named
tours.yamlwith the following content (or just check that the file and the content is already there):tours.yamldatasource: workspace: tours autoCreate: true model: properties: name: label: Name required: true i18n: true description: label: Description i18n: true isFeatured: type: Boolean #Types 'Decimal', 'Long' and 'Double' are also available. label: Feature this item image: type: asset label: Image tourTypes: label: Tour Types type: reference:category multiple: true location: label: Start City i18n: true date: label: Date type: Date duration: type: Long label: Tour Duration options: "2": value: 2 label: 2 days "7": value: 7 label: 7 days "14": value: 14 label: 14 days "21": value: 21 label: 21 days tourOperator: label: Tour Operator i18n: true body: type: richText label: Body i18n: true
| Magnolia will automatically pick up the new content type and will make it available on our running instance. |
| Check out Content types for more details. |
Creating a Magnolia app
-
Change to the
basic-tours-lm/appsdirectory.cd ../apps -
Create a file named
tours.yamlwith the following content (or just check that the file and the content is already there):!content-type:tours name: tours label: Tours # Optionally override any of the app configuration supplied by the content type. subApps: detail: label: Tour Detail form: properties: isFeatured: buttonLabel: Featured
| To see your new Tours app, log out and log back in, and press the grid icon. |
Defining a REST API Endpoint
Defining REST API endpoints is as easy as creating the content type and app.
-
Change to the
basic-tours-lm/restEndpoints/deliverydirectory.cd ../restEndpoints/delivery -
Create a file named (you guessed it)
tours.yamlwith the following content:$type: jcrDeliveryEndpoint_v2 workspace: tours depth: 10 bypassWorkspaceAcls: true includeSystemProperties: true nodeTypes: - mgnl:content references: - name: assetReference propertyName: image referenceResolver: class: info.magnolia.rest.reference.dam.AssetReferenceResolverDefinition assetRenditions: - 960x720 - 480x360Congratulations!We are now ready to see our app in action.
Extra: Updating and adding new Tours
-
Open the Tours app again http://localhost:8080/magnoliaAuthor/.magnolia/admincentral#app:tours.
-
Add your own tour.
-
Check the endpoint URL again and look for the tour you added.
Extra: Build a client
We have seen how easy it is to get started. Let’s build our website to consume the data. We will build a very simple project.
Open the basic-headless-demos/frontend directory.
Write the client
Edit index.html and copy in the following code:
<!DOCTYPE html>
<html lang="en">
<head>
<meta charset="utf-8" />
<meta name="viewport" content="width=device-width, initial-scale=1, shrink-to-fit=no" />
<link rel="stylesheet" href="https://stackpath.bootstrapcdn.com/bootstrap/4.3.1/css/bootstrap.min.css" integrity="sha384-ggOyR0iXCbMQv3Xipma34MD+dH/1fQ784/j6cY/iJTQUOhcWr7x9JvoRxT2MZw1T" crossorigin="anonymous"/>
<title>Hello, world!</title>
</head>
<body>
<div class="jumbotron">
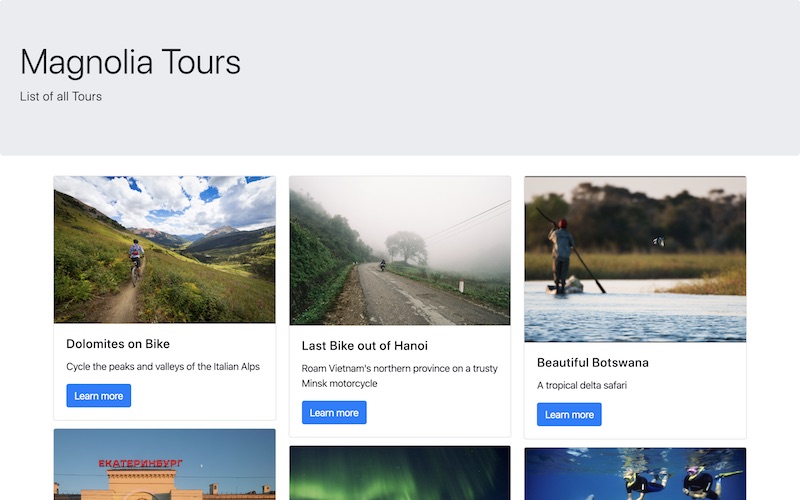
<h1 class="display-4">Magnolia Tours</h1>
<p class="lead">List of all Tours</p>
</div>
<div class="container">
<div class="card-columns tours"><!-- placeholder for results --></div>
</div>
<script src="https://cdnjs.cloudflare.com/ajax/libs/babel-polyfill/7.8.3/polyfill.min.js" crossorigin="anonymous"></script>
<script src="https://code.jquery.com/jquery-3.4.1.min.js" integrity="sha256-CSXorXvZcTkaix6Yvo6HppcZGetbYMGWSFlBw8HfCJo=" crossorigin="anonymous"></script>
<script src="https://cdnjs.cloudflare.com/ajax/libs/popper.js/1.14.7/umd/popper.min.js" integrity="sha384-UO2eT0CpHqdSJQ6hJty5KVphtPhzWj9WO1clHTMGa3JDZwrnQq4sF86dIHNDz0W1" crossorigin="anonymous"></script>
<script src="https://stackpath.bootstrapcdn.com/bootstrap/4.3.1/js/bootstrap.min.js" integrity="sha384-JjSmVgyd0p3pXB1rRibZUAYoIIy6OrQ6VrjIEaFf/nJGzIxFDsf4x0xIM+B07jRM" crossorigin="anonymous"></script>
<script>
(function($) {
const ENDPOINT = "http://localhost:8080/magnoliaAuthor/.rest/delivery/tours/?limit=100&orderBy=mgnl:lastModified%20desc";
const IMAGE_BASE = 'http://localhost:8080';
$.get(ENDPOINT, function(data) {
$(".tours").append(data.results.map((item)=>`
<div class="card">
<img src="${IMAGE_BASE + item.image.renditions['480x360'].link}" class="card-img-top" alt="...">
<div class="card-body">
<h5 class="card-title">${item.name}</h5>
<p class="card-text">${item.description}</p>
</div>
</div>`));
});
})(jQuery);
</script>
</body>
</html>Run the frontend
The frontend needs to be run on a web server. In your terminal, go to /basic-headless-demos/frontend and start a web server, then access your page in the browser.
For example, use the http-server npm package:
npm install http-server -g
http-server
Just opening the index.html file in a web browser, for example by double-clicking on it, will result in a CORS error.
|
Permissions for images
What? No images displaying? We need to allow anonymous access to the image URLs since we are running on the author instance.
-
Open the Security app, open the
Rolestab, and edit theanonymousrole. -
Go to the
Web accesstab, clickAdd newand enter the path/.imaging*set toGET.
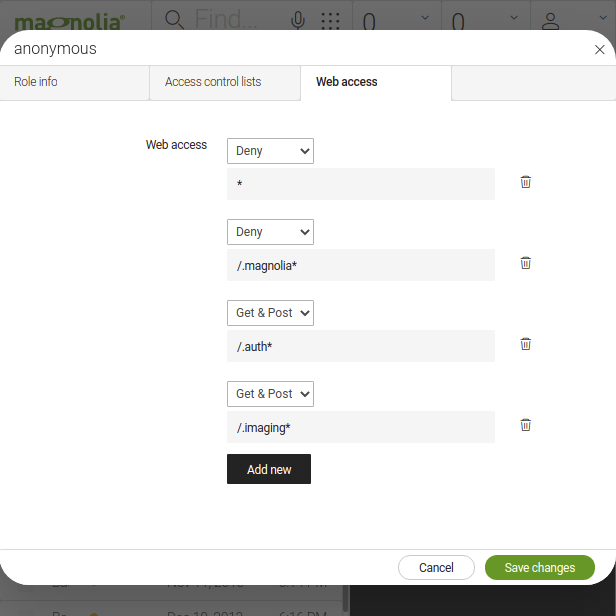
Now refresh your client, et voila - images!
In the meantime, we have the design. Our marketers want to enhance the travel portfolio page. They want to be able to add promotional teaser on top of the page and a custom sidebar too. They want to be able to define freely what to add there and add new article pages. They want to have full control of the navigation.