The Mail module enables the sending of emails from within Magnolia. The module can be used to send plain text and HTML messages, and template-based messages.
Sending emails from Magnolia is typically an automated process. An event acts as a trigger. For example, a verification message is sent to a user when they fill a registration form.
Other Magnolia modules such as
use the Mail module for messaging.
Configuration
The Mail module is configured in /modules/mail.
Besides configuring SMTP settings, the module is ready to use.
Mail command
info.magnolia.module.mail.commands.MailCommand is used to send all mails in Magnolia. The command can execute on events such as user actions, workflow steps and scheduled jobs. You can write message templates and test them manually in the Mail tools app before automating the process for production use.
The command is registered in /modules/mail/commands/default/sendMail.
Configuring SMTP
The default transfer protocol (SMTP) settings are configured in /modules/mail/config/smtpConfiguration.
These settings are displayed in the Mail subapp.
|
For OAuth 2.0-related information, see also these external resources: |
Using client credentials grant flow to authenticate SMTP connections
This section outlines the key configuration steps for Magnolia to access mailboxes in Microsoft Exchange. The client credentials grant flow is used to obtain access tokens over SMTP. These tokens enable secure, application-level access to email without requiring user interaction for authentication. For more information, see the Microsoft legacy protocols documentation.
To configure Microsoft Exchange for Magnolia:
-
In the Azure portal, grant your Microsoft Entra application the necessary
SMTP.SendAsApppermission. -
Get tenant admin consent for Magnolia.
This can be done via an authorization request URL (for multi-tenant applications) or directly through the Microsoft Entra admin center (for single-tenant applications).
-
Register service principals in Exchange: Use the
New-ServicePrincipalcmdlet in Exchange Online PowerShell to register your Entra application’s service principal within Exchange. -
Grant mailbox permissions.
Use the
Add-MailboxPermissioncmdlet to specify which mailboxes your application’s service principal can access. -
Access mailboxes in the Mail module.
Your Microsoft Entra application can now access the configured mailboxes over SMTP with the OAuth 2.0 client credentials grant flow. Ensure that you use
https://outlook.office365.com/.defaultin the scope property for the access token request.
Configuration using the Mail subapp
The Mail module installs the Mail Tools app.
Access to the app is restricted to the superuser role in the app configuration and app launcher layout.
| Fields that contain sensitive data, such as passwords, should be managed using the Passwords app. |
Add your SMTP settings in the Mail subapp to update the smtp configuration node:
-
SMTP server (the name of your mail server)
-
SMTP port (based on your security settings)
-
Authentication
-
No authentication required
-
Authentication with:
-
Username
-
Password
-
Username
-
Client ID
The Google OAuth 2.0 authentication type supported by the Mail module leverages OAuth 2.0 Client IDs. This type by default requires user interaction, which doesn’t readily suit the use case of sending emails automatically.
As a workaround for this limitation, you can follow the procedure described in Refreshing an access token (offline access). You can use the Postman to refresh a token.
Click to see the details.
-
Open the Postman app.
-
Create a new request.
-
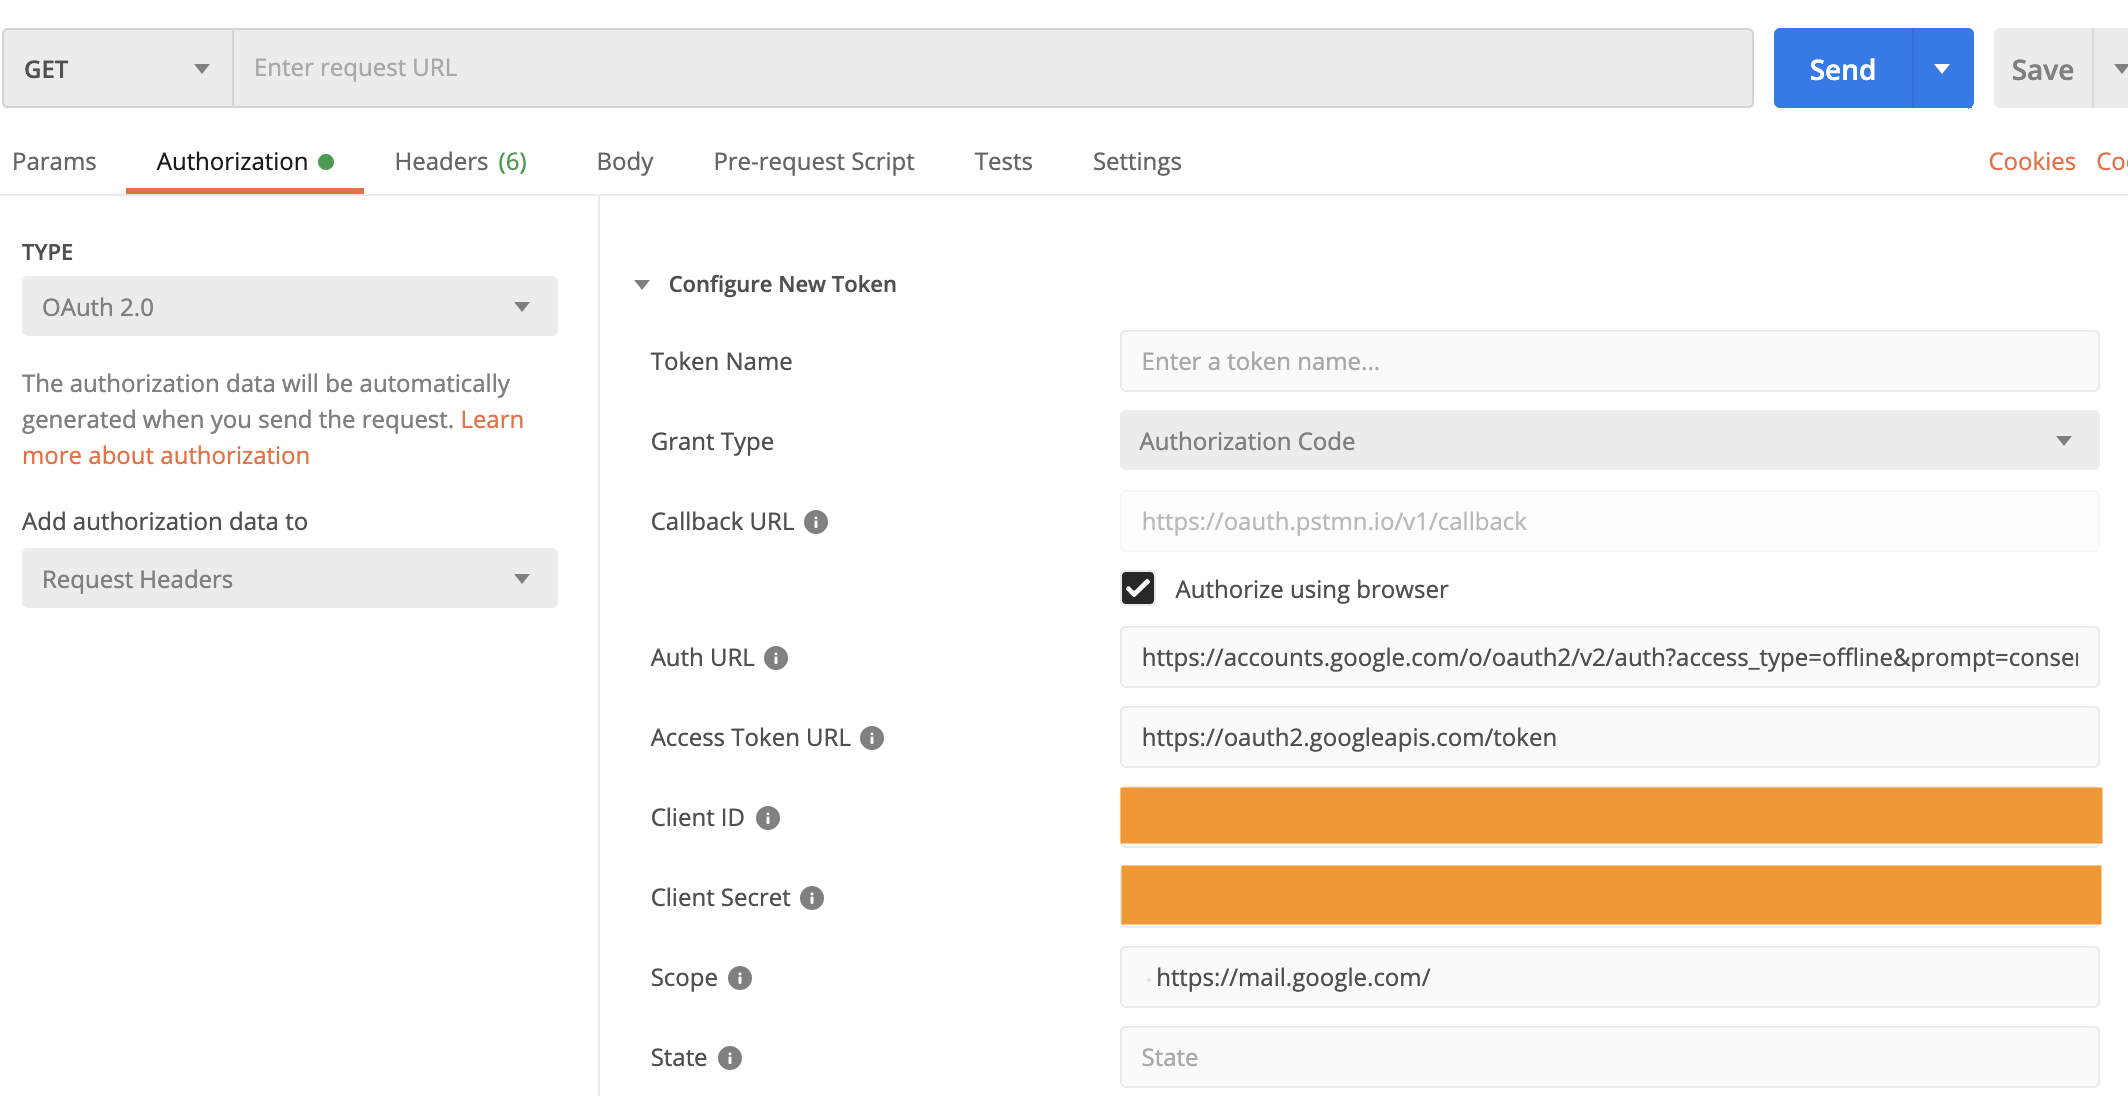
On the Authorization tab, choose OAuth 2.0 as the authorization type.
-
In the Grant Type field, select Authorization Code.
-
In the Callback URL part, check Authorize using browser.
-
In the Auth URL field, enter
https://accounts.google.com/o/oauth2/v2/auth?access_type=offline&prompt=consent. -
In the Access Token URL field, enter
https://oauth2.googleapis.com/token. -
In the Client ID and Client Secret fields, input your client id and client secret, respectively.
-
In the Scope field, enter
https://mail.google.com/. -
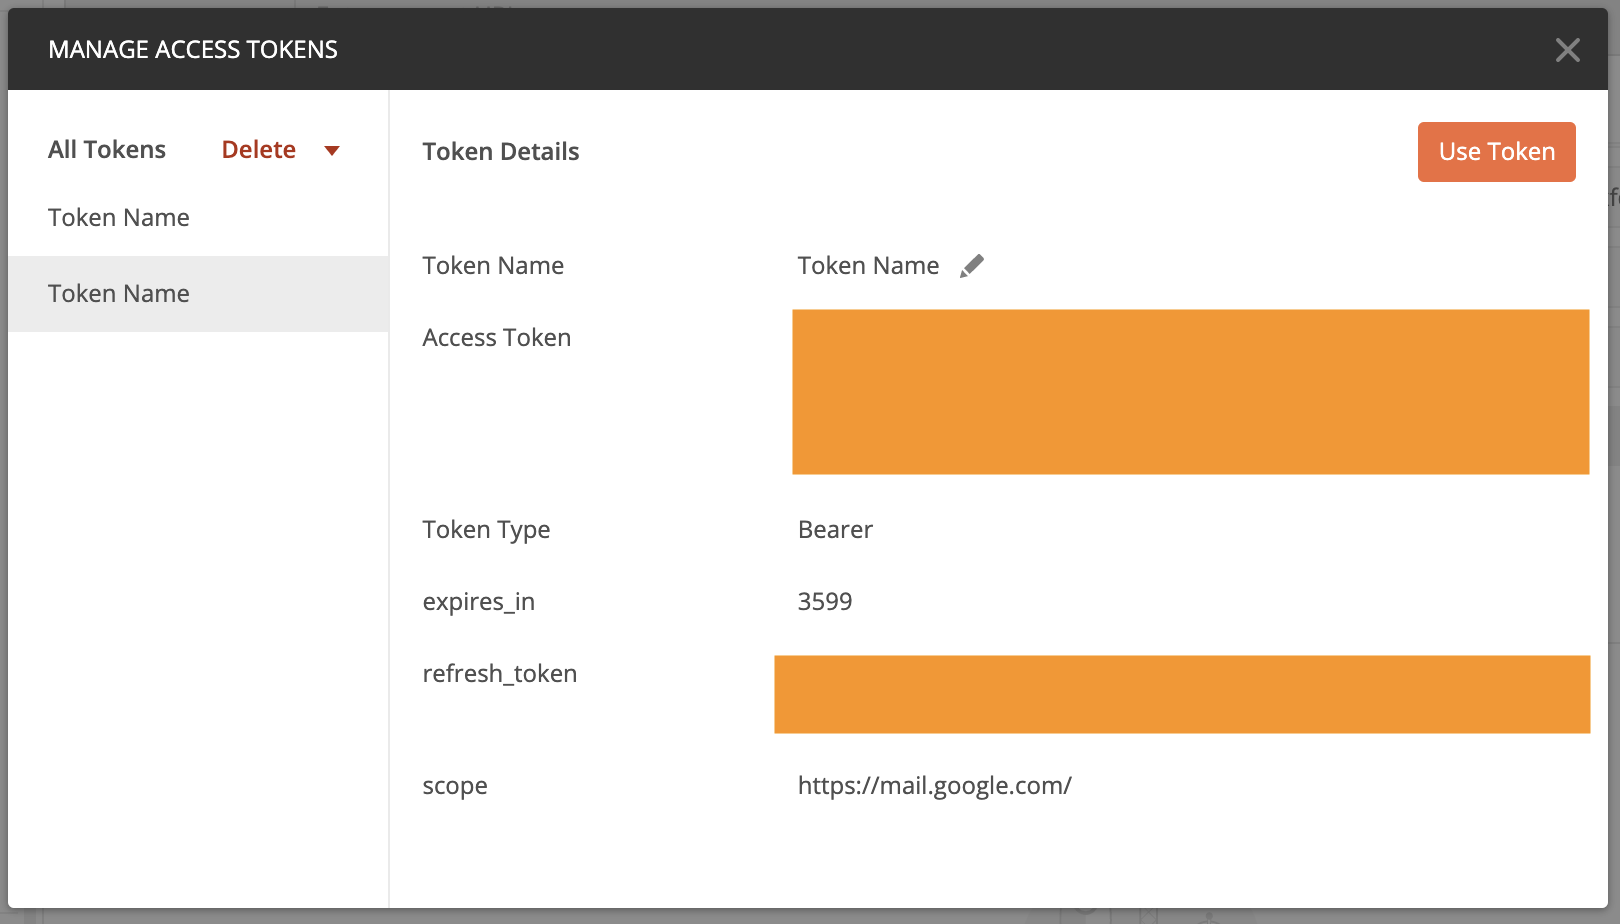
Click the Get New Access Token button.
-
After this, the browser opens a form where you can sign in and then refresh the token.
-
There are other ways of obtaining a refresh token, for example Exchange authorization code for refresh and access tokens.
Development work is underway to support Service Accounts for Google OAuth 2.0 in Magnolia (MGNLMAIL-205, restricted access). This authentication type is designed for server-to-server communication and fits best for the Mail module use case. Its configuration is simpler and without the need to configure a refresh token. -
User
-
Tenant ID
-
Client ID
-
Client Secret
-
-
-
Connection security method
-
No encryption
-
Use SSL
-
Use STARTTLS
-
Configuration using definition decoration
Add your SMTP settings via decorations on the module’s config file: /mail-config/decorations/mail/config.yaml.
Below are some commonly used configuration examples.
smtpConfiguration:
  port: 465
  security: ssl
  server: smtp.gmail.com
  authentication:
    class: info.magnolia.module.mail.smtp.authentication.UsernamePasswordSmtpAuthentication
    passwordKeyStoreId: uuid-of-password-in-password-app-stored-in-keystore-workspace
user: email@example.comsmtpConfiguration:
port: 465
security: tls
server: smtp.gmail.com
authentication:
class: info.magnolia.module.mail.smtp.authentication.GoogleOauthSmtpAuthentication
clientId: client-id
clientSecretKeyStoreId: uuid-of-secret-key-in-password-app-stored-in-keystore-workspace
refreshTokenKeyStoreId: uuid-of-refresh-token-in-password-app-stored-in-keystore-workspace
user: email@example.comsmtpConfiguration:
port: 587
security: tls
server: smtp.office365.com
authentication:
class: info.magnolia.module.mail.smtp.authentication.MicrosoftOauthSmtpAuthentication
clientId: client-id
tenantId: tenant-id
clientSecret: uuid-of-client-secret-in-password-app-stored-in-keystore-workspace
user: email@example.com|
To get the UUID of an item in the Passwords app:
|
Verifying the setup
Using the Mail app
The Verify setup subapp of the Mail app provides tools to:
Verify the current mail settings
Use the first tool to send test mails to verify your SMTP settings. The tool sends a pre-configured simple mail with an optional attachment to the email address in the logged in user’s profile.
To send a test message:
-
Access the relevant profile, typically
superuser, in the Security app. -
Go to System users and add your email address in the
superuserprofile. -
Set the
fromaddress on the template in/modules/mail/config/templatesConfiguration/simpleConfiguration. -
Select either plain text or rich text mail type.
-
Optionally, select an asset attachment from Assets chooser.
-
Click Send test mail.
Verify message templates
The second tool in the Verify setup subapp allows you to verify your mail message templates. Message templates are typically used by forms on pages to send the data to the user who submitted the form.
As in the case of verifying the mail settings, the tool sends the test mail to the email address configured in your user profile.
To send a test message:
-
Select a template in the dropdown. Only registered templates are available. See Templates configuration for more information.
-
Enter the test data. The content depends on the template configuration.
-
Click Send test mail.
Using the Groovy app
You can verify your setup with the Groovy app.
In the Groovy app, you should see the sendMail script.
Add the following script to test your setup, adjust the sender and recipient values, and click the Run button to send the test mail.
// Email
sender = "your-sender-mail@test.com"
recipient = "your-receiver-mail@test.com"

mailModule = info.magnolia.objectfactory.Components.getComponent(info.magnolia.module.mail.MailModule)
mailFactory = mailModule.getFactory()

email = mailFactory.getEmail([:], [])
email.setFrom(sender)
email.setToList(recipient)
email.setSubject("Test Mail")
email.setBody("Test email from the Groovy console!")

println "Sending mail.... "
mailFactory.getEmailHandler().sendMail(email)

println "Done!"
SMTP connection timeout
Using the timeoutInMillis setting on the SMTP configuration will define when a connection attempt to the server times out.
To set connection timeout:
-
From the Configuration app, find the SMTP configuration node (
/modules/mail/config/smtpConfiguration). -
Add a
timeoutInMillisproperty and set its value accordingly. The default value is5000(milliseconds).
SMTP session debugging
Using the debug setting on the SMTP configuration will enable a dump of the session data to system out.
| The session debug is only shown in the standard output and not printed to the log file. |
To enable session debugging:
-
From the Configuration app, find the SMTP configuration node (
/modules/mail/config/smtpConfiguration). -
Add a
debugproperty and set its value totrue. -
From the console see the detailed session debug data.
Templates configuration
Templates are configured in /modules/mail/config/templateConfiguration.
The testFreemarker template is provided as an example.
The info.magnolia.module.mail.MailTemplate allows for a number of configuration nodes and properties.
| Property | Description | ||
|---|---|---|---|
|
required Templates configuration node. |
||
|
required Template name. |
||
|
optional info.magnolia.module.mail.templates.MailAttachment provides for a number of attachment options. |
||
|
optional Any parameters to be passed to the script.
|
||
|
required Relative path to the template script. |
||
|
required Scripting language used in the template. |
||
|
optional Type of content for the message body. It is only necessary to include this property for HTML emails. |
||
|
optional Email address that will appear in the From field of the message, unless defined elsewhere, for example in Form module. |
||
|
optional Subject line of the email, unless defined elsewhere for example in the Form module.
|
Template renderers
Template renderers are registered in /modules/mail/config/factory/renderers.
| Properties | Description |
|---|---|
|
optional Renderers node. |
|
optional Renders FreeMarker email templates. |
|
optional Renders Magnolia web pages in an email. |
|
optional Renders simple text emails that do not require a specific scripting language to be parsed. |
Template script
Here’s the example testFreemarker.html template script.
<h1>${user}</h2.
    <img src="cid:0001"/>
    This is the path that has been changed: ${path}
This script requires two parameters, user and path, that need to be provided in the Data to send box in the Verify templates tool.
The parameters are passed to the template script and rendered in the message.
Each parameter should be added on a single line in the <parameter name>=<value> format.
For example:
user=jsmith
path=/my/path
Attachments
In the attachments node you can define properties for the parameters called by the script.
For example, the testFreemarker.html template script references img src="cid:0001".
-
The
cidproperty identifies the attachment as an image. -
The
urlproperty sets the image location.
| Node name | Value |
|---|---|
⸬ testFreemarker |
|
⸬ attachments |
|
⸬ 0001 |
|
⬩ cid |
img |
⬩ url |
http://www.magnolia-cms.com/.imaging/amplify-miami-2014/imageForTeaserBinary/miami.png |
The mimeMultipart property can be used to define the structure of info.magnolia.module.mail.templates.MgnlMultipartEmail:
| Node name | Value |
|---|---|
⸬ <template configuration> |
|
⸬ attachments |
|
⸬ <attachment name> |
|
⬩ mimeMultipart |
mixed |
⬩ url |
http://www.magnolia-cms.com/.imaging/amplify-miami-2014/imageForTeaserBinary/miami.png |
⸬ <attachment name> |
|
⬩ mimeMultipart |
related |
⬩ url |
http://www.magnolia-cms.com/.imaging/amplify-miami-2014/imageForTeaserBinary/miami.png |
| Property | Description |
|---|---|
|
optional Attachment name. |
|
optional, default is `related` Defines the structure of info.magnolia.module.mail.templates.MgnlMultipartEmail. Values:
|
Custom templates
To create a custom template:
-
In your light module, create a FreeMarker template script named for example
simpleTemplate.html.<your-light-module>/templates/simpleTemplate.html<html> <body> <p>Dear ${fullName},</p> <p>Please follow this link in order to validate your account: <a href="${href}">Verify your user</a></p> <p>Thank you!</p> </body> </html> -
Register the new template in the
/mail/config/templatesConfigurationby decorating the Mail module configuration.Node name Value 📁 config
📁 templatesConfiguration
⸬ newUserRegistration
⸬ attachments
⸬ parameters
⬩ contentType
html
⬩ from
info@registrations.com
⬩ subject
New User Registration
⬩ templateFile
<your-light-module>/templates/simpleTemplate.html
⬩ type
freemarker
|
Email applications and clients on the market display emails in different ways. The main reason for this is varied support for CSS styles. You can use a web based service such as Mailchimp Inbox Inspector to preview the message in various clients and work towards consistency. |