My first content app Part II
Creating a basic content app
This page is the second part of the My first content app tutorial and describes how to configure and create a basic Bookshelf, a Magnolia content app.
The configuration is done using Magnolia content types – formal definitions for types of content in Magnolia including the properties the type may contain and its relationships to other types of content.
Prerequisites
For development and testing, you need a running instance of Magnolia.
In this tutorial, we suppose that it’s installed in a directory called magnolia.
| If you don’t have Magnolia installed and running, go to Installing Magnolia through npm CLI and complete the steps described on it. Then, return and proceed from here. |
Creating the bookshelf light module
Magnolia light modules usually define page, area and component templates and many more things.
In this tutorial, we use a light module called bookshelf to create a content app.
The module contains both a definition of content types and the app descriptor.
-
Open a terminal.
-
Go to the
light-modulesfolder of your Magnolia installation: -
Run the following command:
npm run mgnl -- create-light-module bookshelfThe command creates the
bookshelflight module after you confirm the folder location.bookshelf ├── README.md ├── decorations ├── dialogs │ ├── components │ └── pages ├── i18n │ └── bookshelf-messages_en.properties ├── includes │ └── README.txt ├── templates │ ├── components │ └── pages └── webresources
Creating the app
In the bookshelf folder, enter the following command:
npm run mgnl -- create-app bookshelf-appWhen asked, confirm the name of the content type suggested by the CLI: bookshelf-app.
The command creates the apps and contentTypes subfolders in the light module and adds the bookshelf-app.yaml file to both of them.
bookshelf
├── README.md
├── apps
│   └── bookshelf-app.yaml (1)
├── contentTypes
│   └── bookshelf-app.yaml (2)
├── decorations
├── dialogs
│   ├── components
│   └── pages
├── i18n
│   └── bookshelf-messages_en.properties
├── includes
│   └── README.txt
├── templates
│   ├── components
│   └── pages
└── webresources| 1 | The bookshelf-app.yaml file in the apps subfolder is an app descriptor. |
| 2 | The bookshelf-app.yaml file in the contentTypes subfolder contains a content type definition for the app. |
As the function of the content type definition in this module is to describe a book, rename the content type definition file to book.yaml.
In the next steps, you modify these files to meet the design requirements for the Bookshelf app.
The create-app command also creates a new workspace called bookshelf-app.
However, as the Bookshelf app must interact with the books workspace, the name of the workspace is changed to books below.
|
Customizing the content type definition
In the contentTypes folder, open the book.yaml file and replace its content with the following:
datasource: (1)
  $type: jcrContentTypeDatasource
  workspace: books
  namespaces:
    lib: https://www.magnolia-travel.com/jcr/1.0/lib
  autoCreate: true

model: (2)
  nodeType: lib:book
  properties: (3)
    - name: authors
    - name: ed (4)
      type: Boolean
    - name: title
    - name: description
    - name: publisher
    - name: publish_date (5)
      type: Date
- name: isbn13| 1 | Defines how the content type items are persisted.
|
||
| 2 | Defines the node type and the properties of the new content item for the Bookshelf app. | ||
| 3 | Defines the app properties.
|
||
| 4 | Set the type of the ed property to Boolean since it is more appropriate in regard to the values the system can store (true, false). |
||
| 5 | Set the data type of the publish_date property to Date so that the value would be stored in the JCR as calendar object. |
Customizing the app descriptor
In the apps subfolder, open the bookshelf-app.yaml file and make sure it contains only the following two lines:
!content-type:book (1)
name: bookshelf-app (2)| 1 | The app descriptor instructs the app generator to construct the app from the book content type definition. |
| 2 | You give the app the name bookshelf-app, under which the app is known to other resources and systems in Magnolia. |
Check the app in the Definitions app
After saving the changes, run mgnl start if your Magnolia isn’t running yet.
Then, go to the Definitions app on the author instance to check that the app’s definitions have been loaded by Magnolia (the bookshelf-app should appear in the apps folder).
In case the bookshelf-app isn’t there or there’s a problem notification next to it, please double-check that all your yaml files have been copied exactly as they appear in this tutorial.
Starting the app
Magnolia adds a tile for your new app to the App launcher automatically when registering the app.

- i18n message keys and the Name, Title and Description labels
-
The
magnolia-ui-frameworkmodule already contains several generic i18n message keys whose values are applied as labels in the UI of the Bookshelf app.
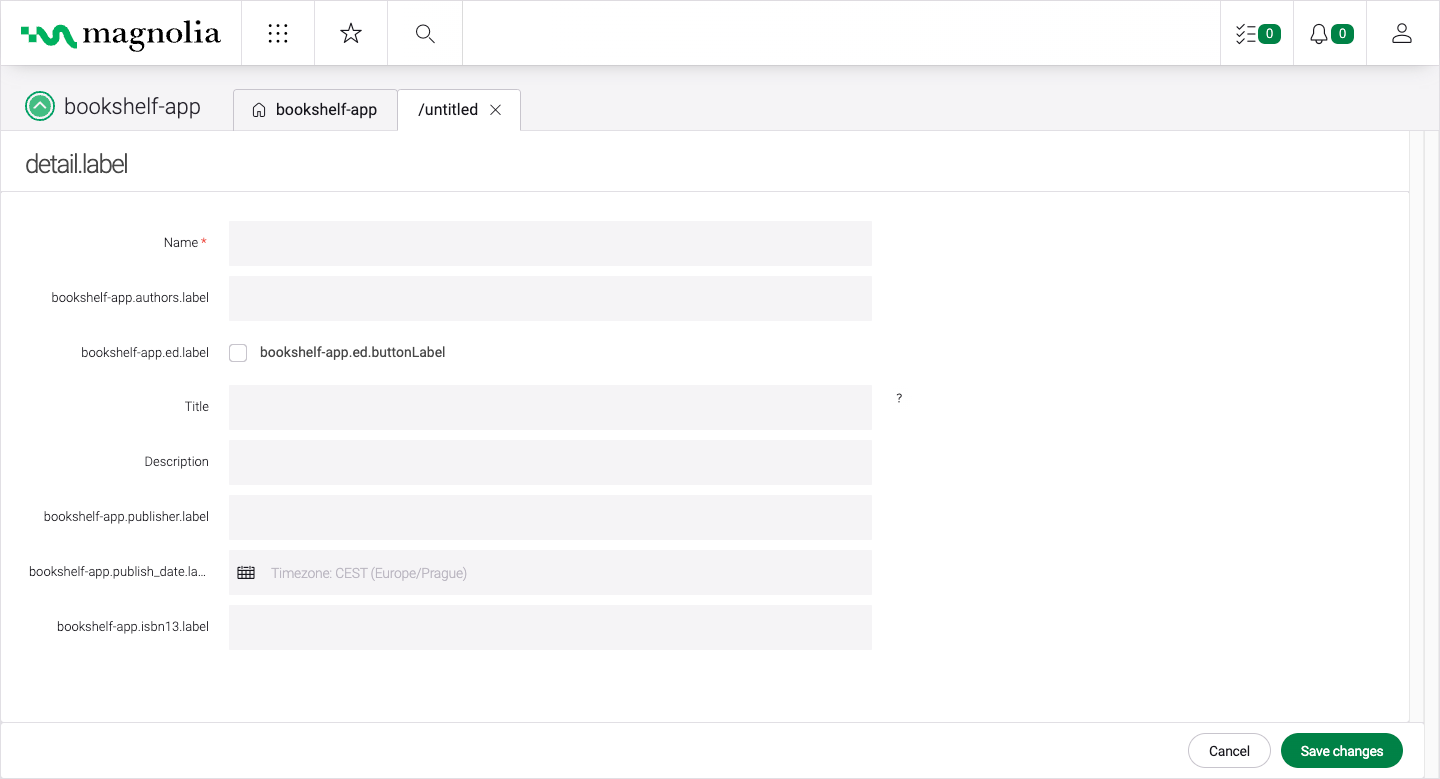
In the last part of the tutorial, you create new label values in subsection Adding an i18n message bundle.