Content delivery
Content Delivery Networks (CDNs) allow you to quickly deliver your site content by caching content appropriately for improved speed and performance. DX Cloud uses Fastly as the default CDN. If you’re using Fastly as your CDN, you’ll be able to see all available tabs in the Cockpit.
Select desired cluster
Select your desired cluster from the dropdown menu at the top of the Cockpit.

CDN statistics
You can view your CDN statistics for an active domain in a content delivery server.
| You must register a domain in the cockpit. If you haven’t done that, see Networking. The statistics sections remain empty until you enable a domain for the content delivery server. |
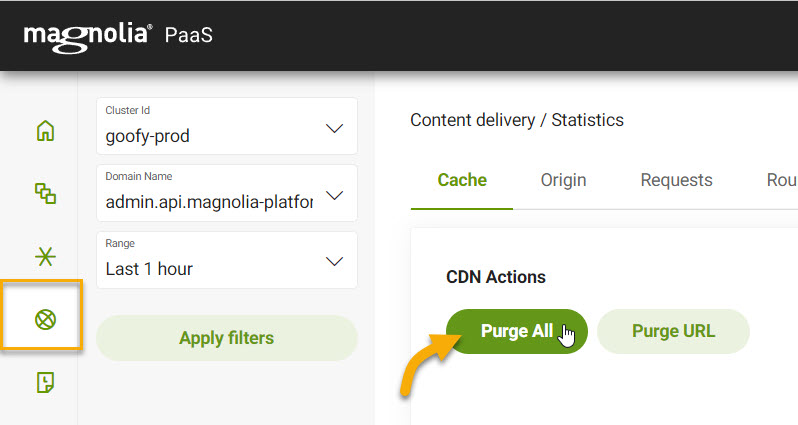
Purge All
To purge the entire cache from the content delivery server for the domains in the selector, click Purge All CDN Cache. Alternatively, you can purge by URL.
| For more, see Purging. |
| It does not currently purge your Magnolia instance’s cache. |
Purge URL
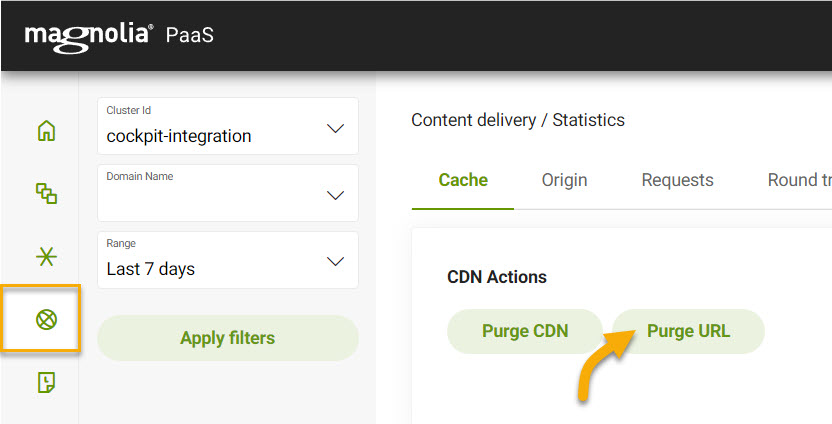
Instead of purging the entire cache, you may want to simply purge a single object or directory from all cache servers. In this case, you will want to use the Purge CDN Cache for URL option in the Cockpit.
-
Go to Content delivery > Statistics.
-
Under CDN Actions, click Purge CDN Cache for URL.
-
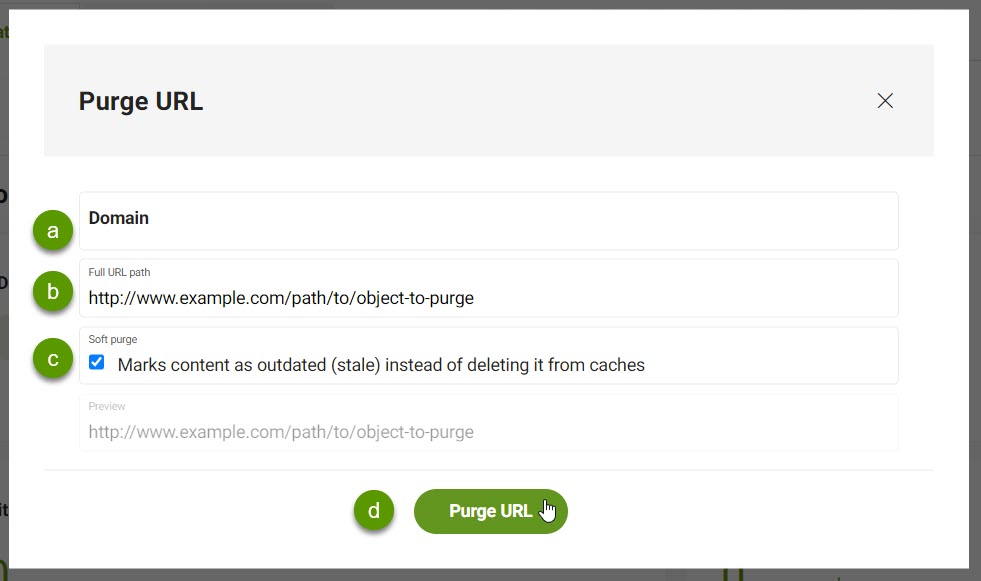
In the dialog:
-
Enter the URL of the object that you want to purge.
For example,
www.example.com/assets/old-assets/orwww.example.com/assets/old-assets/resource.extension. -
Optionally select to perform a Soft purge.
If unselected, a hard purge is performed which immediately makes the object inaccessible. Soft purges mark the object as stale, but it is still accessible.
Stale objects can reduce backend loads by allowing for conditional revalidation and other performance-enhancing patterns. For more, see Fastly’s soft vs hard purge.
-
Click Purge CDN Cache for URL.
-
View stats
-
Go to Content delivery > Statistics.
-
Select the desired Domain from the dropdown list.
-
Select the Range for the statistics.
-
Click Apply filters.
Filter selection persists
Cache
| Statistic | Description | ||
|---|---|---|---|
|
Measurement (expressed as a percentage) of how many content requests the cache filled compared to how many requests it received. |
||
|
Hit ratio expressed over a timeline. |
||
|
The percentage of cacheable requests compared to all requests.
|
||
|
Cache statuses expressed as a percentage by category.
|
||
|
Cache coverage (as a percentage) expressed over a timeline. |
Origin
| Statistic | Description |
|---|---|
|
Displays (as a map) the requests per geographic zone. |
|
Displays the requests per geographic zone and host. |
Requests
| Statistic | Description |
|---|---|
|
Displays the number of total requests. |
|
Displays the number of total requests in the last 24 hours. |
|
Displays the number of total requests since the beginning of the current month. |
|
Displays a chart for the number of total requests per host as a percentage. |
|
Displays a graph for the request volumes coming in currently on a timeline. |
|
Displays a graph for the request volumes coming in currently on a timeline per host. |
|
Displays the rate of requests coming in on a timeline. This is requests per second. |
|
Displays the rate of requests coming in on a timeline per host. This is requests per second. |
Round trip
| Statistic | Description |
|---|---|
|
The average time it took to get a response after initiating network request. |
|
The average time it took to get a response after initiating network request for the last 24 hours. |
|
The average time it took to get a response after initiating network request since the beginning of the month. |
|
The average time it took to get a response after initiating network request on timeline. |
|
The average time it took to get a response after initiating network request on timeline per host. |
Duration
| Statistic | Description |
|---|---|
|
Graph showing how long requests are taking on a timeline. |
|
Graph showing how long requests are taking on a timeline, categorized by status. Statuses
|
|
Graph showing how long requests are taking on a timeline, categorized by host. |
Traffic
| Statistic | Description |
|---|---|
|
Shows the traffic volume in GB. |
|
Shows the traffic volume in GB over the last 24 hours. |
|
Shows the traffic volume in GB since the beginning of the month. |
|
Chart showing bytes transferred (in GB) over a timeline. |
|
Chart showing bytes transferred (in GB) over a timeline, categorized by host. |
HTTP statuses
| Statistic | Description |
|---|---|
|
Shows the total percentage of errors. |
|
Shows the total percentage of errors over the last 24 hours. |
|
Shows the total percentage of errors since the beginning of the month. |
|
Chart showing a breakdown of the HTTP statues returned, categorized by status, such as |
|
Timeline showing the number of INFO ( |
|
Chart showing HTTP redirects requests on a timeline, categorized by HTTP status code such as |
|
Chart showing HTTP error requests on a timeline, categorized by HTTP status code such as |
Access control
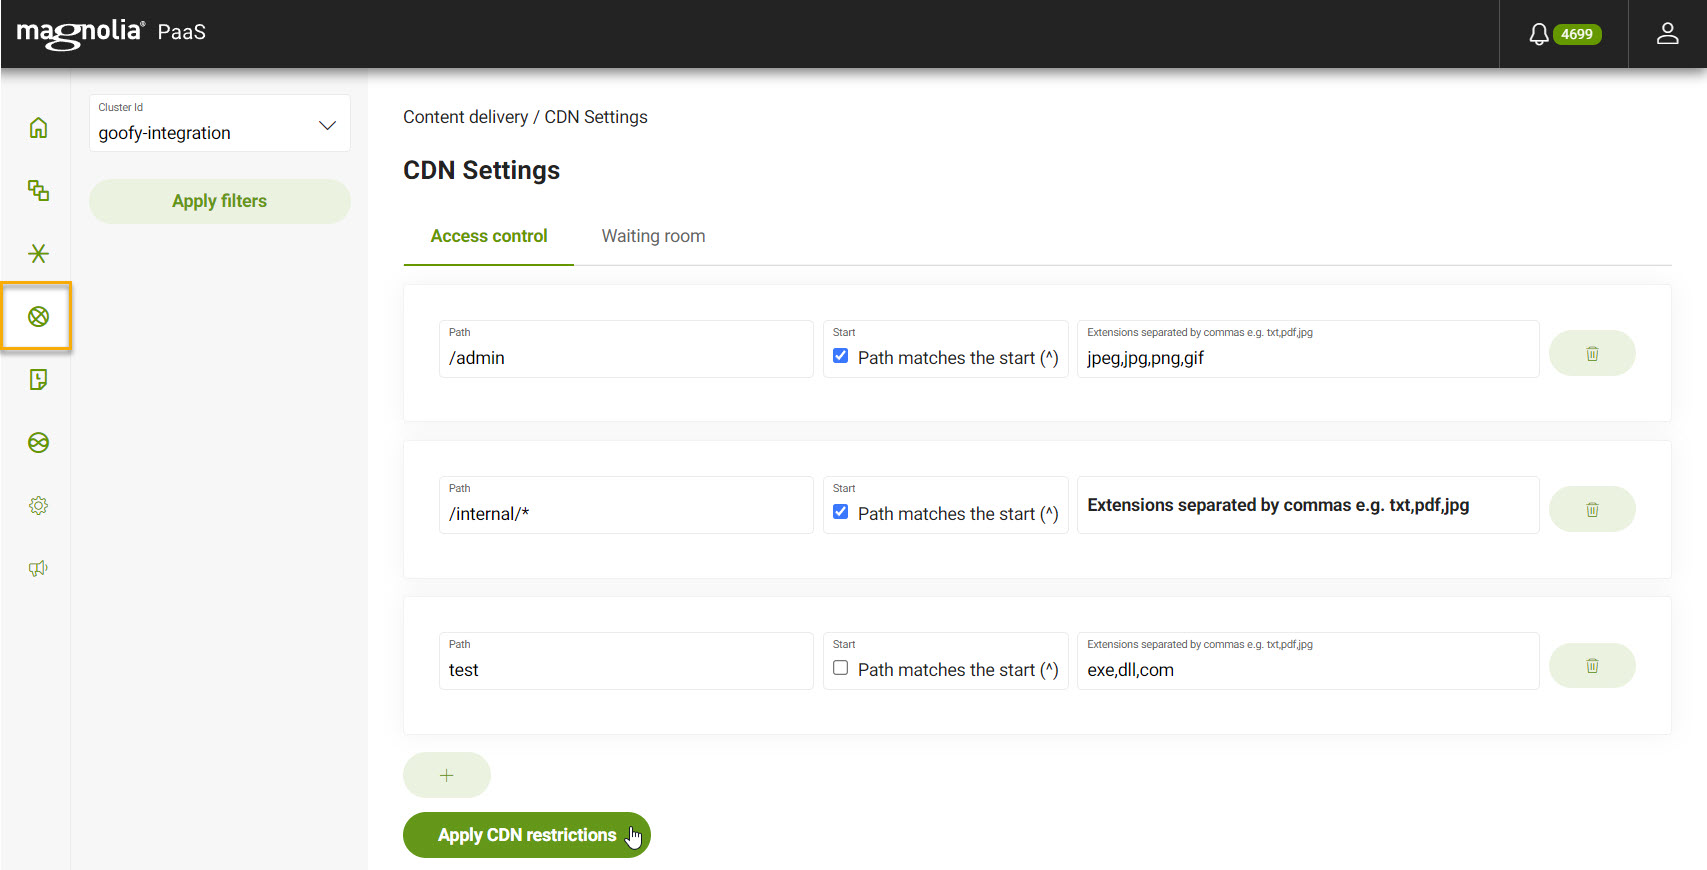
With Access control in DX Cloud, you’re able to configure rules that prohibit access to certain paths and extensions. This prevents any unintended visits to pages that should be internal or files that should be kept for certain groups or individuals.
Apply CDN restrictions
View from the Cockpit
-
Go to CDN > Access control.
-
Click the to create a new restriction.
-
Enter the Path that you want to protect.
example/internal/* (1)1 This would protect all areas of the site under internal. -
If desired, enable Path matches the start (^). This ensures that the match occurs only if the URL path starts with the specified pattern.
-
If desired, add any extensions that you explicitly want to protect under this path. The extensions should be separated by commas.
examplepdf,txt,jpg,png
-
-
Click Apply CDN restrictions.
Block IPs
If you spot a malicious IP or need to block IPs for whatever reason, you can block them directly from the Cockpit.
| The option to block IPs from the Cockpit is only applicable if you are using Fastly as your CDN. Otherwise, you can block IPs using an ingress. |
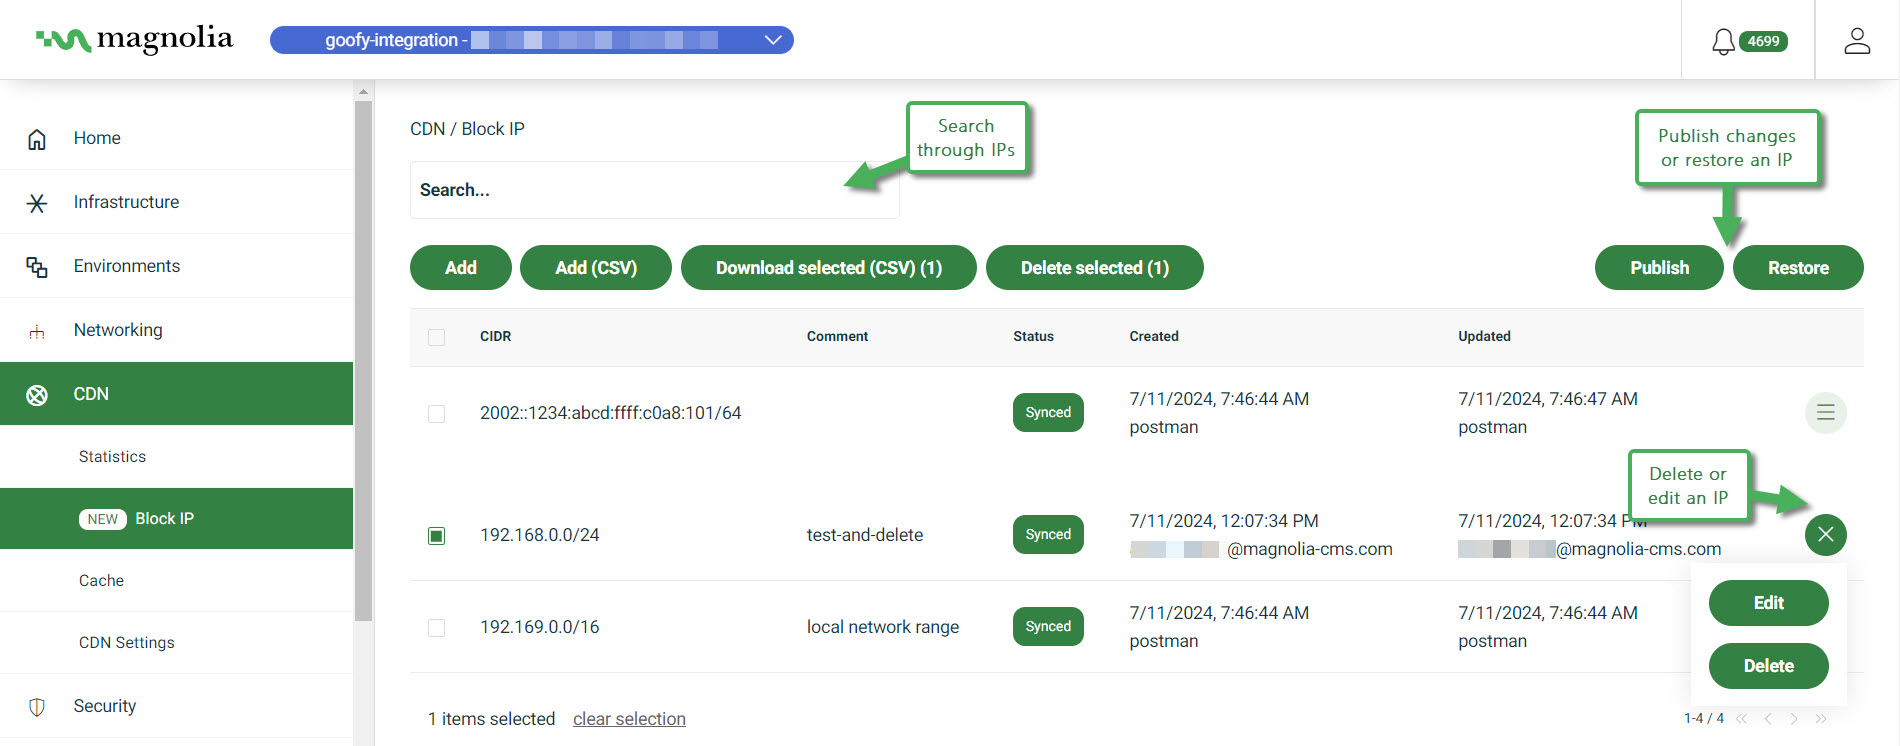
You can add IPs to block individually or in a batch by uploading a .csv file.
You can also see important information about when an IP was added by viewing the information in the Cockpit table.
| CIDR | Comment | Status | Created | Updated | |
|---|---|---|---|---|---|
Example |
192.168.0.0/24 |
Blocking suspicious IPs |
Synced |
7/11/2025, 11:45:25 UTC user@example.com |
7/11/2025, 11:45:25 UTC user@example.com |
Description |
The IP(s) to block. |
A comment typically written to describe the reason for blocking the IP(s). |
The status of the IP.
|
When the IP(s) were added/created. |
When the IP(s) were updated. For example, if the IP was edited within the Cockpit. |
You can perform actions such as editing and deleting IPs as well as downloading the IPs as a .csv file for further inspection.
Instructions
-
Go to CDN > Block IP.
-
Choose to block a single IP or import a list to block:
-
Click Add IP.
-
Enter the CIDR[1].
The appropriate bit prefix (
/32(IPv4) or/128(IPv6)) is appended automatically. -
Add a comment.
-
Click Block IP.
IPv6 Example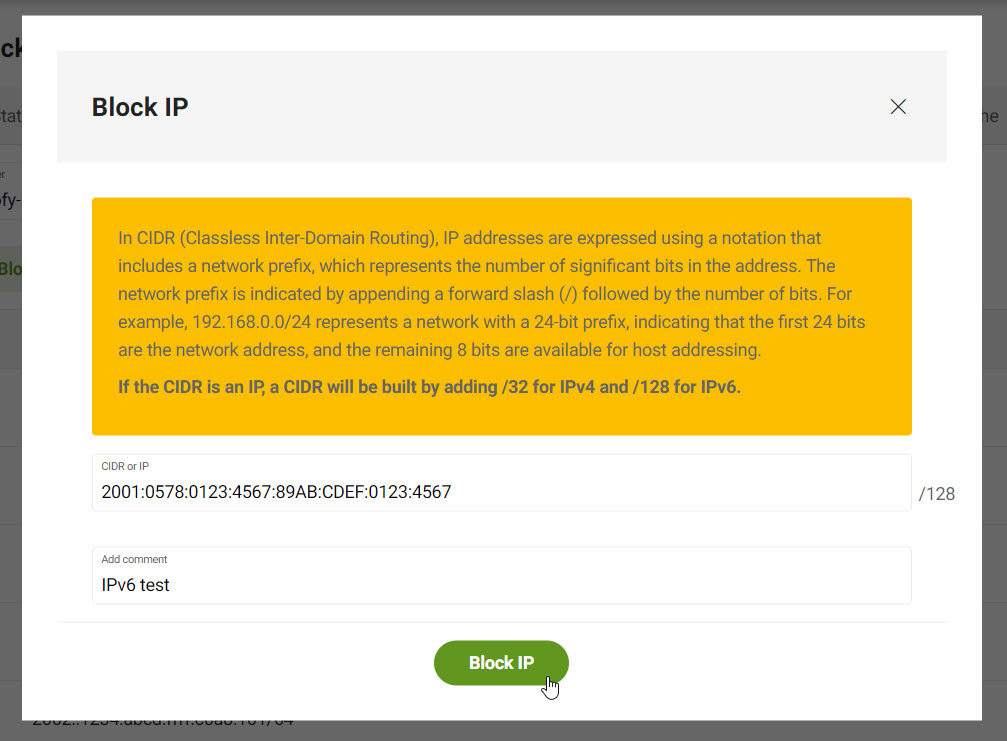
-
Click Add IP (CSV).
-
Select the file you wish to upload.
-
Click Add IP (CSV).
See an example format and CSV file below these instructions.
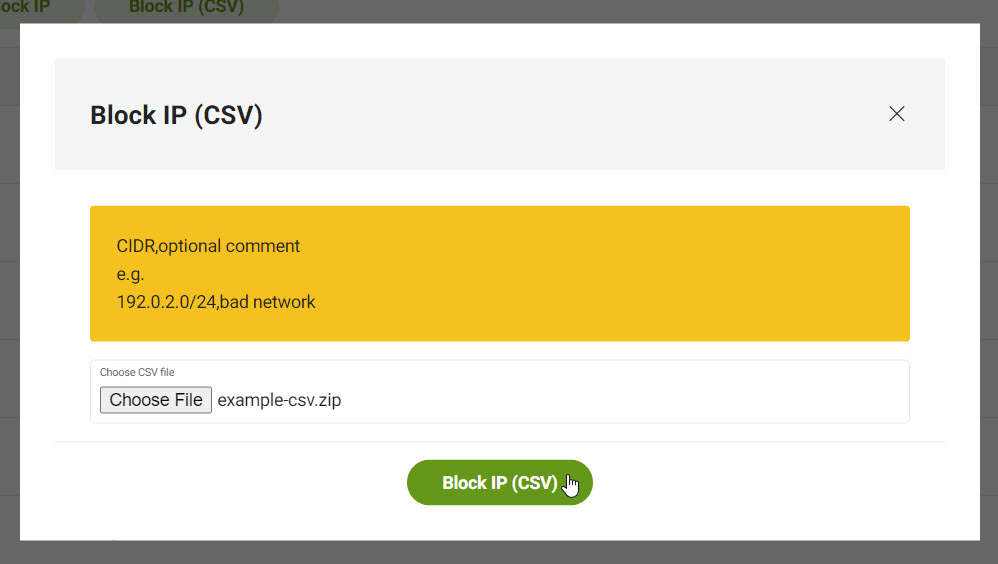
- CSV entry format
-
CIDR[1],Comment
example csv file192.169.0.0/16,local network range 23.45.67.111/32, 2002::1234:abcd:ffff:c0a8:101/64 192.169.0.1/12,"commas, in, a, comment, example" (1)1 Comments are optional. However, if you use them and there are commas in your comment, be sure to wrap the comment in double quotations. Otherwise, it may be read as a separate entry in the CSV file. -
Removed a blocked IP (unblock)
-
Go to CDN > Block IP.
-
Choose one of the currently blocked IPs and click Delete selected.
-
Alternatively, click Delete all to delete all listed IPs.
-
Download IPs
-
Go to CDN > Block IP.
-
Choose one of the currently blocked IPs and click Download selected.
-
Alternatively, click Download all to download all listed IPs.
-
-
This generates a
.csvfile download with the following information:csv-
id -
cidr -
action; this is typically "block" for having blocked the IP -
comment; any comments entered when adding the IP(s) in the Cockpit
-
Cache
You can add cache rules from your DX Cloud Cockpit. Caching reduces requests to Magnolia which helps reduce heavy processing loads and improves performance.
| The options in the Cache section aren’t available to satellite clusters. |
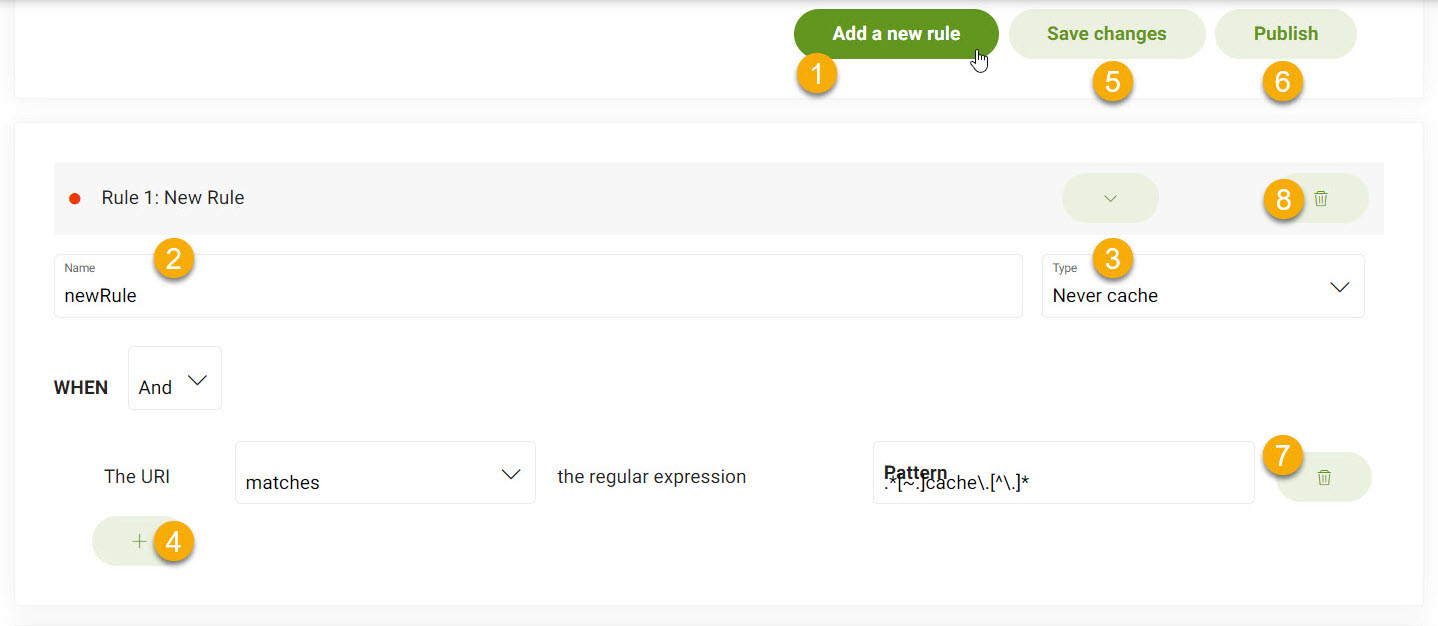
Expand the image here to see the different parts of adding a rule in the Cockpit and is applicable to both cache types.
Rule anatomy
-
Add a new rule. Once you click this, a new rule is added to the top of the list.
-
Naming your rule.
-
Choosing the cache type which is Never or a duration (in minutes).
-
Add a voter.
-
Save changes to your rules. This saves changes to Author.
-
Publish rules to production. This saves changes to Public.
-
Move rule up or down. Remember the first to match is accepted.
-
Delete a rule.
| Serving stale content origin failure is off by default. Contact support to enable it. |
Add Browser cache rule
browserCachePolicy is defined in Magnolia.
|
Rules
-
The rules apply from top to down.
-
The first rule matching the request defines which
Cache-Controlheader will be applied to the response.
Instructions
To add a Browser cache rule:
-
Go to your Cockpit.
-
Go to Content delivery > Cache.
-
Choose the Browser cache tab.
-
Click Add a new rule.
The new rule will appear at the top of the rule list where you can edit it.
-
Give the rule a Name.
-
Choose the Type.
Table 1. options Type Description Never cache
You guessed it. It’s never cached.
Cache for
Allows you to set the time something is cached for (in minutes).
-
Choose When it happens using the
ANDorORoptions. -
Click the symbol if you want to add any voters.
-
Choose the condition you want and click Add.
Each condition comes with a preset set of rules you can choose from.
For example, URL starts with condition comes with an option of starts with or does not start with whereby you can add a pattern to fulfill that requirement.
-
-
When you’re happy with your new rule, don’t forget to save you work by going to the top and clicking Save changes.
-
To put your rules into production, you’ll also need to Publish your new rule.
-
Add CDN cache rule
| It also helps serve cached content when Magnolia is down or having any issues. |
Rules
-
The rules apply from top to down.
-
The first rule matching the request defines which
Surrogate-Controlheader will be applied to the response.-
The
Surrogate-Controlheader takes precedence over theCache-Controlone. -
Surrogate-Controlheaders are removed before a response is sent to an end user. -
In the absence of the
Surrogate-Controlheader, the CDN uses theCache-Controlheader.
-
Instructions
To add a CDN cache rule:
-
Go to your Cockpit.
-
Go to Content delivery > Cache.
-
Choose the CDN cache tab.
-
Click Add a new rule.
The new rule will appear at the top of the rule list where you can edit it.
-
Give the rule a Name.
-
Add a directive to the Surrogate Control field.
What values can be added?-
max-age: defines how long the response entity can be considered fresh in seconds before it considers the cached entity stale. -
stale-while-revalidate: defines how long in seconds that the cache can reuse a stale response while it revalidates it to a cache. -
stale-if-error: indicates when an error is encountered, a cached stale response can be used to satisfy the request, regardless of other freshness information. Unlikestale-while-revalidate, stale-if-error doesn’t allow for any asynchronous revalidation.
Example:
max-age=86400, stale-while-revalidate=60 -
-
Choose When it happens using the
ANDorORoptions. -
Click the symbol if you want to add any voters.
-
Choose the condition you want and click Add.
Each condition comes with a preset set of rules you can choose from.
For example, URL starts with condition comes with an option of starts with or does not start with whereby you can add a pattern to fulfill that requirement.
-
-
When you’re happy with your new rule, don’t forget to save you work by going to the top and clicking Save changes.
-
To put your rules into production, you’ll also need to Publish your new rule.
-
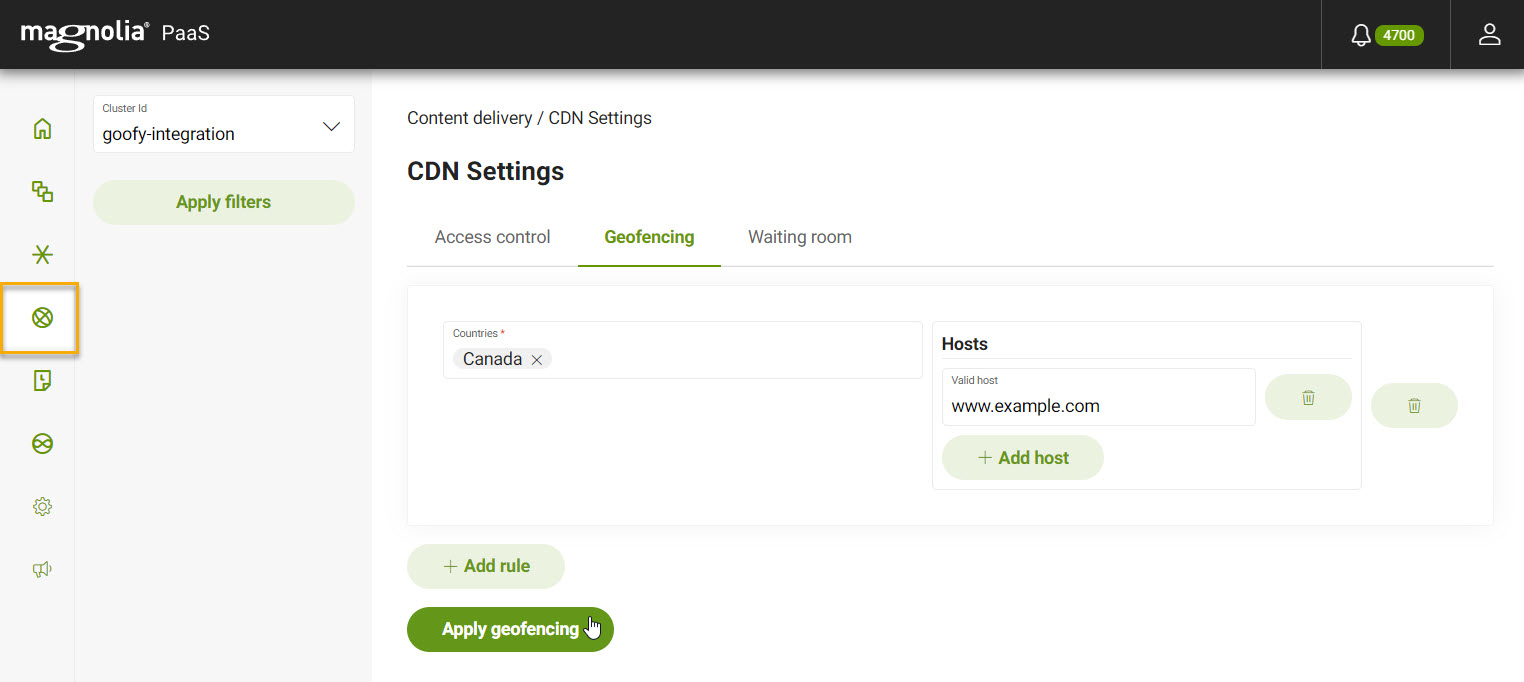
Geofencing
DX Cloud’s geofencing lets you control access to your site content based on a user’s geographic location. This allows you to define country boundaries around your site’s access. The feature ensures you’re able to comply with regional regulations, enforce licensing restrictions, or tailor content based on geographic targeting.
Apply Geofencing
View from the Cockpit
-
Go to CDN > Geofencing.
-
Optional If desired, add a custom error message. If left blank, the default message is "Restricted Content".
-
Click Add rule to add a new geofencing rule.
-
Select the countries from the menu.
-
Add the host(s) you want to restrict in the Hosts field.
-
-
Click Apply geofencing.
Error responses
You can customise error responses directly from the Cockpit with DX Cloud.
This ensures that when users get a 404 or 503 error, they’ll receive your custom message.
Set custom error page response
View from the Cockpit

-
Go to CDN > Responses.
-
Click Apply Filters.
Filter selection persists
-
Toggle on the desired error page.
-
Enter your custom message inside the
htmlelement.We recommend keeping the message concise. There is a maximum 3MB limit for the Fastly configuration which includes these pages and other objects. -
Click Apply changes.
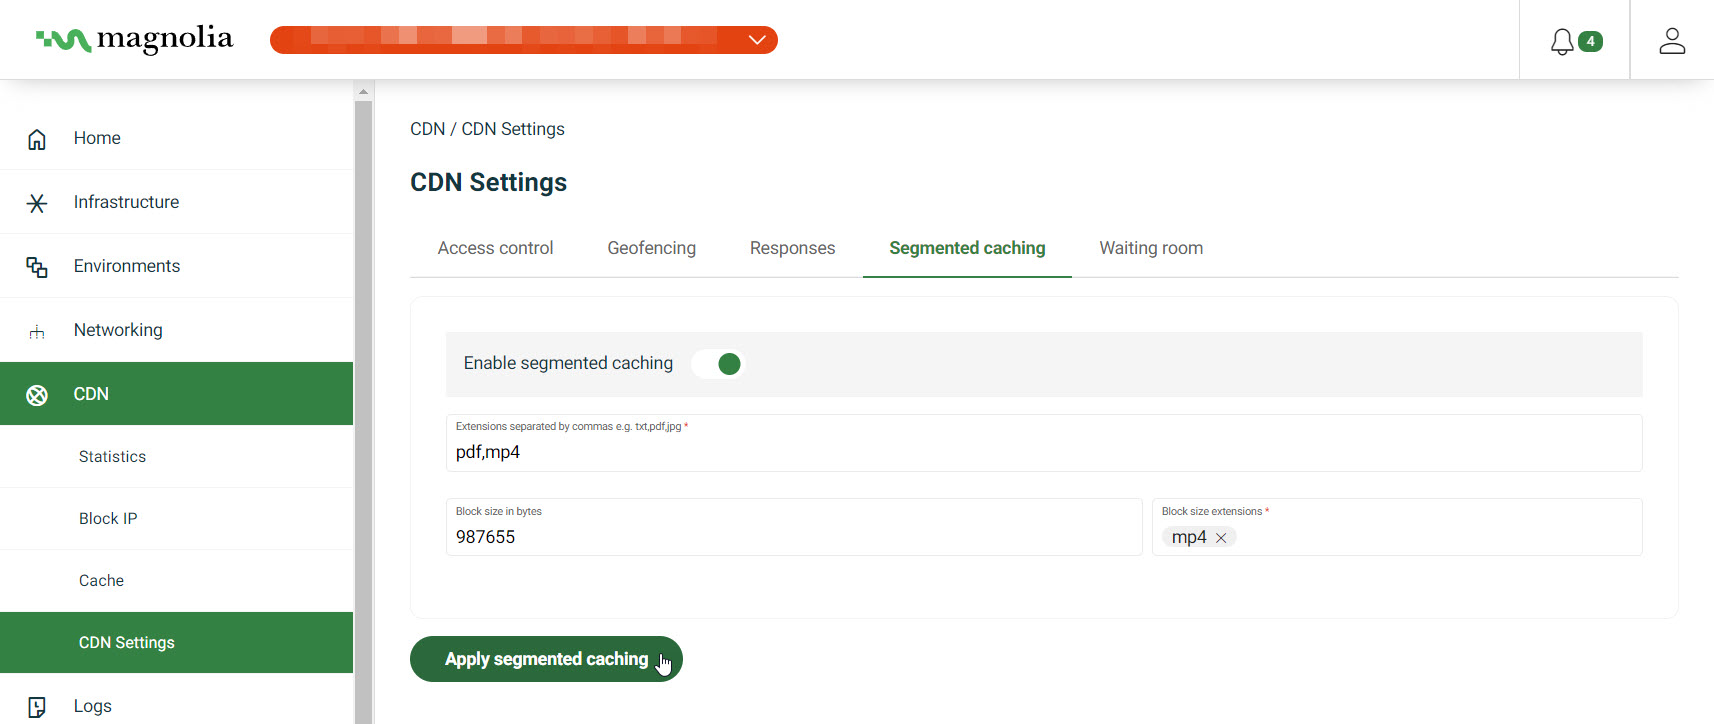
Segmented caching
Segmented caching breaks up large files or objects into smaller segments and caches each segment separately, helping optimize content delivery.
You should use segmented caching for resources larger than 20 MB to prevent 503 Service unavailable errors for large resource requests.
Imagine you have a large video file. Instead of caching the entire video as one big chunk, segmented caching breaks it into smaller pieces. This allows the CDN to cache each segment separately.
So, for example, if a user only watches a small part of a video, the CDN only needs to fetch and deliver the watched segment, rather than the whole video. This makes resource delivery faster and more efficient.
Apply segmented caching
View from the Cockpit
-
Go to CDN > Segmented caching.
-
Ensure that you have enabled segmented caching by toggling it on.
-
Specify the file extensions where you want the cache segmented.
-
Optional Specify the size of the segments in Block size in bytes.
This defines the size of the segment itself.
-
Optional Specify which file extensions to which you want the block size to apply.
-
Click Apply segmented caching.
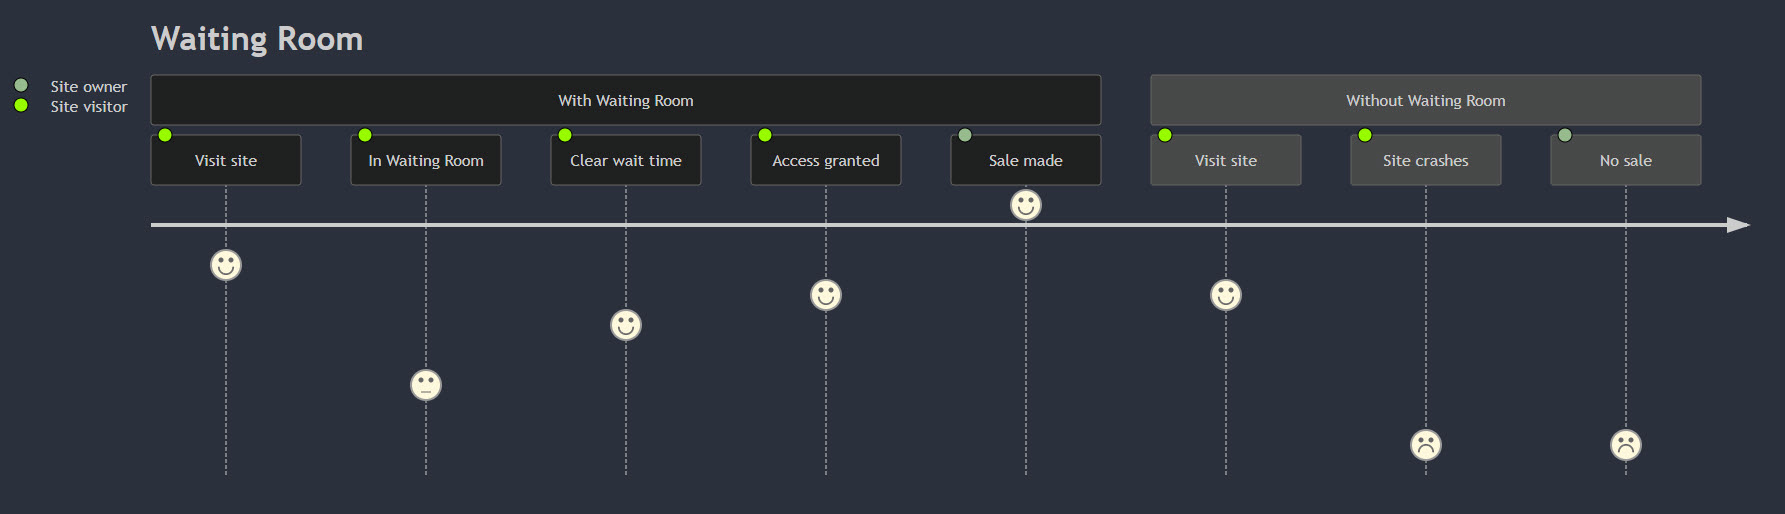
Fastly Waiting Room
Premium feature
The Fastly Waiting Room is a feature to help you manage high traffic volume on your site and prevent site overload. It assigns a delay for new user requests which allows existing users to finish what they’re trying to do.
The Fastly Waiting Room:
-
Prevents site overload by intelligently handling the influx of new visitors.
-
Fairly distributes the site traffic so that each user has equal chance of access. During high-demand events, promotions, or sales, this can be highly useful.
-
Reduces server load so performance is not hindered.
Get the Fastly Waiting Room
The Fastly Waiting Room is a premium feature. You’ll need to talk with your DX Cloud representative to discuss enabling the feature.
You must have the appropriate admin privileges to enable the Fastly Waiting Room. If you go to the Waiting Room in the Cockpit without the appropriate privileges, you’ll see an error page. If your account has the privileges to enable the Fastly Waiting Room, you can follow the instructions here.
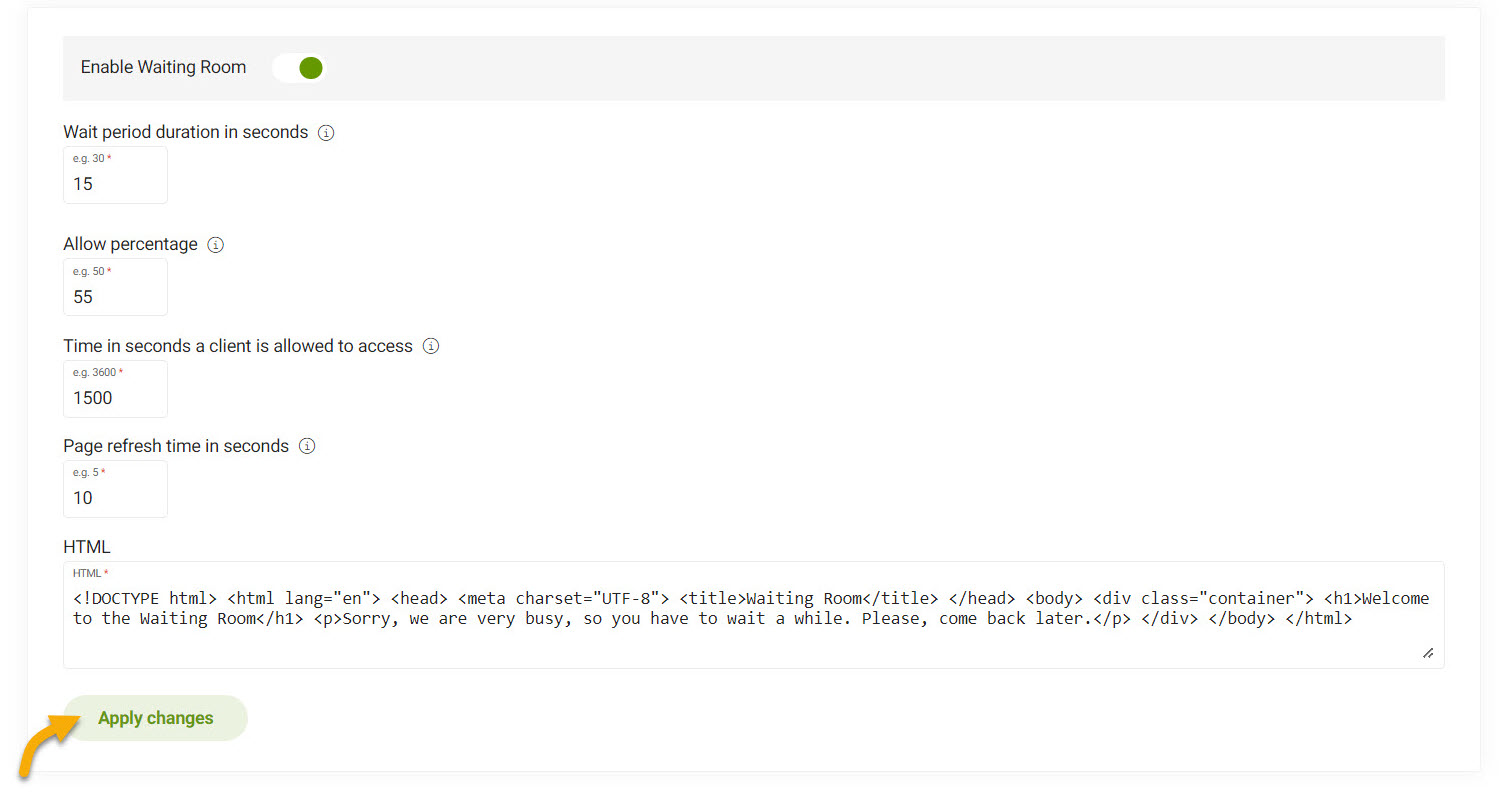
Configure the Fastly Waiting Room
-
In your Cockpit, go to CDN > Waiting room.
View from the Cockpit
-
Toggle Enable Waiting Room to enable the feature.
-
Input the Wait period duration in seconds.
This is the minimum period of time a visitor must wait before a decision to grant access is made.
-
Input the Allow percentage. Enter a value between
0and100.Important considerations
-
Input the Time in seconds a client is allowed to access.
This is how long the site visitor can stay on the site after access is granted.
Default is
3600seconds (60 minutes/1 hour) -
Input Page refresh time in seconds.
This is how long the Waiting Room waits to refresh and check for cookie status. Default is
5seconds -
Input the HTML that is used to render the look and feel of the Waiting Room.
Sample and tips