Networking
The Networking section of the Cockpit lets you create and manage ingresses and certificates, handle redirects and configure your desired redirect settings, and manage secrets.
Select desired cluster
Select your desired cluster from the dropdown menu at the top of the Cockpit.

Ingresses
Kubernetes Ingresses manage external access to services within a cluster, enabling HTTP and HTTPS traffic routing based on hostnames and paths. They provide a flexible, scalable way to expose Magnolia applications, supporting features like SSL termination, load balancing, and custom Nginx configurations. Ingresses are essential for delivering secure, performant web experiences in the DX Cloud Cockpit.
In this section, you can find:
-
Instructions to add an Ingress in the Cockpit
You can also find embedded help directly in the Cockpit.
Add an Ingress
This guide helps you configure a new Ingress resource to manage external access to services.
-
Go to Networking > Ingresses in your Cockpit.
-
Ensure you are on your desired cluster.
-
Click Add. This opens a dialog where you configure critical Ingress criteria.
-
Under General settings:
-
Give your Ingress a Name and a Description.
-
-
Under Access control:
-
Enter the Allow List IPs.
-
Enter the Deny List IPs.
-
Disable the robots header (if desired).
-
Add any desired Denied locations. You can also deny access to Admincentral for locations here.
-
-
Under NGINX options:
-
Set the Max body size.
-
Enable Response buffering.
-
Set the Max buffer size.
-
Set the Number buffers.
-
Enable Request buffering.
-
Configure the Connection timeout.
-
Adjust the Read timeout.
-
Set the Send timeout.
-
Enable Force SSL redirect if desired.
-
Enable From to www redirect if desired.
-
Enable the Ingress firewall. Recommended
-
Set Rate limiting parameters.
-
Specify any Headers to clear in the response.
-
Set any Headers you want in the response.
-
If desired, enable and define an Error page.
-
Enable Sticky sessions to route a client’s requests to the same backend server.
-
If desired, enable Basic auth.
-
Configure CORS to control which domains can access resources.
-
Enable client certificate authentication to require clients to present a valid SSL/TLS certificate.
-
-
Under CDN options:
-
Choose to enable content delivery for the Ingress (if desired). If enabled, Fastly is currently the only option.
-
-
Under Rules:
Ingress rules specify the direction of allowed access to and from different identities and resources.
-
Allow regular expression: Allow regular expression.
-
Host: Choose the host from the dropdown menu. Only available hosts are listed.
-
Path type: Choose the path type.
-
ImplementationSpecific: Matching is up to the IngressClass. -
Exact: Matches the URL path exactly including being case-sensitive. -
Prefix: Matches based on a URL path prefix split by/. This is case-sensitive.
-
-
Path: Specify the path itself, such as
/iconsor/docs. -
Service: Choose the desired service from the dropdown. This is typically
publicorauthor. -
Backend port: Choose the port. This can be the port number (such as
9090) or the port name if a name is given.
-
-
Under TLS certificates:
-
Choose to enable Acquire certificates automatically, using Let’s Encrypt (HTTP-01) if desired.
-
Otherwise, select an existing SSL/TLS certificate secret from the cluster to secure the Ingress. This is disabled if certificate acquisition is automatic (enabled above).
-
General settings
Access control
whitelistIps
🏷️ Allow List IPs
A list of IP addresses or CIDR ranges allowed to access the Ingress. Only requests from these IPs are permitted, enhancing security by restricting access.
blacklistIps
🏷️ Deny List IPs
A list of IP addresses or CIDR ranges blocked from accessing the Ingress. Requests from these IPs are denied, protecting against known threats.
NGINX options
proxyBodySize
🏷️ Max body size
Sets the maximum allowed size of the client request body, specified in bytes (e.g., "10m" for 10 megabytes). Limits large uploads to protect server resources.
-
Objective: Limits the size of client request bodies (e.g., file uploads) to prevent resource exhaustion.
-
Context: Magnolia allows authors to upload assets (e.g., images, PDFs) via the admin interface. Large uploads can strain server memory or disk, slowing down the CMS or causing crashes.
This protects the Magnolia instance from being overwhelmed by oversized uploads (e.g., a user uploading a 1GB video) and ensures server stability for both author and public instances. -
Example: Setting proxyBodySize to "10m" allows images up to 10MB, sufficient for most CMS assets, while blocking larger files that could disrupt performance.
proxyBuffering
🏷️ Enable response buffering
Controls response buffering:
-
on (default): NGINX buffers the response in memory (or disk if large) before delivering it to the client.
-
off: NGINX streams the response to the client as it receives it from the backend.
Set it "off" for:
-
Server-Sent Events (SSE)
-
Real-time APIs
-
Reduce memory use under load
proxyBufferSize
🏷️ Max buffer size
Sets the size of the buffer used for reading the first part of the response received from the proxied server (ie: Magnolia, frontend application), specified in bytes (e.g., "16k" for 16 kilobytes). By default proxy buffer size is set as "4k".
-
Objective: Allow large cookies, big JWT token or long custom headers to pass through Nginx.
-
Context: Magnolia allows customers to use their own IDP to handle the authentication. Large number can increase the risk of Nginx memory bloat and DoS attacks
-
Example: Setting proxyBufferSize to "16k" allows 16 kilobytes of headers/cookies
proxyBuffersNumber
🏷️ Buffer numbers
Sets the number of the buffers in proxy_buffers used for reading the first part of the response received from the proxied server (ie: Magnolia, frontend application). By default number of buffers is set as "4".
-
Objective: Allow response having a large number of header of a large body content.
-
Context: Magnolia allows customers to build their own pages and does not set any limit on the page size or the number of headers. Large number can increase the risk of Nginx memory bloat and DoS attacks
proxyRequestBuffering
🏷️ Enable request buffering
Controls request buffering:
-
on (default): Buffer the entire request body in memory or to disk before sending it to the backend.
-
off: NGINX streams the request to the backend as it receives it from the client.
Set it "off" for:
-
File uploads (ie: Enable progress bar while uploading file to Magnolia)
-
Real-time data input
proxyConnectTimeout
🏷️ Connection timeout
Sets the maximum time (in seconds) that NGINX will wait while establishing a TCP connection to the upstream (i.e. your Magnolia or frontend instance). By default timout is set as "60" seconds.
proxyReadTimeout
🏷️ Read timeout
Sets the maximum time (in seconds) that NGINX will wait to read data from the backend service after the connection has been established. By default timout is set as "60" seconds.
proxySendTimeout
🏷️ Send timeout
Sets the maximum time (in seconds) that NGINX will wait while sending data to the backend. By default timout is set as "60" seconds.
forceSslRedirect
🏷️ Force SSL redirect
When enabled, redirects all HTTP requests to HTTPS, ensuring secure communication. Useful for enforcing SSL/TLS across all traffic.
-
Objective: Redirects HTTP requests to HTTPS to enforce secure, encrypted communication.
-
Context: Magnolia public sites (e.g., corporate websites) and author instances handle sensitive data, such as user sessions or content drafts, requiring encryption to protect against eavesdropping.
Ensures all traffic to Magnolia is secure, building trust with site visitors, improving SEO (Google prioritizes HTTPS), and complying with regulations like GDPR for EU users. -
Example: Enabling forceSslRedirect redirects
http://magnolia-site.comtohttps://magnolia-site.com, securing user interactions and protecting admin logins.
fromToWwwRedirect
🏷️ From to www redirect
When enabled, redirects requests between "www" and non-"www" (apex) versions of the domain (e.g., www.example.com to example.com). Ensures consistent URL usage.
If your rule’s host is the apex domain, the ingress will redirect the "www" requests to the apex domain.
If your rule’s host is the "www" domain, the ingress will redirect the apex requests to the "www" domain.
In both cases, the preferred domain should be the only one defined in the rules.
-
Objective: Redirects traffic between
wwwand non-wwwdomains to maintain consistent URL structures. -
Context: Magnolia sites often use a primary domain for branding (e.g.,
example.comorwww.example.com). Inconsistent URLs can confuse users, harm SEO due to duplicate content, or break analytics tracking.Provides a unified user experience and improves SEO by preventing duplicate content penalties, ensuring all traffic uses the preferred domain. -
Example: Enabling fromToWwwRedirect redirects
www.magnolia-site.comtomagnolia-site.com, standardizing links and analytics for a corporate website.
enableWaf
🏷️ Enable ingress firewall (OWASP)
Enables the Web Application Firewall (WAF) to protect against common web attacks, such as SQL injection or cross-site scripting. Enhances security for public endpoints.
For more detail visit OWASP ModSecurity Project.
-
Objective: Activates a Web Application Firewall to block common web attacks, leveraging OWASP rulesets for protection.
-
Context: Magnolia public sites are internet-exposed, making them targets for attacks like SQL injection or XSS. Author instances are critical, as compromised access could lead to content vandalism or data breaches.
Protects Magnolia from exploits, ensuring site availability and data integrity, and supports compliance with security standards like PCI DSS for e-commerce integrations. -
Example: Enabling enableWaf blocks malicious requests (e.g., XSS attempts on
/login), safeguarding Magnolia’s public and admin interfaces.
rateLimiting
🏷️ Rate limiting
Configures rate limiting to restrict the number of requests per client, preventing abuse or denial-of-service attacks. Define limits and burst settings.
-
Objective: Limits the frequency of client requests to prevent server overload or denial-of-service (DDoS) attacks.
-
Context: Magnolia public sites may face traffic spikes from bots or scrapers, while author instances are vulnerable to brute-force login attempts. Rate limiting ensures server stability under load.
Maintains Magnolia’s availability during high traffic or attacks, reducing server load and ensuring responsive content delivery for users. -
Example: Setting rateLimiting to 100 requests per minute per IP prevents bots from overwhelming
/api/content, keeping the public site accessible.
headersToClear
🏷️ Headers to clear
Specifies HTTP headers to remove from the response, improving security or compatibility by eliminating unwanted headers.
-
Objective: Removes specific HTTP response headers to enhance security or resolve compatibility issues.
-
Context: Magnolia may include default headers (e.g.,
Server: nginx) that reveal software versions, aiding attackers. Some headers may conflict with Magnolia’s frontend or third-party integrations.Reduces the attack surface by hiding server details and ensures compatibility with Magnolia’s rendering or external tools, improving security and functionality. -
Example: Clearing the
Serverheader prevents attackers from identifying Nginx version vulnerabilities, protecting the public site.
headersToSet
🏷️ Headers to set
Defines custom HTTP headers to add to the response, such as security headers (e.g., X-Frame-Options) or caching directives.
-
Objective: Adds custom HTTP response headers to enhance security, control caching, or support specific functionality.
-
Context: Magnolia public sites benefit from security headers (e.g.,
X-Frame-Options: DENYto prevent clickjacking) and caching headers (e.g.,Cache-Control) for static assets. Author instances may need headers for compliance or integration.Strengthens security against attacks and optimizes performance by controlling browser caching, critical for Magnolia’s content delivery and user safety. -
Example: Setting
X-Frame-Options: DENYprevents Magnolia pages from being embedded in malicious iframes, enhancing site security.
errorPage
🏷️ Error page
Customizes error pages for specific HTTP status codes (e.g., 404, 500), providing user-friendly messages or redirects.
-
Objective: Customizes error pages to improve user experience during HTTP errors.
-
Context: Magnolia public sites need branded error pages (e.g.,
404) to guide users back to content, while author instances benefit from clear error messages during maintenance or issues.Enhances user experience by replacing default Nginx errors with Magnolia-branded pages, maintaining professionalism and usability during issues. -
Example: Setting errorPage for
404to/not-foundredirects users to a custom Magnolia page with navigation links, reducing bounce rates.
stickySession
🏷️ Sticky session
Enables sticky sessions to route a client’s requests to the same backend server, useful for session-based applications. Configure session persistence settings.
-
Objective: Routes a client’s requests to the same backend server to maintain session persistence.
-
Context: Magnolia author instances rely on sessions for user authentication and content editing. Public sites with personalization (e.g., user-specific content) may also use session data.
Ensures consistent user sessions, preventing login issues or data loss in the CMS, and supports Magnolia’s personalization features for public sites. -
Example: Enabling
stickySessionkeeps an author’s editing session on the same pod, avoiding interruptions during content updates.
basicAuth
🏷️ Basic auth
Enables HTTP Basic Authentication, requiring a username and password for access. Specify credentials or authentication settings.
-
Objective: Requires HTTP Basic Authentication (username/password) to restrict access to the Ingress.
-
Context: Magnolia author instances or staging sites need restricted access to prevent unauthorized editing. Public sites may use basicAuth for private sections (e.g., employee portals).
Secures sensitive Magnolia interfaces (e.g., /author) from public access, providing simple authentication without complex SSO setups. -
Example: Enabling basicAuth on
/authorrequires a password, protecting the admin interface from unauthorized access.
cors
🏷️ CORS
Configures Cross-Origin Resource Sharing (CORS) to control which domains can access resources, enabling secure cross-origin requests.
-
Objective: Configures Cross-Origin Resource Sharing to allow specific domains to access Magnolia’s resources via HTTP requests.
-
Context: Magnolia’s frontend may use REST APIs (e.g., for content delivery) accessed by external domains, such as mobile apps or headless CMS frontends. CORS is critical for these integrations.
Enables secure integration with Magnolia’s APIs or headless content delivery, supporting modern web and mobile applications consuming CMS content. -
Example: Setting cors to allow
\app.magnolia-site.comenables a mobile app to fetch content from/api/content, ensuring secure API access.
certificateAuthentication
🏷️ mTLS
Enables client certificate authentication, requiring clients to present a valid SSL/TLS certificate. Enhances security for sensitive endpoints.
-
Objective: Requires clients to present a valid SSL/TLS client certificate for mutual TLS (mTLS) authentication.
-
Context: High-security Magnolia author instances or enterprise integrations may use client certificates to restrict access to admins or trusted clients. Common in B2B scenarios for API endpoints.
Provides strong authentication beyond passwords, ensuring only authorized clients interact with Magnolia, critical for sensitive or enterprise environments. -
Example: Enabling certificateAuthentication for
/api/adminrestricts access to clients with valid certificates, securing enterprise API calls.
CDN options
enabled
🏷️ Enabled
Enables or disables the Content Delivery Network (CDN) for the Ingress. When enabled, traffic is routed through the CDN (Fastly) to improve performance and caching.
Rules
allowRegex
🏷️ Allow regular expressions
Allows using regular expressions in the rules path fields. Only use if you use rules with path type "ImplementationSpecific" and an actual regular expression as a path.
Using that option might have performance impact on your ingress.
host
🏷️ Host
Specifies the host domain for the Ingress rule (e.g., example.com). Defines which domain or subdomain the rule applies to, routing matching requests to the specified paths.
TLS
acquireCertificate
🏷️ Enable automatic certificate acquisition
When enabled, automatically acquires an SSL/TLS certificate for the Ingress, typically via a certificate manager (e.g., Let’s Encrypt). Disables manual secret selection.
Claim an Ingress
Claiming an Ingress designates the Cockpit as the primary tool for managing its configuration, ensuring that subsequent changes are made through the Cockpit and external updates (e.g., via Rancher or CI/CD pipelines) are ignored when publishing. Once claimed, the Cockpit’s, external changes are overwritten when publishing from the Cockpit. Only healthy ingresses, those without synchronization warnings, can be claimed and managed via the Cockpit.
|
After claiming an Ingress, ensure it is managed exclusively through the Cockpit to avoid conflicts. Changes made externally (e.g., in Rancher or via Establish clear ownership for each Ingress, choosing one management approach:
|
To claim an Ingress:
-
Go to Networking > Ingresses.
-
Choose the desired Ingress.
-
Under the details section click Claim.
Validation Severity Levels
Ingress validation issues are categorized into two severity levels:
-
Warnings : These ingresses are functional but fail validation checks, preventing them from being claimed. Warnings indicate issues that must be resolved at the infrastructure level (e.g., via Rancher). After fixing the issues, trigger a Synchronization in the Cockpit to revalidate the Ingress. If no synchornization warnings remain, the Ingress can be claimed. Attempting to claim an Ingress with synchronization warnings will result in an
HTTP 422status code from the backend. -
Errors : Ingresses with errors are non-functional and can be claimed to allow fixes directly in the Cockpit. Use the Cockpit interface to edit and resolve these errors, restoring the Ingress to a healthy state.
| To troubleshoot validation issues, check the Ingress details in the Cockpit or consult your Kubernetes management tool (e.g., Rancher) for specific error messages. |
Synchronize an Ingress
Synchronization updates the Cockpit’s view of an unclaimed Ingress to reflect its current configuration in the Kubernetes cluster (e.g., managed via Rancher). Synchronization allows users to review the Ingress’s state in the Cockpit before deciding to claim it for Cockpit management. Synchronization is not available for claimed Ingresses, as claiming stops this process to ensure the Cockpit controls the Ingress’s configuration.
Ingresses created in the Cockpit are typically claimed and aligned with Kubernetes upon publishing, so synchronization is only needed if external changes or validation issues arise.
|
Synchronization is only for unclaimed ingresses. After claiming an Ingress, the Cockpit manages the Ingress exclusively, and synchronization is disabled. External changes to a claimed Ingress (e.g., via Rancher) are not reflected in the Cockpit and are overwritten by a Cockpit publish. Manage claimed ingresses exclusively through the Cockpit to avoid issues. |
Why Synchronize?
Synchronization is used when:
-
You need to view the latest Kubernetes configuration of an unclaimed Ingress (e.g., created in Rancher or modified externally) in the Cockpit before claiming it.
-
Validation warnings have been fixed at the infrastructure level (e.g., in Rancher), and you need to revalidate an unclaimed Ingress to confirm it’s claimable.
|
Ingresses created in the Cockpit are typically claimed and synced with Kubernetes upon publishing, so synchronization is rarely needed unless external changes occur before claiming. Ingresses created in Rancher or other Kubernetes tools require synchronization to appear accurately in the Cockpit before claiming. |
How to synchronize an Ingress
To synchronize an Ingress:
-
In the Cockpit, go to Networking > Ingresses.
-
Select an unclaimed Ingress from the list.
-
Verify that no unpublished changes exist in the Cockpit (e.g., check for pending edits in the Ingress details).
-
Click the Synchronize button.
The Cockpit then pulls the Ingress’s current configuration from the Kubernetes cluster, updates its database, and revalidates the Ingress.
If validation errors persist (e.g., resulting in an HTTP 422 status code), resolve them at the infrastructure level and synchronize again.
Best Practices
-
Choose a management tool: Decide whether an Ingress is managed via the Cockpit, a CI/CD pipeline, or manually (e.g., Rancher). Synchronize unclaimed ingresses to review their state, then claim them for Cockpit management if desired.
-
Check before synchronizing: Ensure no temporary Cockpit edits are critical, as they will be lost during synchronization.
-
Synchronize selectively: Use synchronization only when needed (e.g., to review external changes or revalidate warnings). After claiming, manage the Ingress exclusively via the Cockpit.
-
Monitor Ingress health: After synchronizing, check for validation warnings () or errors () in the Cockpit.
-
Troubleshoot issues: If synchronization fails, verify the Ingress configuration in Rancher or with
kubectl get Ingressto identify discrepancies.
General settings
Access control
whitelistIps
🏷️ Allow List IPs
A list of IP addresses or CIDR ranges allowed to access the Ingress. Only requests from these IPs are permitted, enhancing security by restricting access.
blacklistIps
🏷️ Deny List IPs
A list of IP addresses or CIDR ranges blocked from accessing the Ingress. Requests from these IPs are denied, protecting against known threats.
NGINX options
proxyBodySize
🏷️ Max body size
Sets the maximum allowed size of the client request body, specified in bytes (e.g., "10m" for 10 megabytes). Limits large uploads to protect server resources.
-
Objective: Limits the size of client request bodies (e.g., file uploads) to prevent resource exhaustion.
-
Context: Magnolia allows authors to upload assets (e.g., images, PDFs) via the admin interface. Large uploads can strain server memory or disk, slowing down the CMS or causing crashes.
This protects the Magnolia instance from being overwhelmed by oversized uploads (e.g., a user uploading a 1GB video) and ensures server stability for both author and public instances. -
Example: Setting proxyBodySize to "10m" allows images up to 10MB, sufficient for most CMS assets, while blocking larger files that could disrupt performance.
proxyBuffering
🏷️ Enable response buffering
Controls response buffering:
-
on (default): NGINX buffers the response in memory (or disk if large) before delivering it to the client.
-
off: NGINX streams the response to the client as it receives it from the backend.
Set it "off" for:
-
Server-Sent Events (SSE)
-
Real-time APIs
-
Reduce memory use under load
proxyBufferSize
🏷️ Max buffer size
Sets the size of the buffer used for reading the first part of the response received from the proxied server (ie: Magnolia, frontend application), specified in bytes (e.g., "16k" for 16 kilobytes). By default proxy buffer size is set as "4k".
-
Objective: Allow large cookies, big JWT token or long custom headers to pass through Nginx.
-
Context: Magnolia allows customers to use their own IDP to handle the authentication. Large number can increase the risk of Nginx memory bloat and DoS attacks
-
Example: Setting proxyBufferSize to "16k" allows 16 kilobytes of headers/cookies
proxyBuffersNumber
🏷️ Buffer numbers
Sets the number of the buffers in proxy_buffers used for reading the first part of the response received from the proxied server (ie: Magnolia, frontend application). By default number of buffers is set as "4".
-
Objective: Allow response having a large number of header of a large body content.
-
Context: Magnolia allows customers to build their own pages and does not set any limit on the page size or the number of headers. Large number can increase the risk of Nginx memory bloat and DoS attacks
proxyRequestBuffering
🏷️ Enable request buffering
Controls request buffering:
-
on (default): Buffer the entire request body in memory or to disk before sending it to the backend.
-
off: NGINX streams the request to the backend as it receives it from the client.
Set it "off" for:
-
File uploads (ie: Enable progress bar while uploading file to Magnolia)
-
Real-time data input
proxyConnectTimeout
🏷️ Connection timeout
Sets the maximum time (in seconds) that NGINX will wait while establishing a TCP connection to the upstream (i.e. your Magnolia or frontend instance). By default timout is set as "60" seconds.
proxyReadTimeout
🏷️ Read timeout
Sets the maximum time (in seconds) that NGINX will wait to read data from the backend service after the connection has been established. By default timout is set as "60" seconds.
proxySendTimeout
🏷️ Send timeout
Sets the maximum time (in seconds) that NGINX will wait while sending data to the backend. By default timout is set as "60" seconds.
forceSslRedirect
🏷️ Force SSL redirect
When enabled, redirects all HTTP requests to HTTPS, ensuring secure communication. Useful for enforcing SSL/TLS across all traffic.
-
Objective: Redirects HTTP requests to HTTPS to enforce secure, encrypted communication.
-
Context: Magnolia public sites (e.g., corporate websites) and author instances handle sensitive data, such as user sessions or content drafts, requiring encryption to protect against eavesdropping.
Ensures all traffic to Magnolia is secure, building trust with site visitors, improving SEO (Google prioritizes HTTPS), and complying with regulations like GDPR for EU users. -
Example: Enabling forceSslRedirect redirects
http://magnolia-site.comtohttps://magnolia-site.com, securing user interactions and protecting admin logins.
fromToWwwRedirect
🏷️ From to www redirect
When enabled, redirects requests between "www" and non-"www" (apex) versions of the domain (e.g., www.example.com to example.com). Ensures consistent URL usage.
If your rule’s host is the apex domain, the ingress will redirect the "www" requests to the apex domain.
If your rule’s host is the "www" domain, the ingress will redirect the apex requests to the "www" domain.
In both cases, the preferred domain should be the only one defined in the rules.
-
Objective: Redirects traffic between
wwwand non-wwwdomains to maintain consistent URL structures. -
Context: Magnolia sites often use a primary domain for branding (e.g.,
example.comorwww.example.com). Inconsistent URLs can confuse users, harm SEO due to duplicate content, or break analytics tracking.Provides a unified user experience and improves SEO by preventing duplicate content penalties, ensuring all traffic uses the preferred domain. -
Example: Enabling fromToWwwRedirect redirects
www.magnolia-site.comtomagnolia-site.com, standardizing links and analytics for a corporate website.
enableWaf
🏷️ Enable ingress firewall (OWASP)
Enables the Web Application Firewall (WAF) to protect against common web attacks, such as SQL injection or cross-site scripting. Enhances security for public endpoints.
For more detail visit OWASP ModSecurity Project.
-
Objective: Activates a Web Application Firewall to block common web attacks, leveraging OWASP rulesets for protection.
-
Context: Magnolia public sites are internet-exposed, making them targets for attacks like SQL injection or XSS. Author instances are critical, as compromised access could lead to content vandalism or data breaches.
Protects Magnolia from exploits, ensuring site availability and data integrity, and supports compliance with security standards like PCI DSS for e-commerce integrations. -
Example: Enabling enableWaf blocks malicious requests (e.g., XSS attempts on
/login), safeguarding Magnolia’s public and admin interfaces.
rateLimiting
🏷️ Rate limiting
Configures rate limiting to restrict the number of requests per client, preventing abuse or denial-of-service attacks. Define limits and burst settings.
-
Objective: Limits the frequency of client requests to prevent server overload or denial-of-service (DDoS) attacks.
-
Context: Magnolia public sites may face traffic spikes from bots or scrapers, while author instances are vulnerable to brute-force login attempts. Rate limiting ensures server stability under load.
Maintains Magnolia’s availability during high traffic or attacks, reducing server load and ensuring responsive content delivery for users. -
Example: Setting rateLimiting to 100 requests per minute per IP prevents bots from overwhelming
/api/content, keeping the public site accessible.
headersToClear
🏷️ Headers to clear
Specifies HTTP headers to remove from the response, improving security or compatibility by eliminating unwanted headers.
-
Objective: Removes specific HTTP response headers to enhance security or resolve compatibility issues.
-
Context: Magnolia may include default headers (e.g.,
Server: nginx) that reveal software versions, aiding attackers. Some headers may conflict with Magnolia’s frontend or third-party integrations.Reduces the attack surface by hiding server details and ensures compatibility with Magnolia’s rendering or external tools, improving security and functionality. -
Example: Clearing the
Serverheader prevents attackers from identifying Nginx version vulnerabilities, protecting the public site.
headersToSet
🏷️ Headers to set
Defines custom HTTP headers to add to the response, such as security headers (e.g., X-Frame-Options) or caching directives.
-
Objective: Adds custom HTTP response headers to enhance security, control caching, or support specific functionality.
-
Context: Magnolia public sites benefit from security headers (e.g.,
X-Frame-Options: DENYto prevent clickjacking) and caching headers (e.g.,Cache-Control) for static assets. Author instances may need headers for compliance or integration.Strengthens security against attacks and optimizes performance by controlling browser caching, critical for Magnolia’s content delivery and user safety. -
Example: Setting
X-Frame-Options: DENYprevents Magnolia pages from being embedded in malicious iframes, enhancing site security.
errorPage
🏷️ Error page
Customizes error pages for specific HTTP status codes (e.g., 404, 500), providing user-friendly messages or redirects.
-
Objective: Customizes error pages to improve user experience during HTTP errors.
-
Context: Magnolia public sites need branded error pages (e.g.,
404) to guide users back to content, while author instances benefit from clear error messages during maintenance or issues.Enhances user experience by replacing default Nginx errors with Magnolia-branded pages, maintaining professionalism and usability during issues. -
Example: Setting errorPage for
404to/not-foundredirects users to a custom Magnolia page with navigation links, reducing bounce rates.
stickySession
🏷️ Sticky session
Enables sticky sessions to route a client’s requests to the same backend server, useful for session-based applications. Configure session persistence settings.
-
Objective: Routes a client’s requests to the same backend server to maintain session persistence.
-
Context: Magnolia author instances rely on sessions for user authentication and content editing. Public sites with personalization (e.g., user-specific content) may also use session data.
Ensures consistent user sessions, preventing login issues or data loss in the CMS, and supports Magnolia’s personalization features for public sites. -
Example: Enabling
stickySessionkeeps an author’s editing session on the same pod, avoiding interruptions during content updates.
basicAuth
🏷️ Basic auth
Enables HTTP Basic Authentication, requiring a username and password for access. Specify credentials or authentication settings.
-
Objective: Requires HTTP Basic Authentication (username/password) to restrict access to the Ingress.
-
Context: Magnolia author instances or staging sites need restricted access to prevent unauthorized editing. Public sites may use basicAuth for private sections (e.g., employee portals).
Secures sensitive Magnolia interfaces (e.g., /author) from public access, providing simple authentication without complex SSO setups. -
Example: Enabling basicAuth on
/authorrequires a password, protecting the admin interface from unauthorized access.
cors
🏷️ CORS
Configures Cross-Origin Resource Sharing (CORS) to control which domains can access resources, enabling secure cross-origin requests.
-
Objective: Configures Cross-Origin Resource Sharing to allow specific domains to access Magnolia’s resources via HTTP requests.
-
Context: Magnolia’s frontend may use REST APIs (e.g., for content delivery) accessed by external domains, such as mobile apps or headless CMS frontends. CORS is critical for these integrations.
Enables secure integration with Magnolia’s APIs or headless content delivery, supporting modern web and mobile applications consuming CMS content. -
Example: Setting cors to allow
\app.magnolia-site.comenables a mobile app to fetch content from/api/content, ensuring secure API access.
certificateAuthentication
🏷️ mTLS
Enables client certificate authentication, requiring clients to present a valid SSL/TLS certificate. Enhances security for sensitive endpoints.
-
Objective: Requires clients to present a valid SSL/TLS client certificate for mutual TLS (mTLS) authentication.
-
Context: High-security Magnolia author instances or enterprise integrations may use client certificates to restrict access to admins or trusted clients. Common in B2B scenarios for API endpoints.
Provides strong authentication beyond passwords, ensuring only authorized clients interact with Magnolia, critical for sensitive or enterprise environments. -
Example: Enabling certificateAuthentication for
/api/adminrestricts access to clients with valid certificates, securing enterprise API calls.
CDN options
enabled
🏷️ Enabled
Enables or disables the Content Delivery Network (CDN) for the Ingress. When enabled, traffic is routed through the CDN (Fastly) to improve performance and caching.
Rules
allowRegex
🏷️ Allow regular expressions
Allows using regular expressions in the rules path fields. Only use if you use rules with path type "ImplementationSpecific" and an actual regular expression as a path.
Using that option might have performance impact on your ingress.
host
🏷️ Host
Specifies the host domain for the Ingress rule (e.g., example.com). Defines which domain or subdomain the rule applies to, routing matching requests to the specified paths.
TLS
acquireCertificate
🏷️ Enable automatic certificate acquisition
When enabled, automatically acquires an SSL/TLS certificate for the Ingress, typically via a certificate manager (e.g., Let’s Encrypt). Disables manual secret selection.
Manage certificates
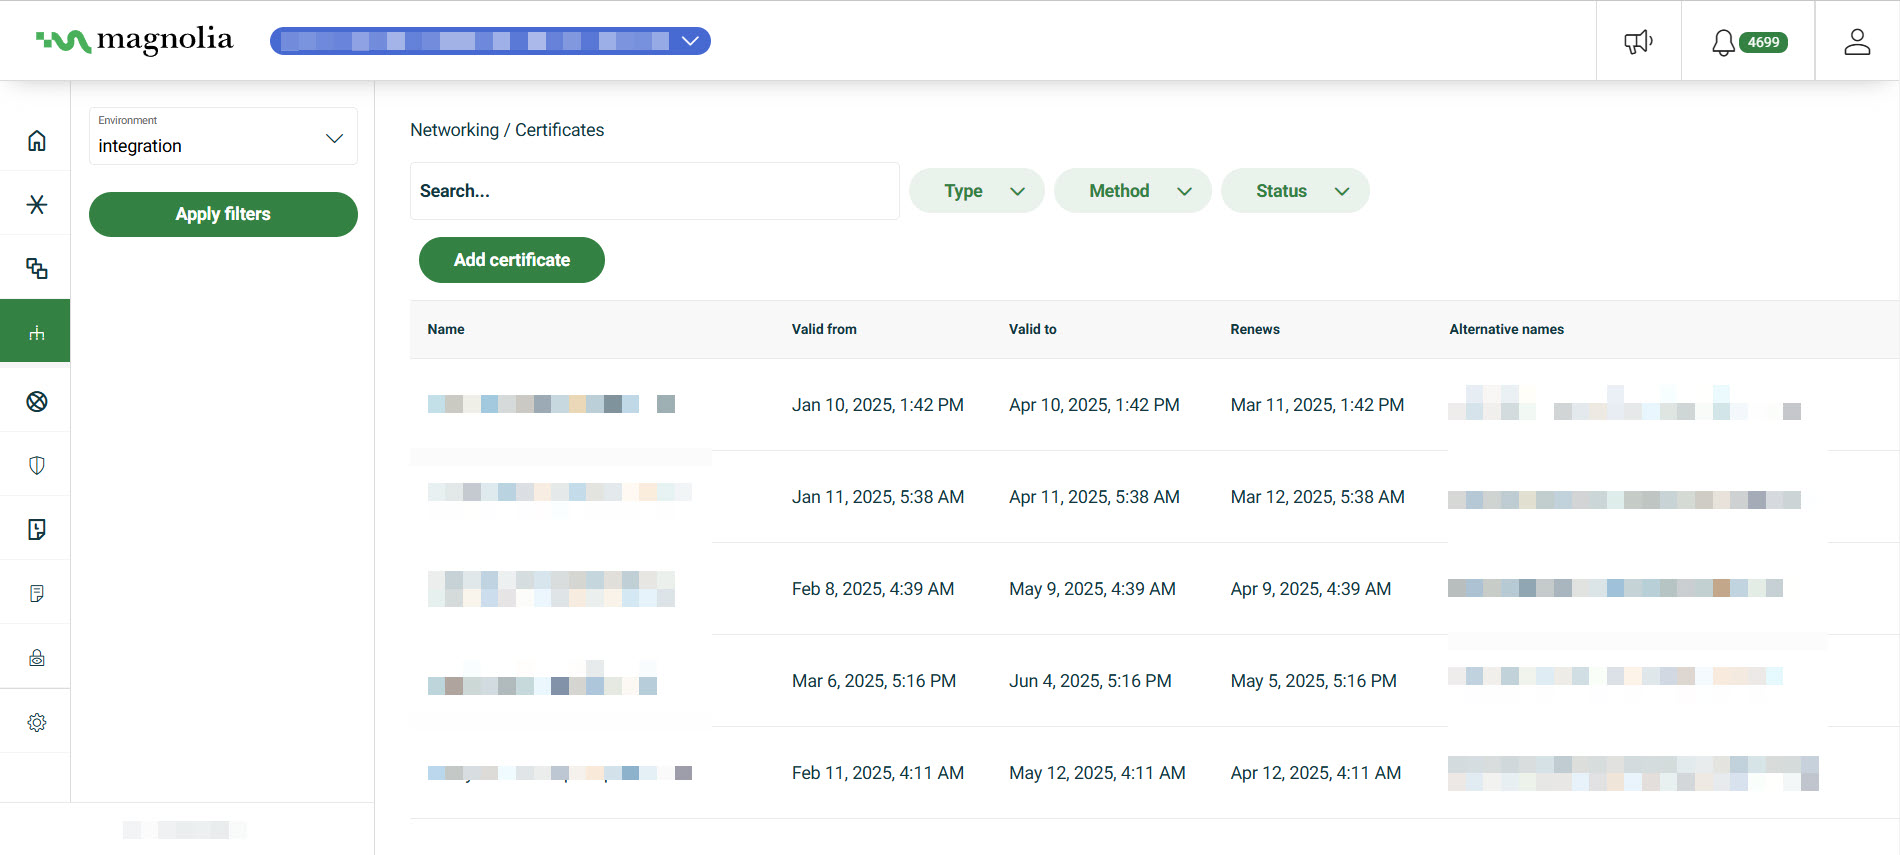
You can manage your own certificates directly in the Cockpit under the Networking section. You can either choose to add a managed certificate or add a custom certificate.
The Networking > Certificates section displays useful information in a table format including the certificate status, validity period, and whether or not the certificate is custom. You can also filter by Type, Method, and Status.
Managed
Managed certificates involve fewer manual steps on your side. Once set up, we take care of everything, ensuring your certificate stays valid and up to date.
You have two options, including HTTP-01 which is the most straight forward option and DNS-01 which involves just a few minor steps. See the tabs below to decide which option is best for your DX Cloud project.
Triggers automatically if your ingress includes the cert-manager.io/cluster-issuer annotation (e.g., for LetsEncrypt).
ingress:
  enabled: true
  annotations:
cert-manager.io/cluster-issuer: "letsencrypt-prod" (1)| 1 | Specifies the issuer. Also, automatically triggers a managed certificate when applied. |
In this case, no DNS changes are required as it verifies via a temporary HTTP endpoint.
Best for: Simple setups where the domain is publicly accessible from port 80.
You need to add the provided CNAME record to your domain’s DNS settings to prove ownership.
Best for: Wildcard certificates
Custom
You have more control with custom certificates. However, with more control comes more steps for you. You manage your certificate through a Certificate Signing Request (CSR).
You’ll generate a CSR through the Cockpit, then use it to request a signed certificate from your Certificate Authority (CA).
Once you receive the signed certificate, upload it back into our Cockpit. From there, you retain full control over the certificate’s lifecycle, including renewals and updates.
See Add certificate for Cockpit instructions.
- Actions
Add certificate
This section provides guidance on adding both managed and custom certificates.
There are some limitations for certificates:
-
The maximum number of subdomains per domain is 100.
-
The maximum subdomain and domain length combined is 250 characters.
-
You should add a certificate with either a 2048-bit RSA key, 4096-bit RSA key or 256-bit ECDSA key.
-
You can use wildcards for custom certificates, which are handled as part of these instructions. However, if using LetsEncrypt, you must file a Support request for wildcard certificates.
Managed certificates
View from the Cockpit
-
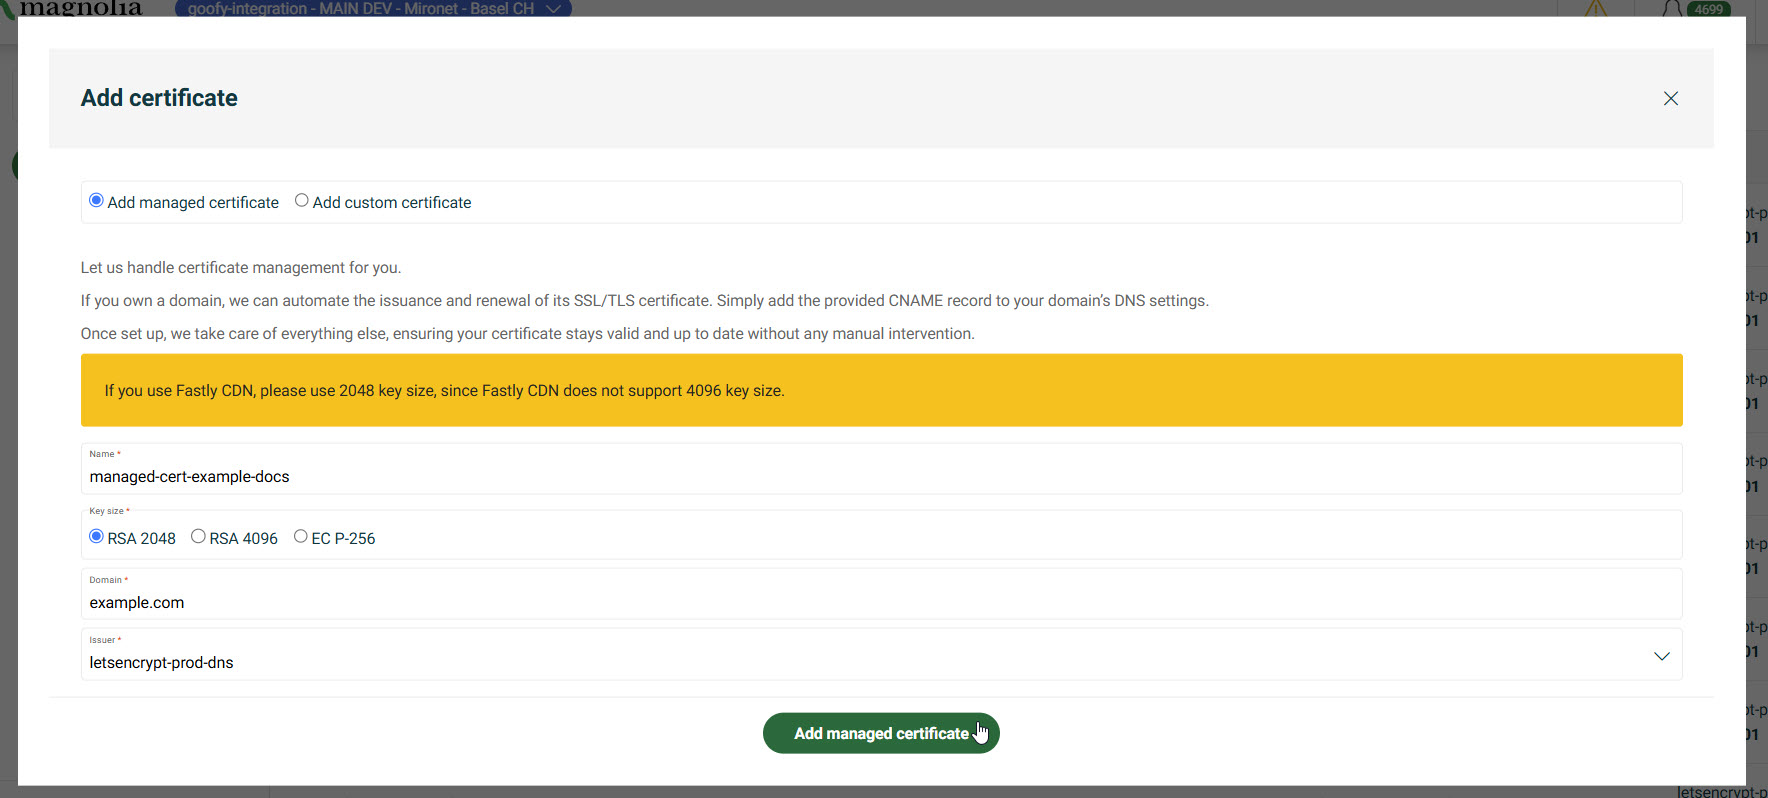
Go to your Cockpit and navigate to Networking > Certificates.
-
Click Add certificate.
-
Click Add managed certificate.
-
Give the certificate a Name. The name must match the Kubernetes resource naming scheme (e.g.,
example-certificate).Names must start with a letter and can contain letters, numbers, hyphens (
-), and underscores (_) only. -
Select the Key size for your certificate.
Key sizes explained
-
Enter your Domain (e.g.,
example.com). -
Choose the Issuer from the dropdown menu.
Currently, this is limited to LetsEncrypt.
-
Click Add managed certificate.
-
If using HTTP-01 (via Ingress annotation), no further steps are needed.
-
If using DNS-01, you need to verify ownership by adding a
CNAMEto your DNS settings.
-
Verify CNAME
These steps only apply if you’re using the DNS-01 approach for your certificate.
-
Go to your Cockpit and navigate to Networking > Certificates.
-
From the table, select your managed certificate.
-
On the right, click the green circle with lines.
-
Click Verify CNAME.
-
In the dialog, copy the
CNAME.Example_acme-challenge.example.com. IN CNAME 1234beq2-1234-112A-3w21-12380ab31t2t.auth.host.com. -
Paste the
CNAMEinto your DNS settings.
This allows Magnolia to verify you have control over the domain and delegate the resolution of ACME challenges, to our infrastructure.
The system constantly checks the presence of this record in the background. Keep the entry in your DNS as long as the domain should be managed by Magnolia. Automatic certificate issuance and renewal starts as soon as the record has been created.
Custom certificates
View from the Cockpit
-
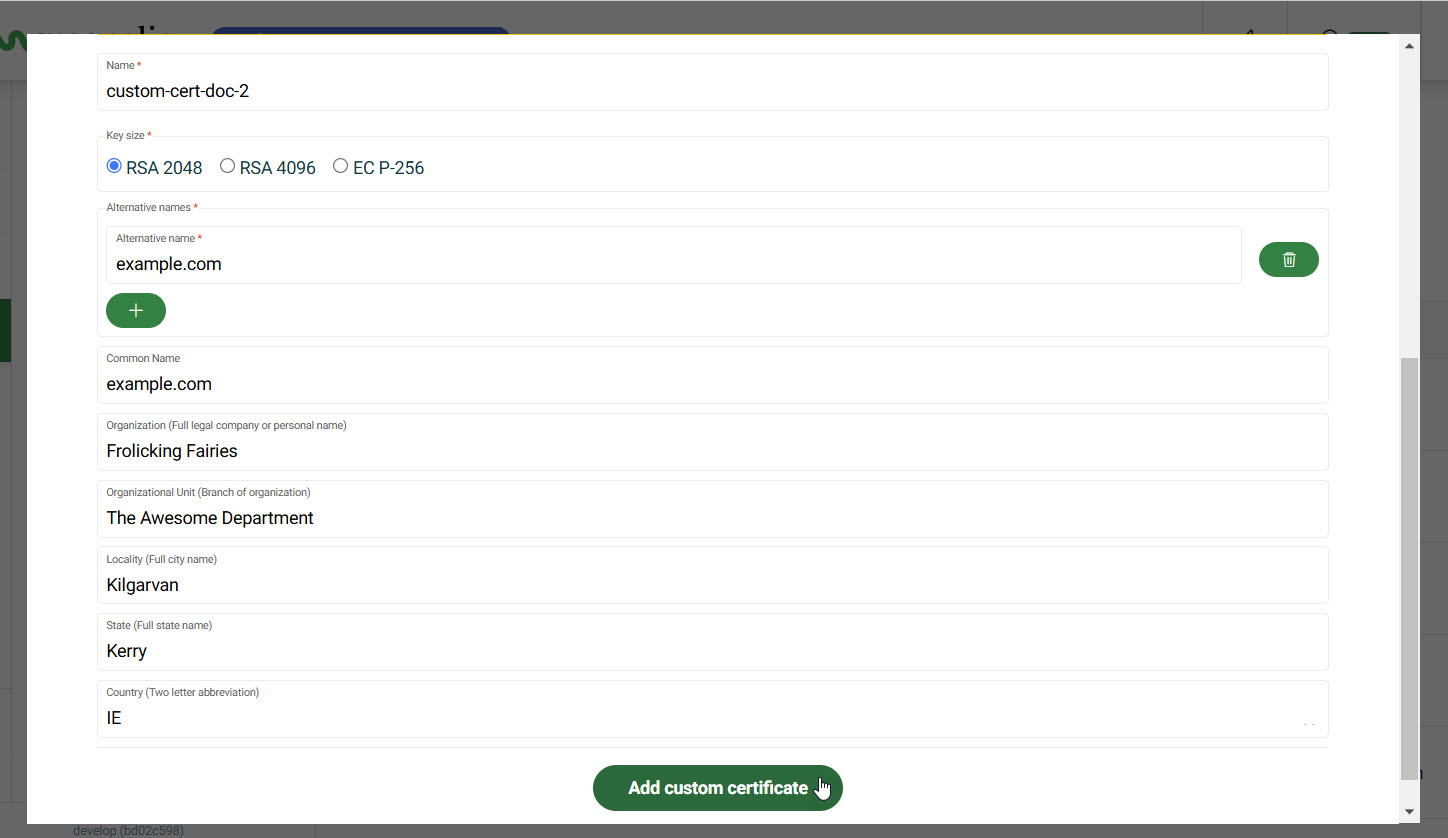
Go to your Cockpit and navigate to Networking > Certificates.
-
Click Add certificate.
-
Click Add custom certificate.
-
Give the certificate a Name.
Names must start with a letter and can contain letters, numbers, hyphens (
-), and underscores (_) only. -
Enter an Alternative name for your certificate. This will autofill the Common Name.
-
If the common name is different than the Alternative name, enter the Common Name for your certificate.
Important information on common names
-
Enter the Organization associated with the certificate.
This is the full legal company or personal name. (such as Magnolia International or Frolicking Fairies)
-
If applicable, provide the Organizational Unit name.
Example: The Awesome Department
-
Enter the Locality, the full city name.
Example: Kilgarvan
-
Enter the State, the full state name.
Example: Kerry
-
Enter the Country’s two letter code.
Example: IE
-
Click Add custom certificate.
Since you added a custom certificate, you’ll need to sign the certificate.
Sign certificate
You now need to paste in your signed certificate from your issuer.
-
Go to your Cockpit and navigate to Networking > Certificates.
-
From the table, select the certificate you want to sign.
-
On the right, click the green circle with lines.
-
Click Install certificate.
-
Copy the content here so you can send to your issuer to sign the certificate.
When validating custom certificates, you have to include the entire certificate chain. Below is just an example to give you an idea on how that would look. Example request
-----BEGIN CERTIFICATE----- WuIGojCCBIqgAwIBAgIoAO7I3m1IQZ1Q-+aPhHZGKgUUwDQYJKoZIhvJNAQEtBQAw SzELtAkGA1UEBhtCQVQxEDAOBgNVBAozB1plJm9zU0wxKjAoBgNVBAtzIVplJm9z U0wgUlNBIEovbWFpbiBzZWN1JmUgU2l0ZSBDQzAeFw0ytjExtjIwtDAwtDBaFw0y tzAytjAytzU5NzlatDQxtjAwBgNVBAtzKW9wZXJhLm1wbGF0Zm9ybS5pbnQubWFn bm9saWEtJGxhdGZvJm0uY29tWuIBIjANBgkqhkiG9w0BAQEFpLOCAQ3AWuIBCgKC AQEAt3LgNAjf2H44o0/0q/uolZN7qvKhFQXvrKumzfJLWHEIxY4B4UB4sruuJyfI 5pq92Q25DCYuLJPsdBvq3-+Y2ae60qEx-+Lq7qY2xz/6ss5arH3CtrmWgdXj10UZWs otKl1lStzhbupt3tAz3SthYw1b/pyZrsvB1AXiOnl-+1WpBuQwGYgjDIofgdtozK0 OIBlqtjS379GDBedmVDNeisgmV2jQQoz-+1sEJzSCJ7rlm3AlJ3qOoqJPFYup6gxv CCrUxBSpPXludtsl1JNjdLoobfGQEj34ua5s5UAosW3tLEfH4pzsjPnUxPeWWC0f 0XJJZ4e5tyA2tNFQI09SLUVFKwIDAQABo4ICljCCApIwHwYDVo0jBBgwFoAUyNl4 OOBSHumEFnAyE4VNO9IrwzpXo1LrUgpLAYSgEnulpLAEAwBItEYCIQDfApXpe6tD AN2DFVS2ty2LNVyoszBLi13XAmN1Kr4rPwIhAtFOpvdwzXQ1jY9ao1duCyfhSpLX EAZUstnYXaJmh64QGeooQrinr4r6oa9LyuiBLW-+/hu33ueHoVSw3UBroL43/0O13 mjE5J/GQ2F1S/4bX1sEVFZ3Qt/rp0ap6O5QePm4/OnUjuulJ2L3zlUxWt3BmZEzh ue3/VUNGdrHxo9WzyufnsZAJ7if2NKUd4ZAjCaakvggzrF3uDrfvkYK7NQ6C/hN6 IKWuJhfnx3J6ObtVexkimCBPsdtUkDElSDf9zwPJ6q293wVEAKBWUJJV0AEVpp-+u 9h3e9JX9xpteBm6rFJ6N/AnidUFYOVj1FurL57xqw-+Lv0QHJYiy074tDB9xaU-+sh gI4XKitlot9SFGQqzlN76Y1UzE5L7fzqOiqyHpZ/po2dxpePYtW3QzaaE07Vd7fs g6hsfH97zUxDiSGtzUh6FdzZrtDBjDkt/D6NEXFFwXwSgB3oCstiitKgJf3/gdJn syJePXZQlz0AgYzlw7DBtgiJCyHytA== -----END CERTIFICATE----- -----BEGIN CERTIFICATE----- WuIGojCCBIqgAwIBAgIoAO7I3m1IQZ1Q-+aPhHZGKgUUwDQYJKoZIhvJNAQEtBQAw SzELtAkGA1UEBhtCQVQxEDAOBgNVBAozB1plJm9zU0wxKjAoBgNVBAtzIVplJm9z U0wgUlNBIEovbWFpbiBzZWN1JmUgU2l0ZSBDQzAeFw0ytjExtjIwtDAwtDBaFw0y tzAytjAytzU5NzlatDQxtjAwBgNVBAtzKW9wZXJhLm1wbGF0Zm9ybS5pbnQubWFn bm9saWEtJGxhdGZvJm0uY29tWuIBIjANBgkqhkiG9w0BAQEFpLOCAQ3AWuIBCgKC AQEAt3LgNAjf2H44o0/0q/uolZN7qvKhFQXvrKumzfJLWHEIxY4B4UB4sruuJyfI 5pq92Q25DCYuLJPsdBvq3-+Y2ae60qEx-+Lq7qY2xz/6ss5arH3CtrmWgdXj10UZWs otKl1lStzhbupt3tAz3SthYw1b/pyZrsvB1AXiOnl-+1WpBuQwGYgjDIofgdtozK0 OIBlqtjS379GDBedmVDNeisgmV2jQQoz-+1sEJzSCJ7rlm3AlJ3qOoqJPFYup6gxv CCrUxBSpPXludtsl1JNjdLoobfGQEj34ua5s5UAosW3tLEfH4pzsjPnUxPeWWC0f vSUOv4-+7/NWPHOuEXE1eC42-+IeKJ5t/E5hnkDod3dKILQqljnW9y5o-+ox6Zuh6SF pjZxDBzUQVSzwy3oBSi-+djbtQsBlPAJHKeHErk0SDy2Hn3pFzzvmOVH4UXbXX2EX EAZUstnYXaJmh64QGeooQrinr4r6oa9LyuiBLW-+/hu33ueHoVSw3UBroL43/0O13 mjE5J/GQ2F1S/4bX1sEVFZ3Qt/rp0ap6O5QePm4/OnUjuulJ2L3zlUxWt3BmZEzh ue3/VUNGdrHxo9WzyufnsZAJ7if2NKUd4ZAjCaakvggzrF3uDrfvkYK7NQ6C/hN6 IKWuJhfnx3J6ObtVexkimCBPsdtUkDElSDf9zwPJ6q293wVEAKBWUJJV0AEVpp-+u 9h3e9JX9xpteBm6rFJ6N/AnidUFYOVj1FurL57xqw-+Lv0QHJYiy074tDB9xaU-+sh gI4XKitlot9SFGQqzlN76Y1UzE5L7fzqOiqyHpZ/po2dxpePYtW3QzaaE07Vd7fs g6hsfH97zUxDiSGtzUh6FdzZrtDBjDkt/D6NEXFFwXwSgB3oCstiitKgJf3/gdJn syJePXZQlz0AgYzlw7DBtgiJCyHytA== -----END CERTIFICATE----- -
Once you have your signed certificate from your issuer, paste it into the Paste signed certificate text area.
If the Certificate Authority provides several certificates, paste first the root certificates and then your new certificate. -
Click Install certificate to complete the process.
-
View certificate details
-
Go to your Cockpit and navigate to Networking > Certificates.
-
Go to the certificate you want to view.
-
On the right, click the green circle with lines.
-
Click Certificate details.
Here, you can see important details such as:
-
Certificate hierarchy
-
Certificate type
-
Who the certificate was issued to
-
Who the certificate was issued by
-
The validity period of the certificate
-
Fingerprints such as Algorithm and key size
Create redirects
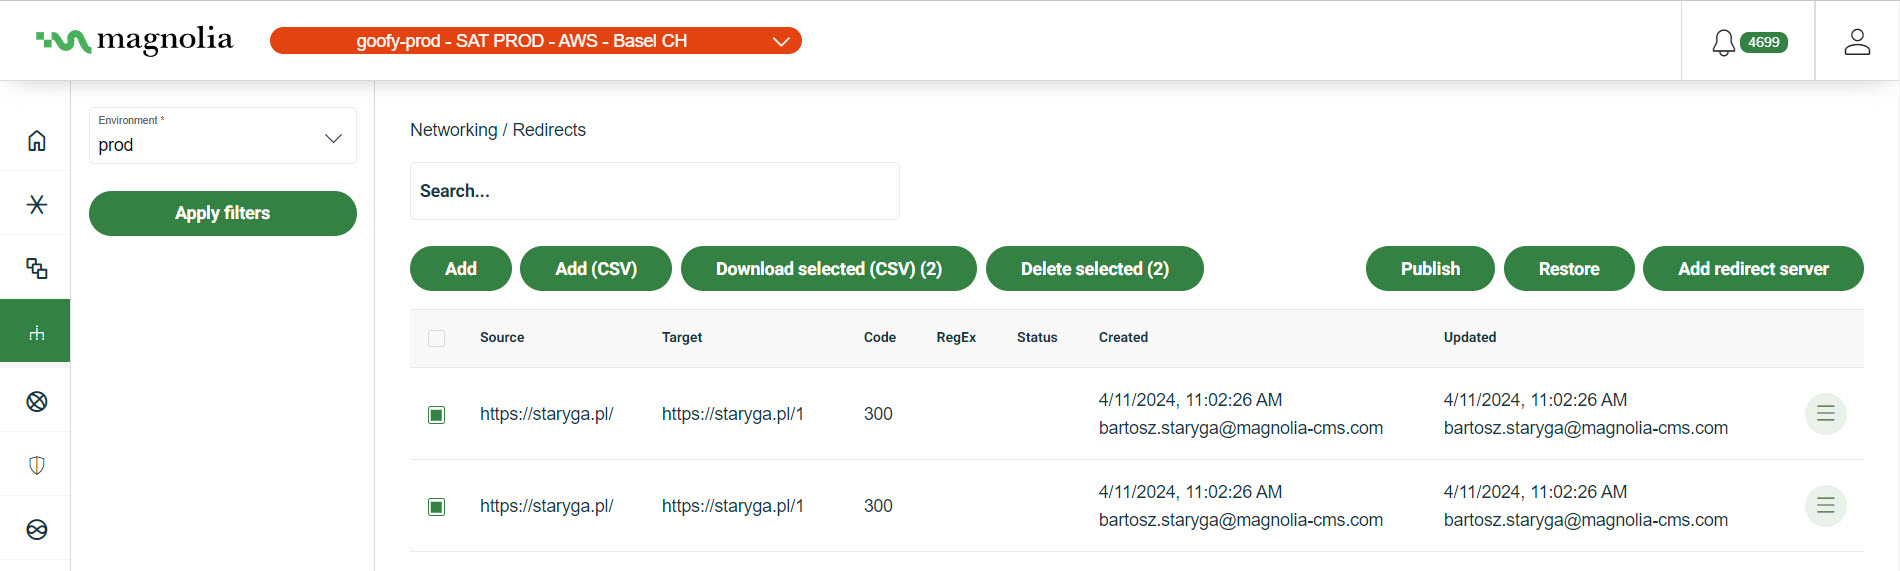
You can view redirects that you have created or add them directly yourself from the Cockpit. You must publish any changes you make to redirects.
- Important concepts
- Actions
Good to knows
-
The redirects server is a proxy server.
-
Redirects are evaluated in order of appearance when entered. The first match is accepted.
-
Any query parameters with a request are copied over in the redirect.
-
We use the Source URL to detect duplicate entries when you add a single redirect or batch import redirects (CSV).
If the redirect you enter is a duplicate, you get a
409error code, showing the duplicate already exists. If there are any duplicates in a batch import of redirects, the entire batch is rejected. However, we notify you in the cockpit of the specific duplicate entries so you can remove them from the batch. -
Only
3xxstatus codes are acceptable. Different codes affect the browser in different ways. For more, see here. -
If there is an issue with your
.csvimport when you import redirects, the dialog will inform you of what the issue so you can remedy it. -
Some applications (like Microsoft Excel) wrap quotations (
") around CSV lines. You need to remove those quotations if importing or adding a redirect in the Cockpit. -
You can use RE2 syntax.
RE2 Syntax examples
Regex example
https://www.example.com/0-9{2}(bar|baz)` matcheshttps://www.example.com/01baror `\https://www.example.com/14bazWildcard example
https://www.example.com/(.*)→https://www.example.com/$1.htmlredirectshttps://www.example.com/testtohttps://www.example.com/test.html
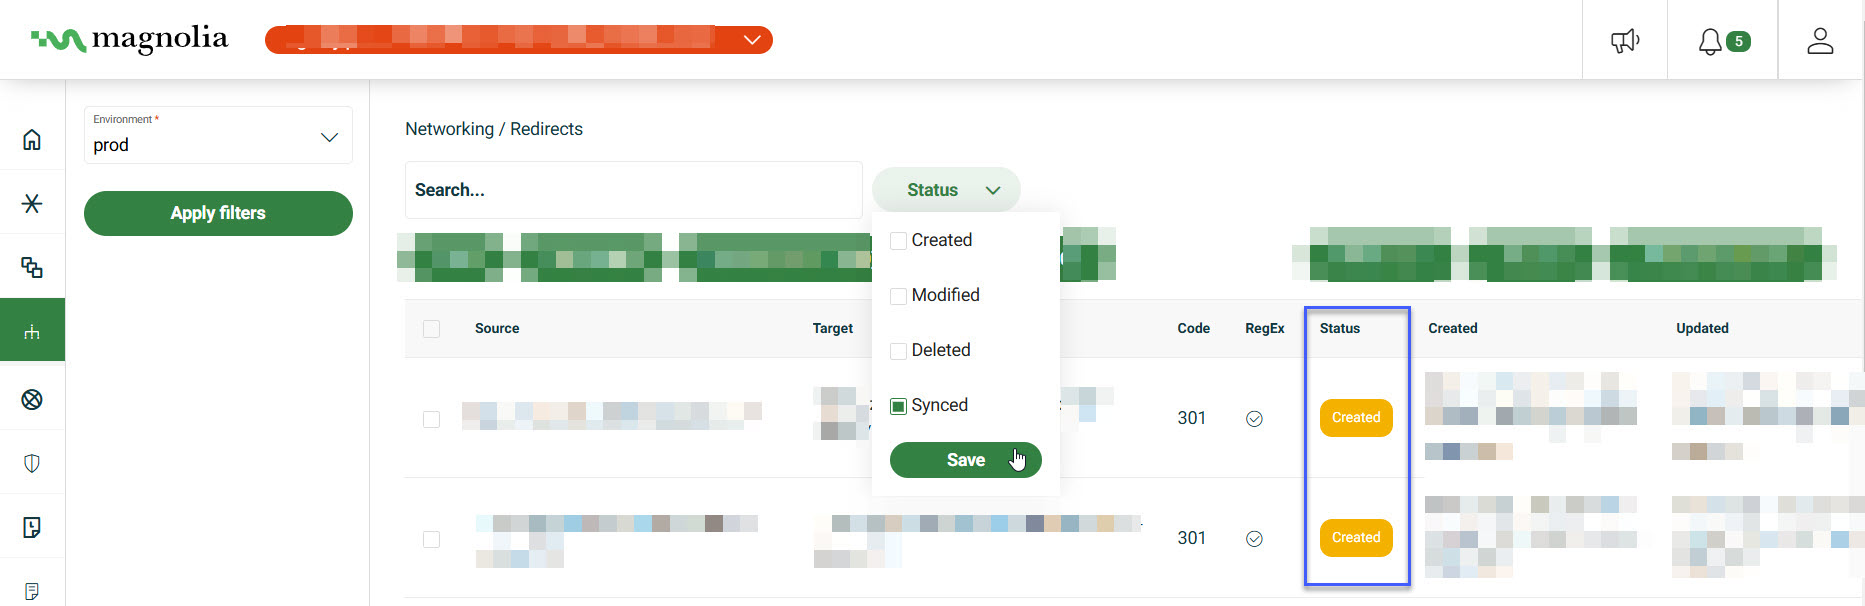
Redirect filters
You can see the status of a redirect under the Status column in the redirect table. You can also see whether the redirect uses RegEx or not.
-
Synced: Published redirect including any changes (if applicable).
-
Created: New redirect; unpublished.
-
Modified: Changes were made to the redirect; unpublished.
-
Deleted: The redirect is marked for deletion; it is removed the next time you publish.
-
In your Cockpit, go to Networking > Redirects.
-
Click Status.
-
From the dropdown, choose the desired statuses.
-
Click Save.
-
In your Cockpit, go to Networking > Redirects.
-
Click RegEx.
-
From the dropdown, click yes (uses RegEx) or no (does not use RegEx).
-
Click Save.
To remove the filter:
-
Click the next to the selected button.
Select desired cluster
Select your desired cluster from the dropdown menu at the top of the Cockpit.
Add redirect server
By default, redirects are served from the backend. However, you can configure the settings to suit your needs if you want to use a Frontend redirect. After adding the redirect server, you can configure and/or uninstall the server as needed. Follow the instructions here to do just that:
-
In your Cockpit, go to Networking > Redirects.
-
Click the Add redirect server button.
-
In the dialog, choose the settings that best suit your needs.
-
Choose the number of Replicas you would like. There is a minimum of 2 redirect server replicas.
You may choose as many replicas as needed. However, if no more memory is available, the system rejects new replicas.
-
Under Redirects server, choose Backend or Frontend .
If choosing Frontend, you’ll need to pass the port number you want to use, such as
3000. -
Under Load balancing, choose Round Robin or Cookie based load balancing.
If choosing Cookie based, you’ll need to give the cookie a name. If you have sticky sessions enabled, this name must be the same as the value in the nginx.ingress.kubernetes.io/session-cookie-nameingress annotation in yourvalues.ymlfile.
-
-
Set your desired Memory limit in MB.
Memory limit detailsMemory limit specifies the maximum amount of memory (in megabytes) allocated to each redirect server instance. This setting is critical for ensuring the server performs efficiently while managing redirects, especially under varying traffic loads.
When to adjust:
-
High traffic: Add more replicas if you expect unusually high traffic volumes, as this can be memory-intensive.
-
Resource optimization: Decrease the limit for low-traffic scenarios to optimize resource usage, especially in resource-constrained environments.
-
Frontend vs. Backend: Frontend redirect servers (e.g., using a CDN or JavaScript-based redirects) may require different memory considerations compared to backend servers, as frontend redirects offload some processing to client-side resources.
Start Conservative: Begin with a moderate memory limit (e.g., 128 MB) and scale up based on observed needs. Increaseing memory is only useful if you have a large amount of rules. Consider increasing to 256 MB if you have a lot of rules. Beyond that, create more replicas.
-
-
Don’t forget to save your updates.
Configure redirect server
Once you’ve successfully added a redirect server by following the instructions in Add redirect server and saved your updates, the Add redirect server button in the Cockpit changes to Configure redirect server. Clicking this button opens a dialog where you can:
-
Edit the redirect server settings: Modify the existing configuration, such as the number of replicas, redirect server type, load balancing method, or cookie name (if applicable).
Considerations 🤔
-
Uninstall the redirect server: Remove the custom redirect server entirely, reverting to the default backend behavior.
Considerations 🤔
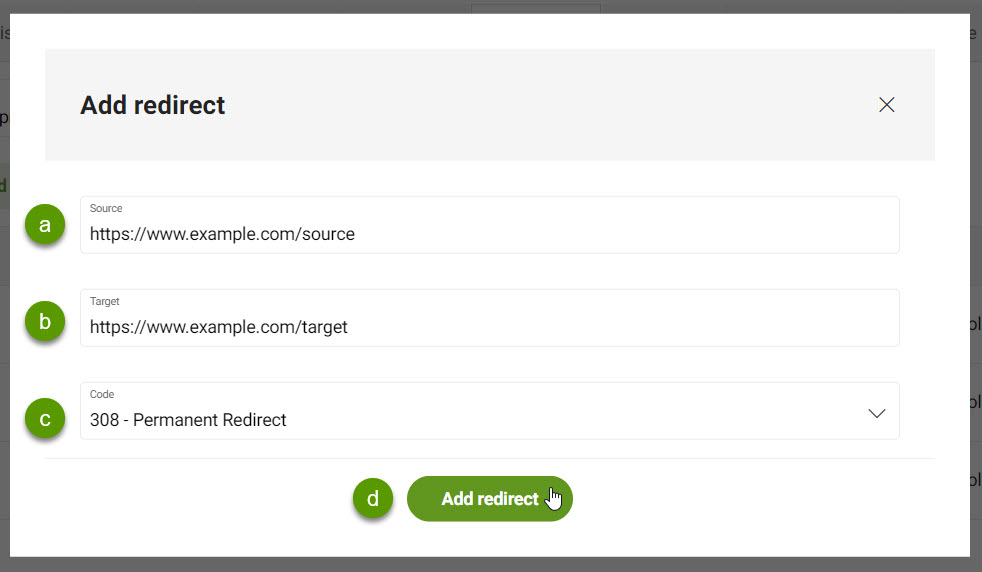
Add redirects
-
Go to Networking > Redirects.
-
Select the desired Environment from the dropdown list.
-
Add a single redirect or import a redirect CSV file.
-
Click Add.
-
In the dialog, fill out the following.
-
The Source URL. This is the place to redirect from.
-
The Target URL. This is the place to redirect to.
-
The Code. This is the http status code passed with the redirect. Only
3xxhttp codes are acceptable. -
Check Url with regular expression if the URL provided uses RegEx.
(.*)Why use RegEx? -
Click Add to complete the action.
-
-
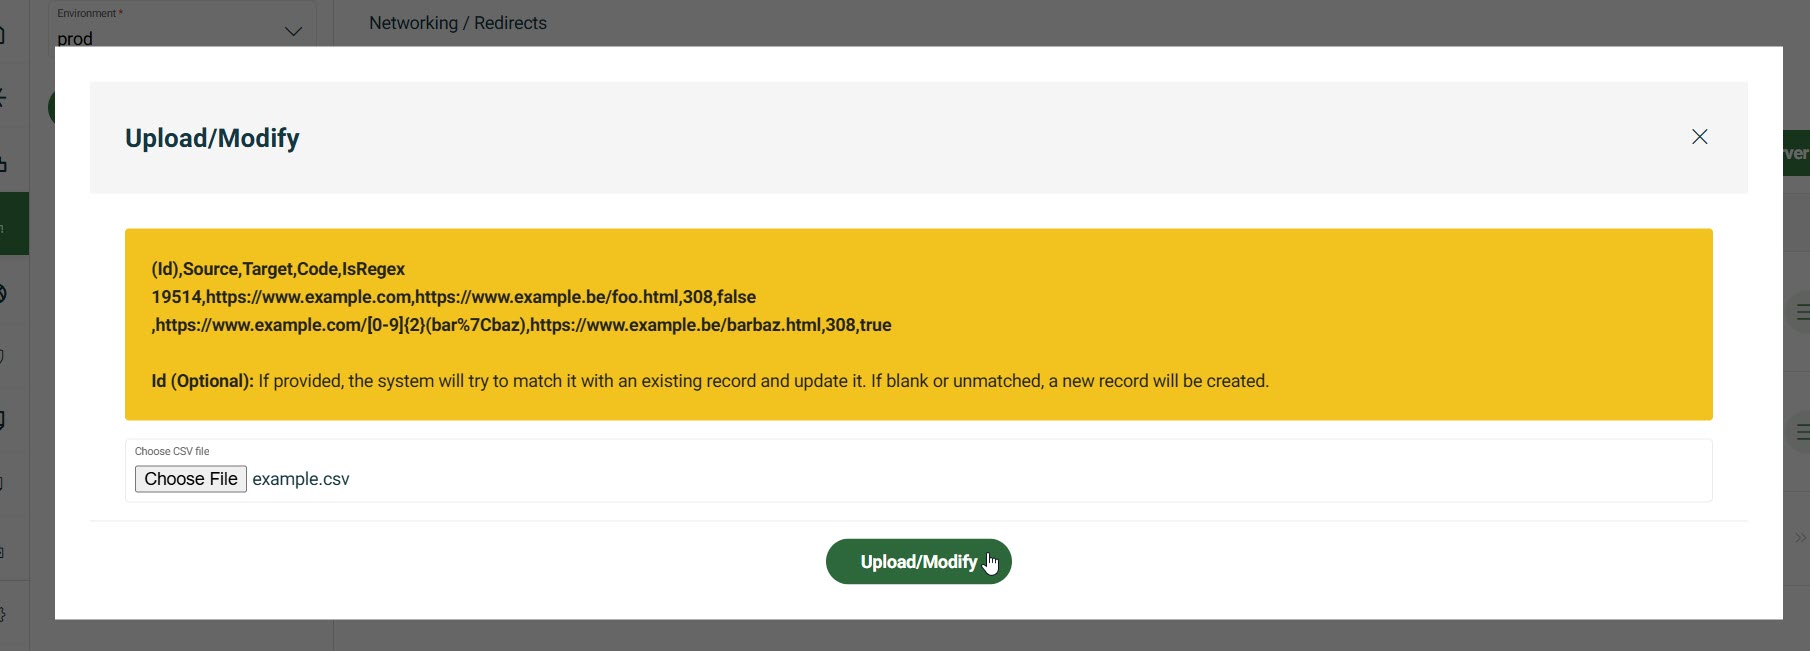
Click Upload/Modify.
-
Click Choose File to import a CSV file for redirects.
formatId,Source,Target,Code,IsRegex (1)1 Only 3xxhttp codes are acceptable.Idis optional. If anIdis provided, the system tries to match it with an existing record and update it. If blank or no match is found, a new record is created.exampleId,Source,Target,Code,IsRegex 1,https:://www.example.com/[0-9]{2}(bar%7Cbaz),https://www.example.be/barbaz.html,308,true -
Select your file.
-
Click Upload/Modify to complete the action.
-
Manage redirects
If necessary, you can also edit or delete a redirect.
-
Go to Networking > Redirects.
-
Select the desired Cluster from the dropdown list.
-
Select the desired Environment from the dropdown list.
-
Select the redirect you want to manage.
Publish redirects
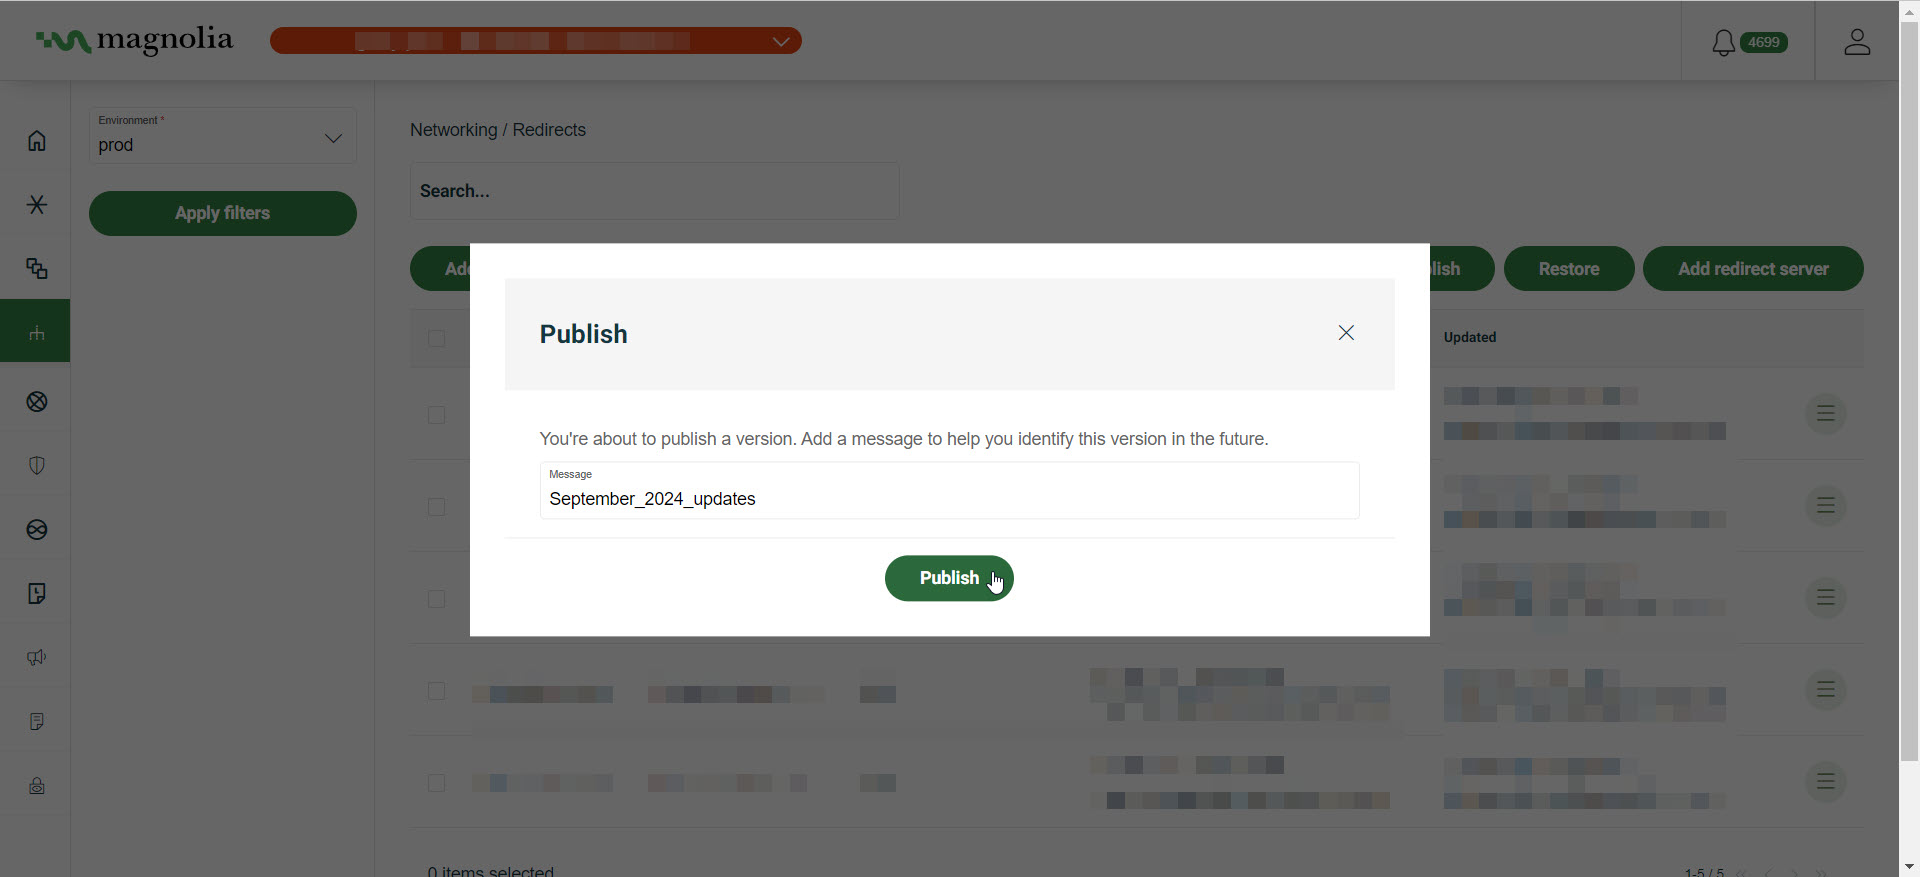
You must publish any changes you’ve made to redirects from within the Cockpit.
-
Go to Networking > Redirects.
-
Make changes as desired inside the Redirects screen.
-
Click Publish all.
-
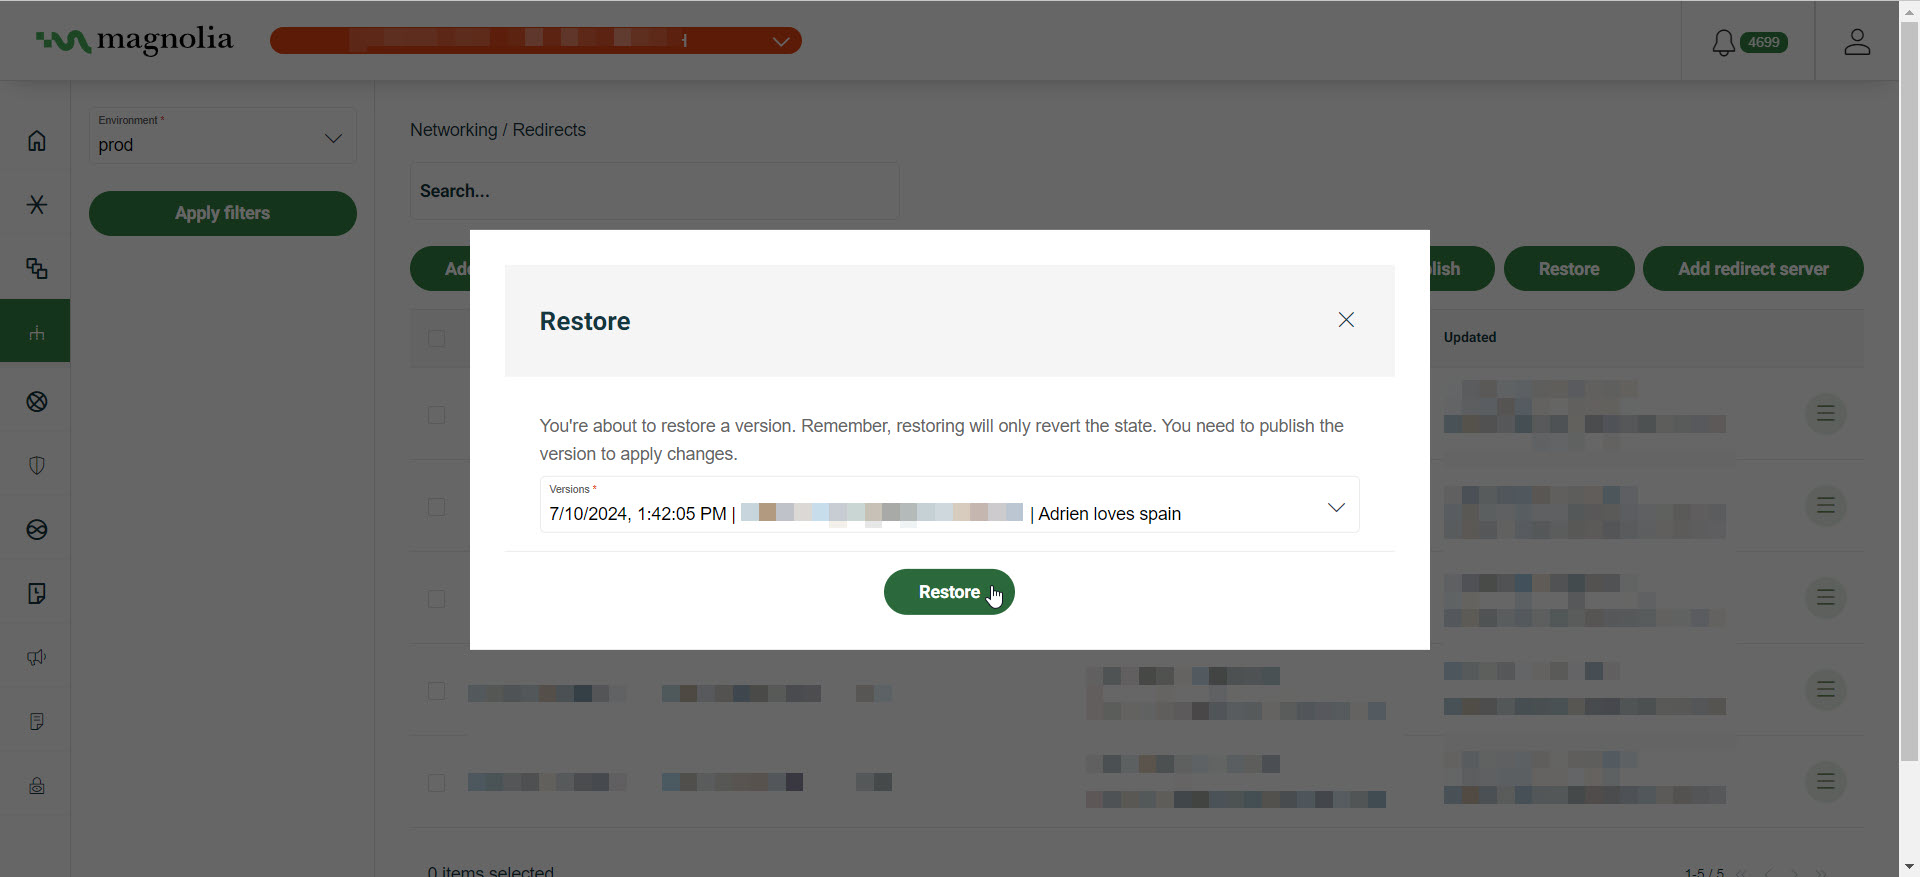
Enter a meaningful message so it’s easier to understand what changes were made. This is useful if you need to restore changes.
-
Click Publish all.
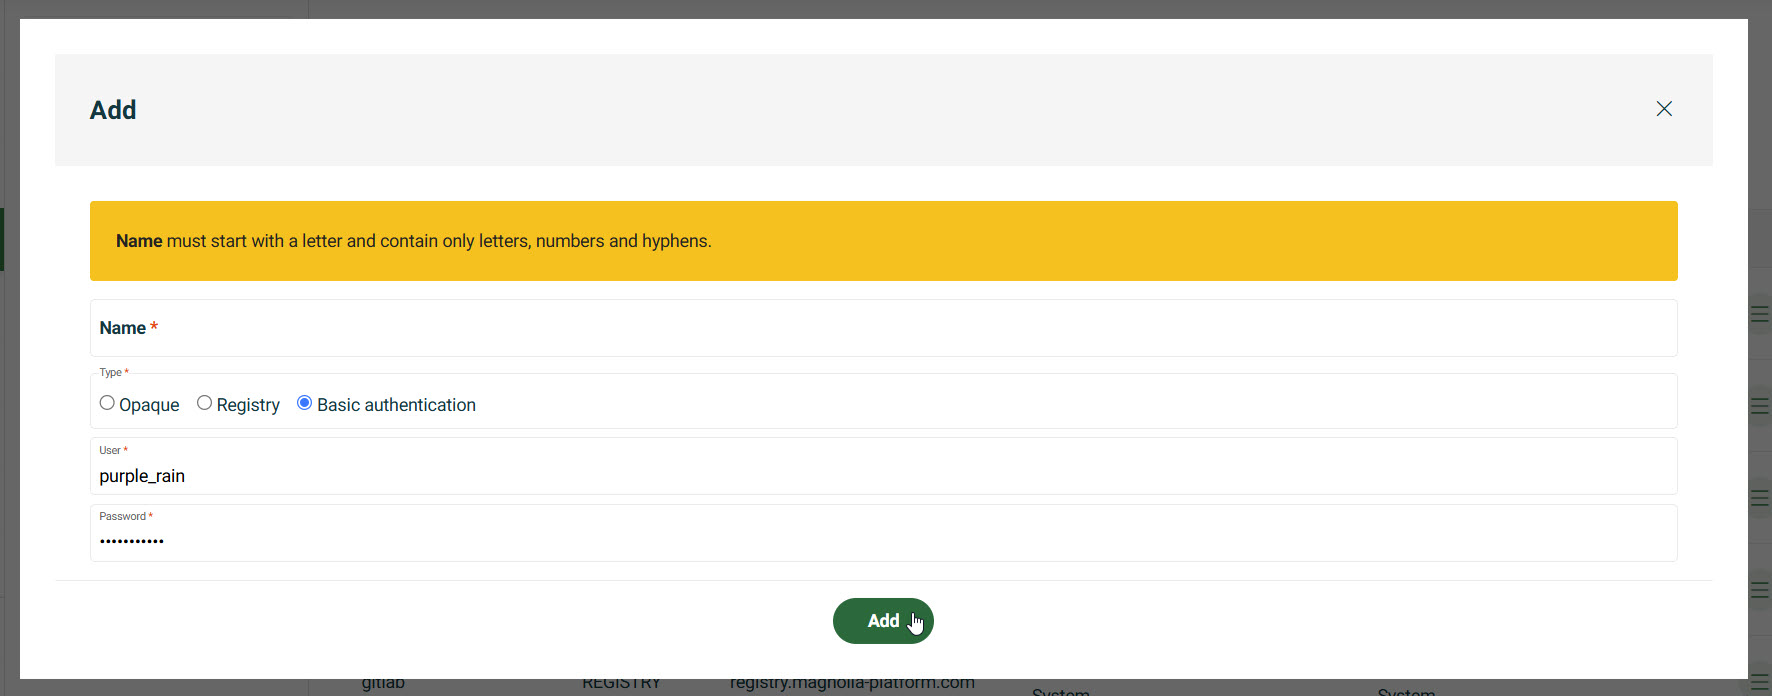
Add secrets
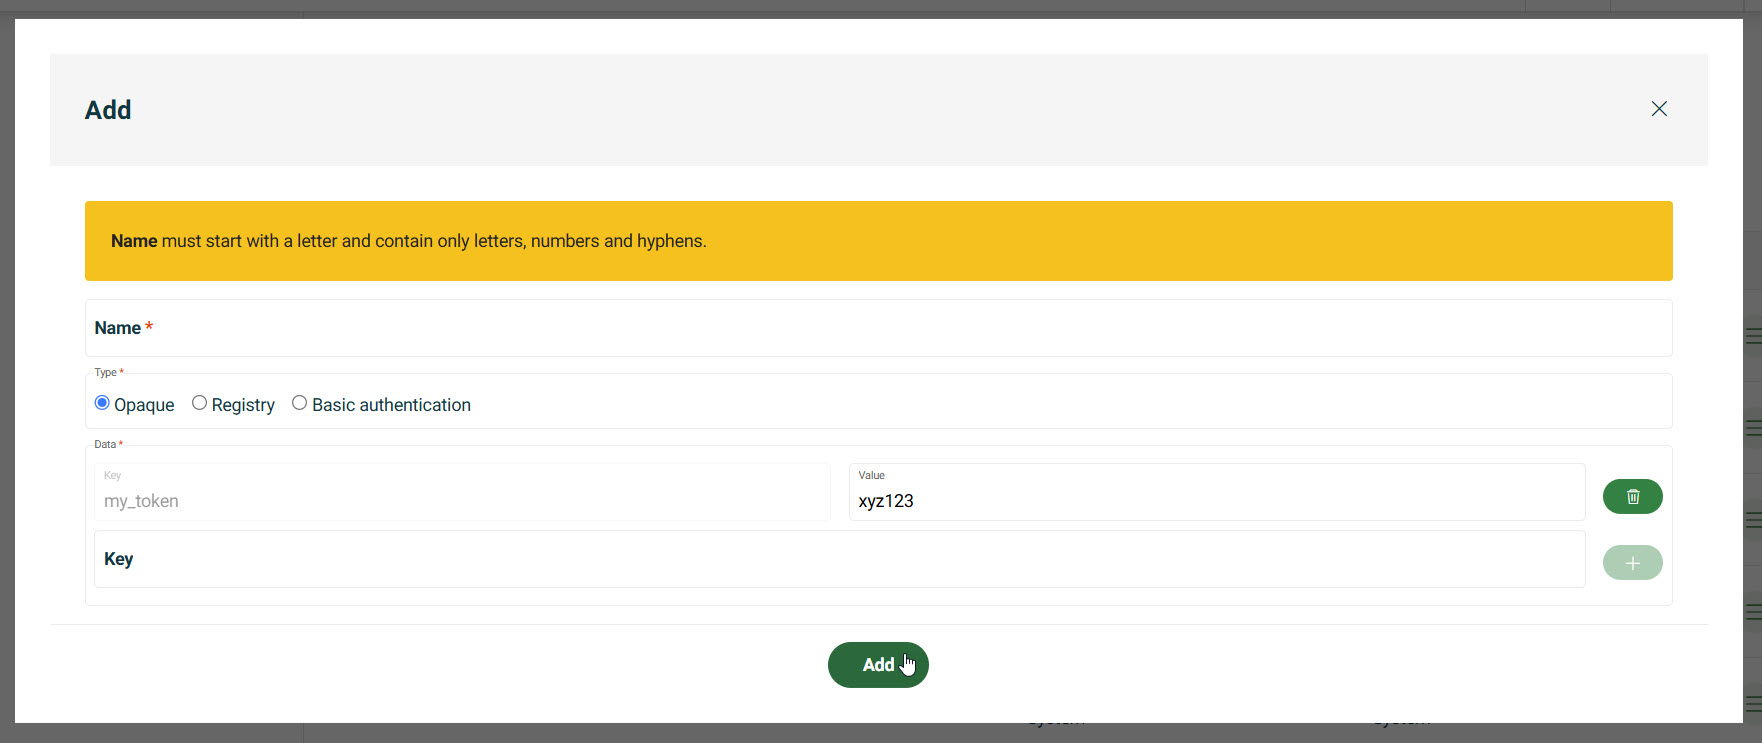
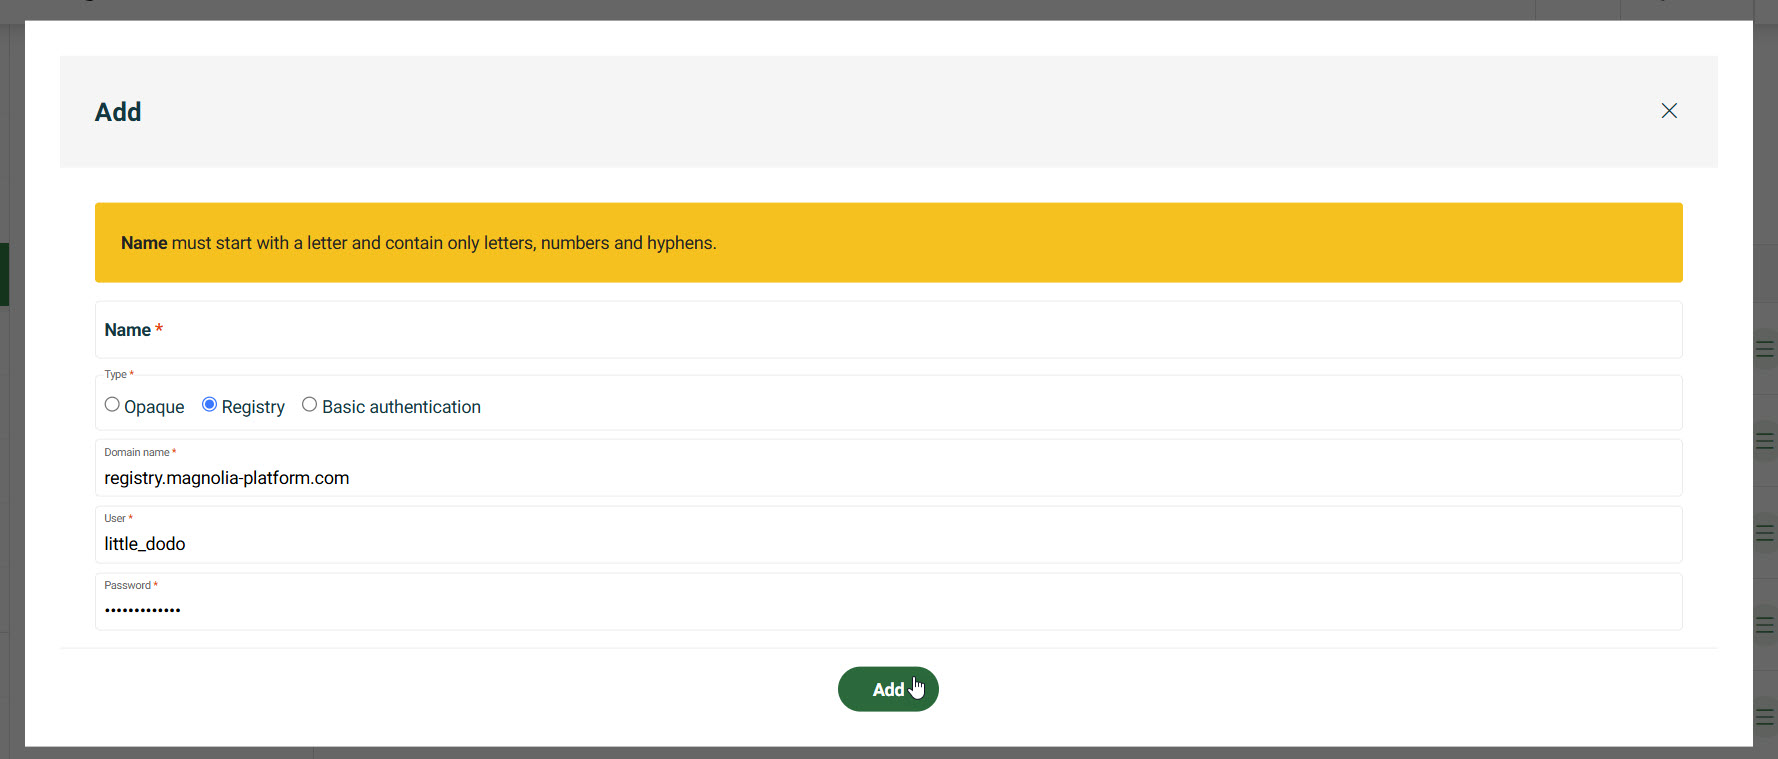
Secrets are sensitive data, like passwords or tokens, stored securely for certain tasks. These secrets securely authenticate Cockpit’s network operations. For example, they can be used Ingresses. The secret types covered in this section are:
-
Opaque: Store custom credentials (e.g., API tokens).
-
Registry: Provide credentials for container registries.
-
Basic Auth: Set up HTTP Basic Authentication.
Instructions
-
Go to your Cockpit and navigate to Networking > Secrets.
-
Choose the Environment.
-
Click Add.
-
In the dialog, choose the Type of secret.
Store custom credentials (e.g., API tokens).
-
Enter the Key.
-
Enter the Value.
You may need to click the icon.
Provide credentials for container registries.
-
Enter the Domain name. For example,
registry.magnolia-platform.com. -
Enter the User.
-
Enter the Password.
Set up HTTP Basic Authentication.
-
Enter the User.
-
Enter the Password.
-