Marketing Tags app
The Marketing Tags app is a central place to manage marketing tags such as Web analytics, third-party content and advertising network code snippets. The app allows you to create tags and place them on pages.
Since many of these tags require cookies to work, you can also link tags to cookies defined in the Cookies app.
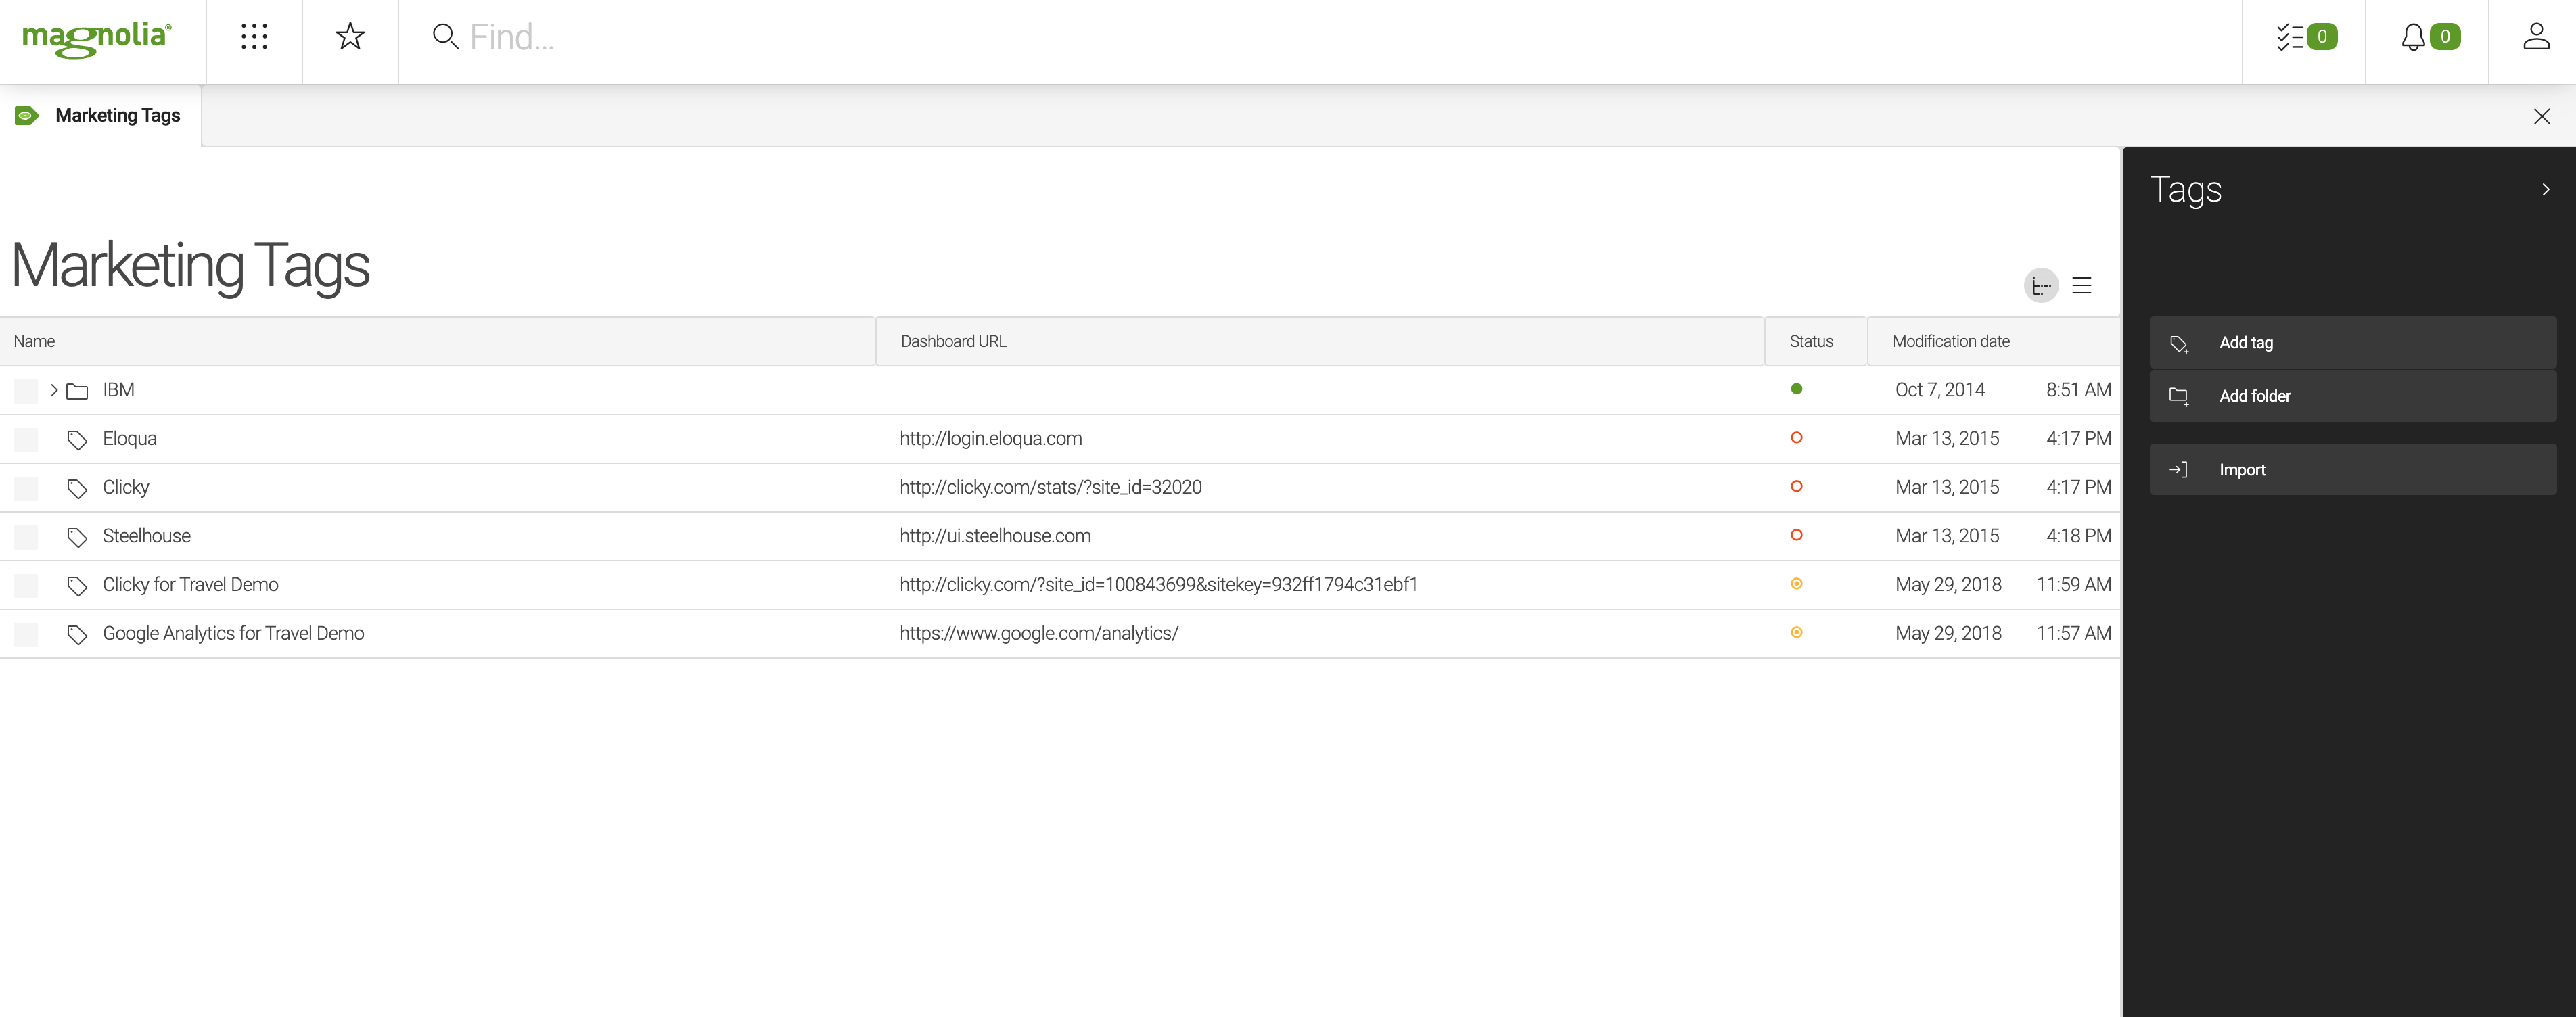
The app manages marketing tags, which are different from content tags. Content tags are keywords or terms assigned to an item of content and are managed using the Tags app.
Marketing tags
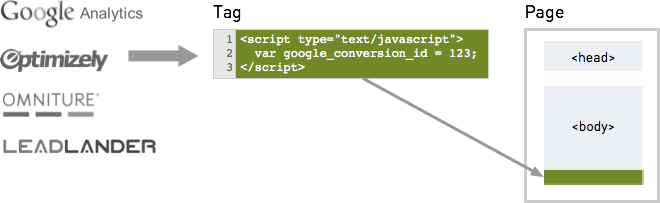
Marketing tags are snippets of code that you insert on Web pages. Tags typically collect analytics information such as how many visitors view the page and how long they stay. Tags can also integrate third-party content such as social media on your site or insert ad campaigns. You can use tags to learn more about visitors or provide content.
A tag is typically a piece of JavaScript code. When a page loads, the JavaScript code runs and collects usage information about the page and the visitor. The tag then reports this information to the service that provided the tag. The service stores and analyzes the information.
| If the service provides an analytics dashboard, you can display it in the Marketing Tags app. |
Since many of these tags require cookies to work, you can also link tags to cookies defined in the Cookies app. By linking tags to cookies, you can make sure the tags used on your website comply with data privacy rules.
For more information about what marketing tags are and how they are used, see:
Configuration
The Marketing Tags app is installed by the Marketing Tags module. The app is configured in /modules/marketing-tags.
Workspace
The app operates on the marketing-tags workspace where the code snippets and their details are stored.
Node types
The Marketing Tags module registers a custom mgnl:marketing-tag node type. The Marketing Tags app operates on nodes of this type.
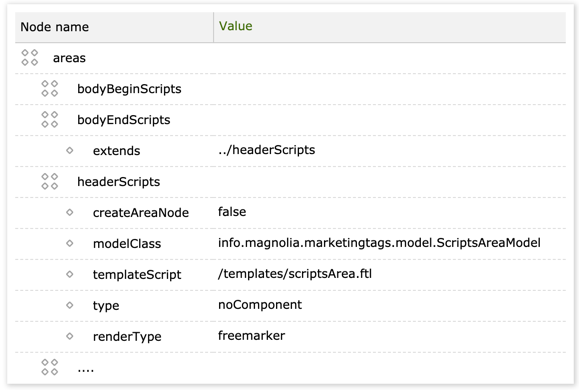
Page areas
The module inserts marketing tags into three alternative page areas: bodyBeginScripts, bodyEndScripts and headerScripts. To function correctly your page templates should contain these areas.
Example: DX Core Travel Demo prototype in Site app /travel/prototype/areas.
| Property | Description | ||
|---|---|---|---|
|
required Area definition within a page template |
||
|
optional, default is When set to |
||
|
required Use |
||
|
required
|
||
|
required
|
||
|
required on Blossom* Renderer to use. Magnolia supports the
|
- Here’s
scriptsArea.ftl
[#assign areaModel = model!]
[#list areaModel.tags as tagNode]
    [#assign tag = cmsfn.asContentMap(tagNode)]
    [#if (cmsfn.publicInstance || tag.activeAuthor!false) && tag.content?has_content]
        ${areaModel.preRender(tag)}
    [/#if]
[/#list]
Setting tag properties
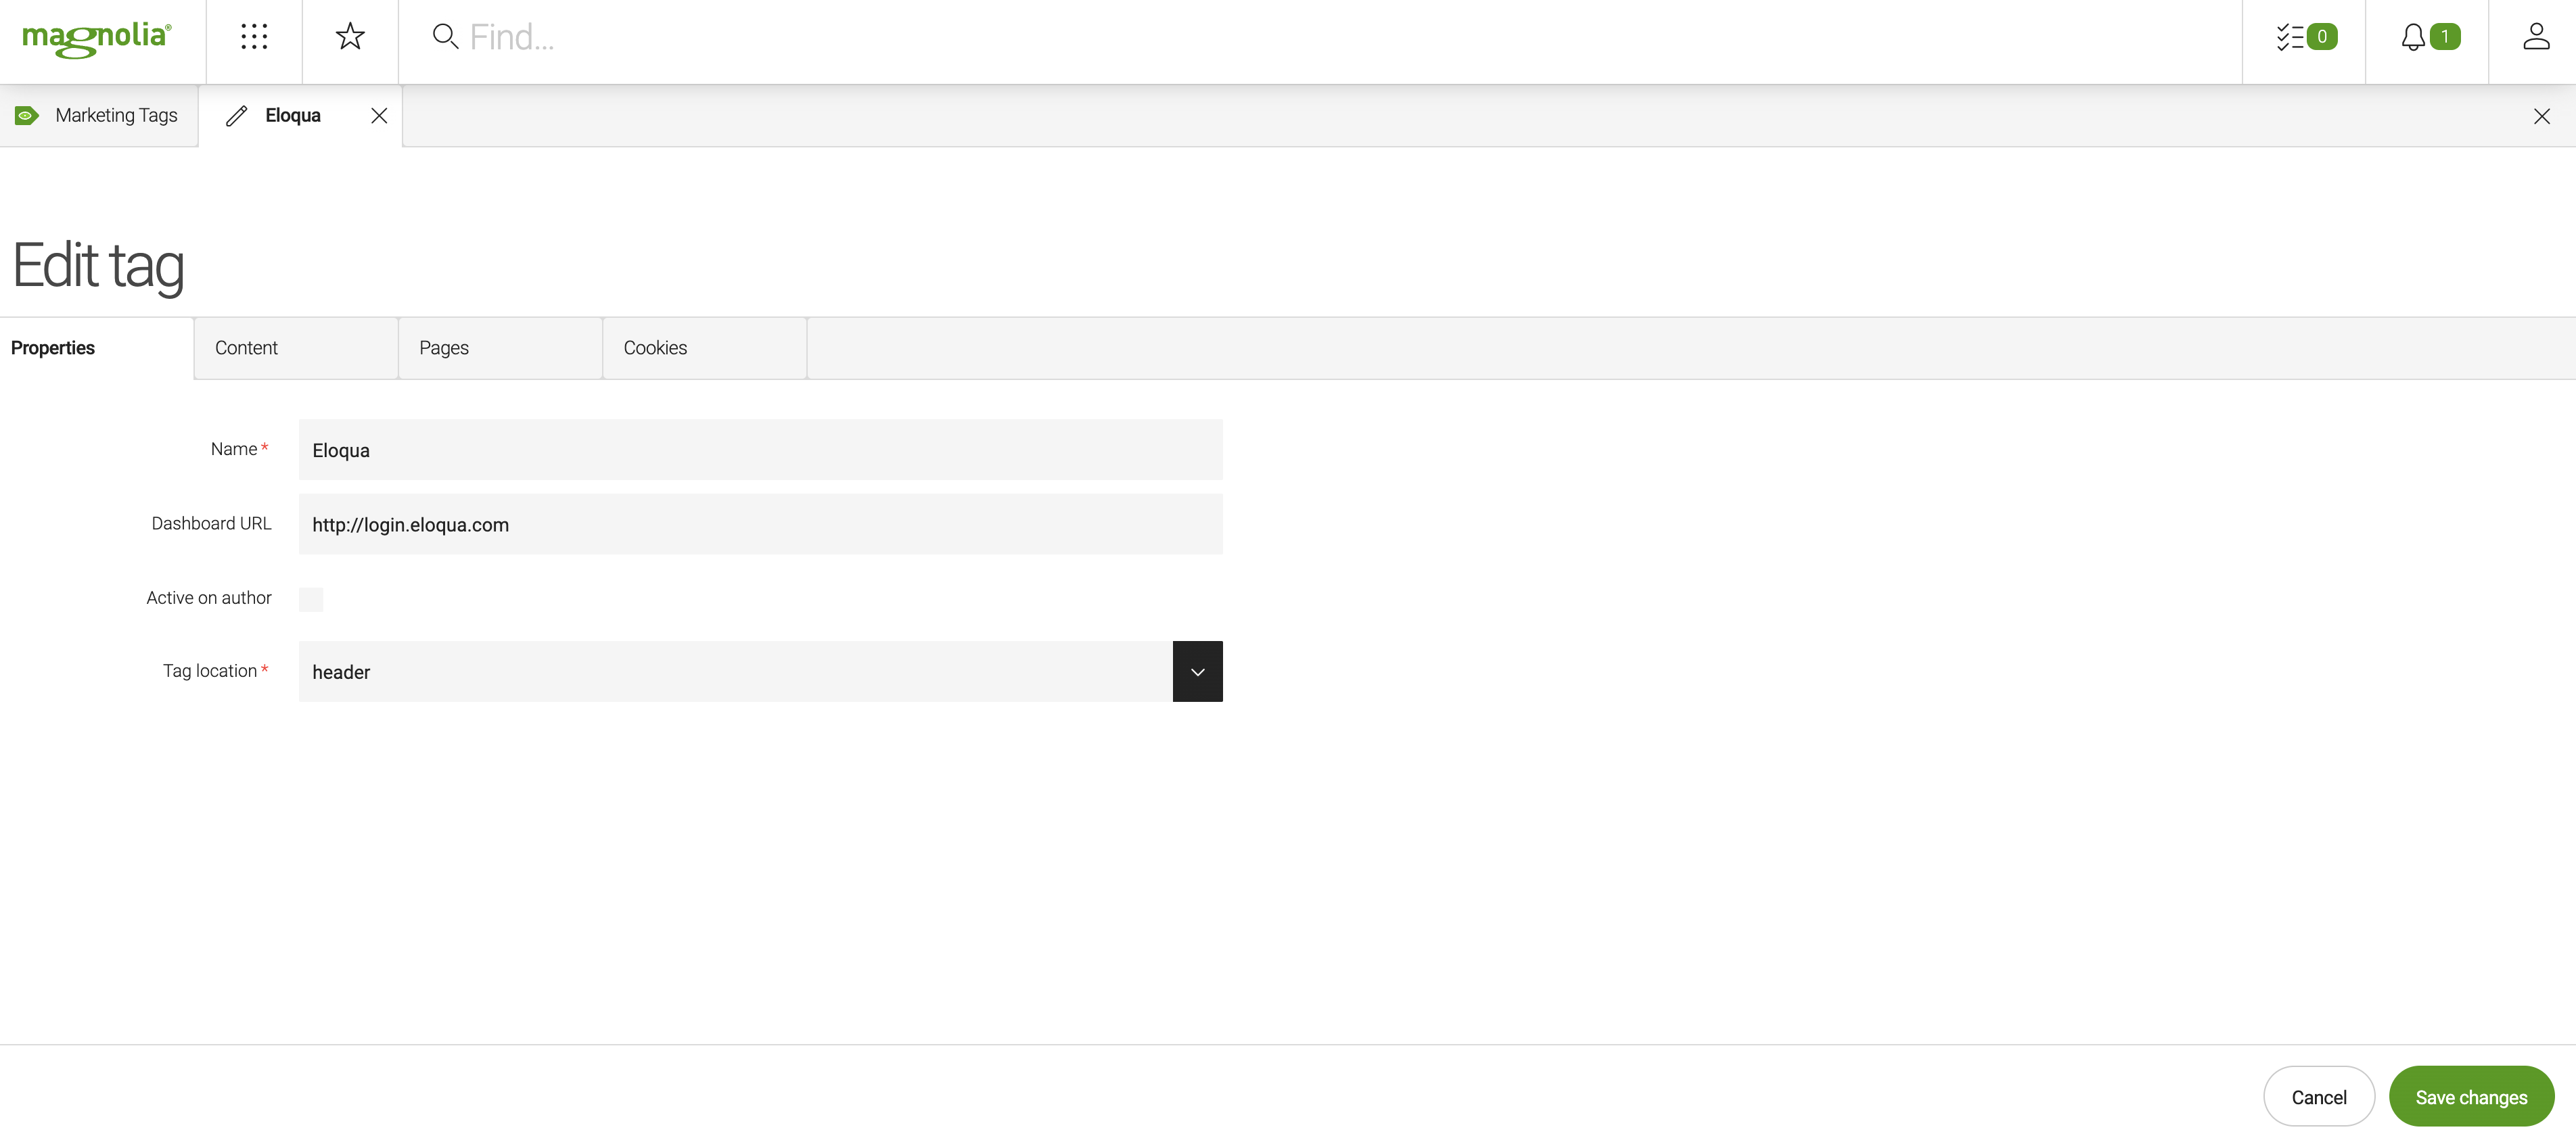
In tag properties, define a name for the tag and indicate where in page HTML it should be inserted. Usually, the provider of the tag specifies where the tag should be added. If not specified, the safest is probably the head element. If the tag takes a long time to load and delays page rendering put at the end of the body. Optionally you can also define a dashboard URL for viewing the information collected by the tag.
Fields:
-
Name: Name the service that provided the tag such as ``Google Analytics''.
-
Dashboard URL: Address of an analytics dashboard provided by the tag service. A dashboard reports the information collected by the tag.
-
Active on author: Check the box to insert the tag on pages also on the author instance. You may want to do this during development and testing so you can see the tag while using the Page Editor. Tags should typically only be inserted on the public instance.
-
Tag location: Where to insert the tag in the page HTML. There are three options:
-
head: inside the
<head>element -
beginning of the body: right after the opening
<body>element -
end of the body: right before the closing
</body>element
-
Setting tag content
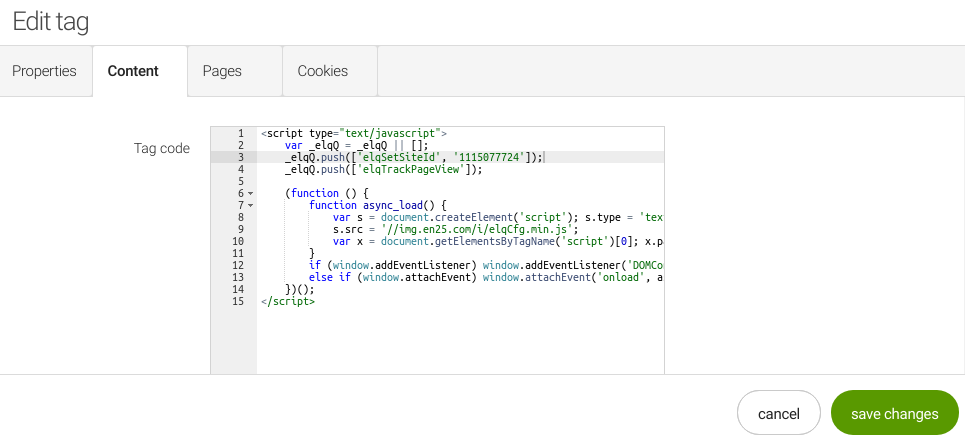
Tag content is typically a piece of JavaScript code. Some tag providers refer to it as a tag, others as a snippet or hook. Paste the code provided by the service into the box. Magnolia inserts the code on the pages you choose on the Pages tab.
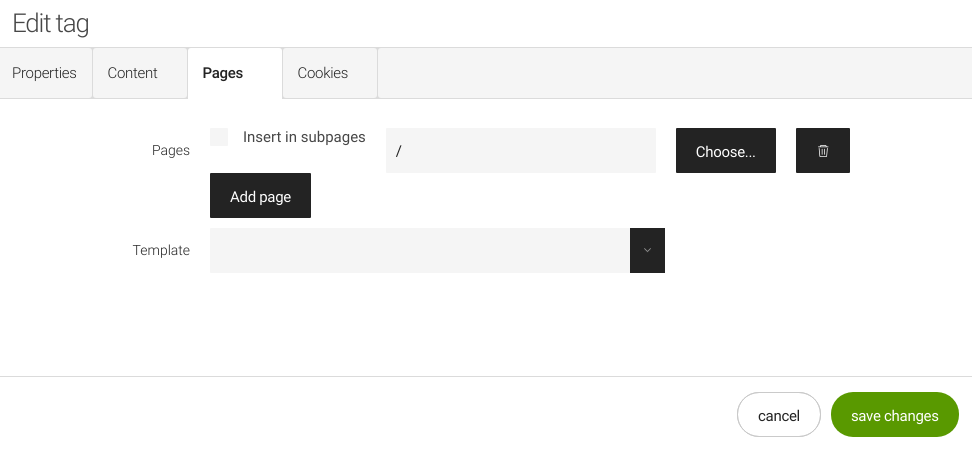
Choosing pages
Choose to which pages the tag should be added. Check the Insert in subpages box to insert the tag on all pages in a site branch. Alternatively, you can select a template. Tags are added to all pages based on the template.
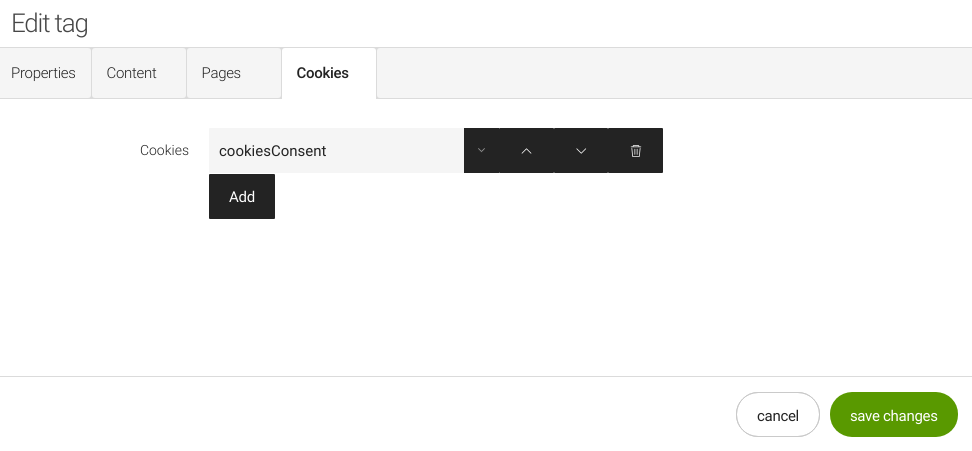
Linking to cookies
Link a tag to a cookie defined in the Cookies app to control whether the tag’s cookie is set or not.
Marketing tag cookies are set on the client-side using JavaScript. Although you cannot control cookies set on the client-side using Magnolia, the JavaScript code snippet, which sets the tag’s cookie, is added by Magnolia on the server-side. By linking the tag to a cookie defined in the Cookies app, you can control whether or not the code snippet is added or not (and so whether the cookie is set or not) based on the website visitor’s cookie consent decision.
Click Add and select a cookie from the Cookies app.
| For more, see GDPR and cookies. |
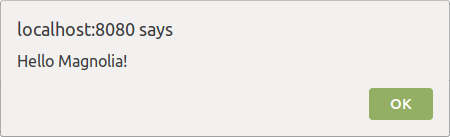
Testing
To test tag insertion, create a tag that displays a JavaScript popup. This way you can verify that a tag would be inserted on the correct pages.
-
Create a tag with the following content:
Test<script> window.alert("Hello Magnolia!"); </script> -
Check the Active on author box.
-
Choose some pages where the tag is active.
-
Open a page that has the tag in the Pages app. A popup is displayed.
Viewing the dashboard
Visit the website of the service that provided the tag in order to view the information collected by the tag. You can view the information in a separate browser window or in the Marketing Tags app. Click the Show provider dashboard action.
|
Some dashboards such as Google Analytics cannot be displayed in a subapp. Google explicitly specifies in their headers that a dashboard cannot be displayed in an iFrame ( |