Part II - Complex content types and security set up
|
Part I - My first content type is a prerequisite to Part II. |
This is the second part of the tutorial about how to use Magnolia content types.
In this part, you will define relationships between different content
types, try out the multiple property and learn to handle complex use
cases using
submodels.
You will see how you can store data in different languages and how to
set up security for a production environment.
Extended use case
In order to promote their tour guides, the travel agency Magnolia Travels decides to provide information about which office each tour guide works out of and what vehicles are available for tourists. For example, the tour office in Ho Chi Minh City currently owns five Yamaha Nuovo 135 bikes.
In the first part of the tutorial, we created a content type for tour guides. In this part, we will define two additional content types in the same domain:
-
Tour office
-
Tour vehicle
A tour office has one or more tour guides. In addition, each tour office has one or more tour vehicles available.
In the next section, we will define content types and app descriptions for the tour vehicles and the tour offices. Later on, we will define the relationships between different content types and extend the content types.
Adding new content types with apps
Add the content type definitions and app descriptors for the tour
vehicles and the tour offices to the light module
content-type-examples.
The new content types require a name property; we will use the
automatically
created name property to define the name property.
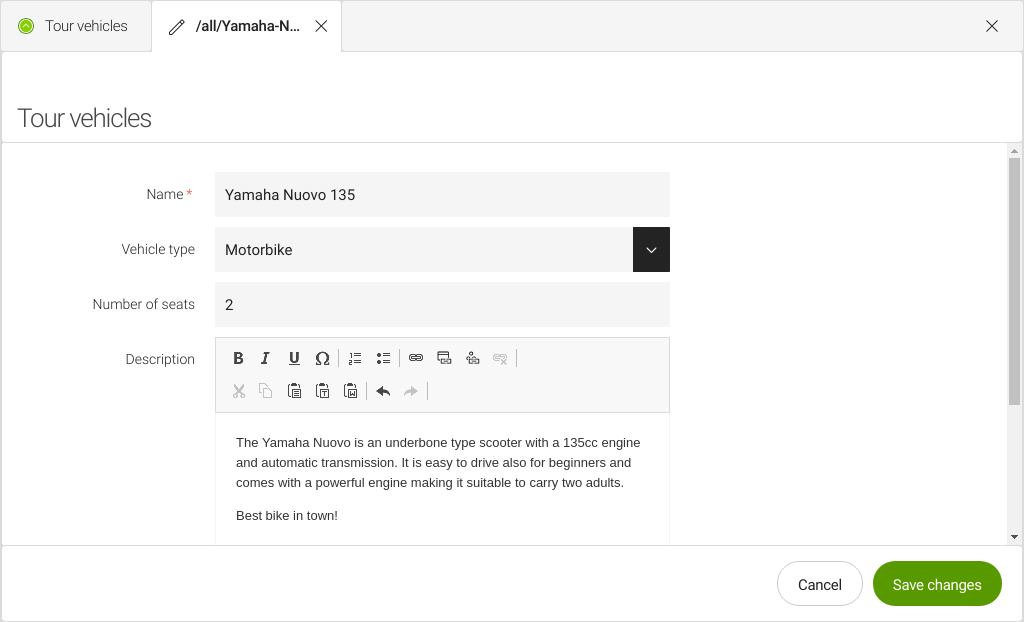
Tour vehicles
A tour vehicle has a name, vehicle type, number of seats and description.
Content Type definition
/content-type-examples/contentTypes/tourVehicle.yaml
datasource:
  workspace: tourvehicles
  namespaces:
    mt: https://www.magnolia-cms.com/jcr/mgnl
  autoCreate: true

model:
  nodeType: mt:tourVehicle
  properties:
    - name: vehicleType
    - name: numberOfSeats
      type: Double
    - name: description
      type: richText
App descriptor
/content-type-examples/apps/tourVehicles-app.yaml
!content-type:tourVehicle
name: tourVehicles-app
#
subApps:
  detail:
    editor:
      form:
        tabs:
          default:
            fields:
              - name: vehicleType
                fieldType: select
                label: Vehicle type
                options:
                  - name: bicycle
                    value: bicycle
                  - name: motorbike
                    value: motorbike
                  - name: van
                    value: van
                  - name: boat
                    value: boat
                  - name: other
                    value: other
Tour offices
A tour office has a name, country, city and address. It may link to tour vehicles and to tour guides.
Content Type definition
/content-type-examples/contentTypes/tourOffice.yaml
datasource:
  workspace: touroffices
  rootPath: /
  namespaces:
    mt: https://www.magnolia-cms.com/jcr/mgnl
  autoCreate: true

model:
  nodeType: mt:tourOffice
  properties:
    - name: city
    - name: address
    - name: country
# - name: tourGuides
# - name: allVehicles
The fields for the linked tour guides and vehicles are not properly defined yet, we will do this in the following sections.
Light module file structure
Your light module should now have the following structure:
content-type-examples/
├── apps/
│ ├── tourGuides-app.yaml
│ ├── tourOffices-app.yaml
│ └── tourVehicles-app.yaml
├── contentTypes/
│ ├── tourGuide.yaml
│ ├── tourOffice.yaml
│ └── tourVehicle.yaml
└── i18n
    └── content-type-examples-backend_en.properties
Updating the i18n file
Since you have created new apps, you also need new user interface
labels. Update your messages file
/content-type-examples/i18n/content-type-examples-backend_en.properties
to use the following version:
/content-type-examples/i18n/content-type-examples-backend_en.properties
# APPS

#
# app "tourVehicles-app"
#
tourVehicles-app = Tour vehicles
tourVehicles-app.default.label = Tour vehicle
tourVehicles-app.default.name.label = Name
tourVehicles-app.default.description.label = Description
tourVehicles-app.default.numberOfSeats.label = Number of seats
tourVehicles-app.default.vehicleType.label = Type
tourVehicles-app.default.vehicleType.options.bicycle = Bicycle
tourVehicles-app.default.vehicleType.options.motorbike = Motorbike
tourVehicles-app.default.vehicleType.options.van = Van
tourVehicles-app.default.vehicleType.options.boat = Boat
tourVehicles-app.default.vehicleType.options.other = Other
# browser
tourVehicles-app.browser.label = Tour vehicles
# actionbar
tourVehicles-app.browser.actionbar.sections.root.label=Vehicles
tourVehicles-app.browser.actionbar.sections.folder.label=Folder
tourVehicles-app.browser.actionbar.sections.item.label=Vehicle
# actions
tourVehicles-app.browser.actions.addItem.label=Add vehicle
tourVehicles-app.browser.actions.editItem.label=Edit vehicle

#
# app "tourOffices-app"
#
tourOffices-app = Tour offices
tourOffices-app.browser.label = Tour offices
tourOffices-app.default.label = Tour offices
tourOffices-app.default.name.label = Name
tourOffices-app.default.city.label = City
tourOffices-app.default.country.label = Country
tourOffices-app.default.address.label = Adress
tourOffices-app.default.tourGuides.label = Guides
tourOffices-app.default.allVehicles.label = All vehicles
tourOffices-app.default.allVehicles.vehicleGroup.vehicle.label = Vehicle
tourOffices-app.default.allVehicles.vehicleGroup.amount.label = Amount
# actionbar
tourOffices-app.browser.actionbar.sections.root.label=Office
tourOffices-app.browser.actionbar.sections.folder.label=Folder
tourOffices-app.browser.actionbar.sections.item.label=Office
# actions
tourOffices-app.browser.actions.addItem.label=Add office
tourOffices-app.browser.actions.editItem.label=Edit office

#
# app "tourGuides-app"
#
tourGuides-app = Tour guides
tourGuides-app.default.label =
tourGuides-app.default.name.label = Name
tourGuides-app.default.birthday.label = Birthday
tourGuides-app.default.gender.label = Gender
tourGuides-app.default.gender.options.female = Female
tourGuides-app.default.gender.options.male = Male
tourGuides-app.default.gender.options.other = Other
tourGuides-app.default.shortBio.label = About
tourGuides-app.browser.label = Tour guide
# actionbar
tourGuides-app.browser.actionbar.sections.root.label=Guides
tourGuides-app.browser.actionbar.sections.folder.label=Folder
tourGuides-app.browser.actionbar.sections.item.label=Guide
# actions
tourGuides-app.browser.actions.addItem.label=Add guide
tourGuides-app.browser.actions.editItem.label=Edit guide
App launcher tiles
Magnolia adds the tiles for the new apps to the App launcher automatically when registering the apps. To make the app tiles appear in the App launcher, you must first restart your Magnolia session once by logging out and logging in again. For further details see App launcher layout.

Linking content types and adding multiple values
You can define relations between different content types. An item of type A can have zero to many links to items of type B. This is called a 0-n relationship.
In this section we define a relation between tour offices and tour guides. An office may have one or many tour guides.
We will also use the multiple property to make it possible to add more
than one tour guide to a given office.
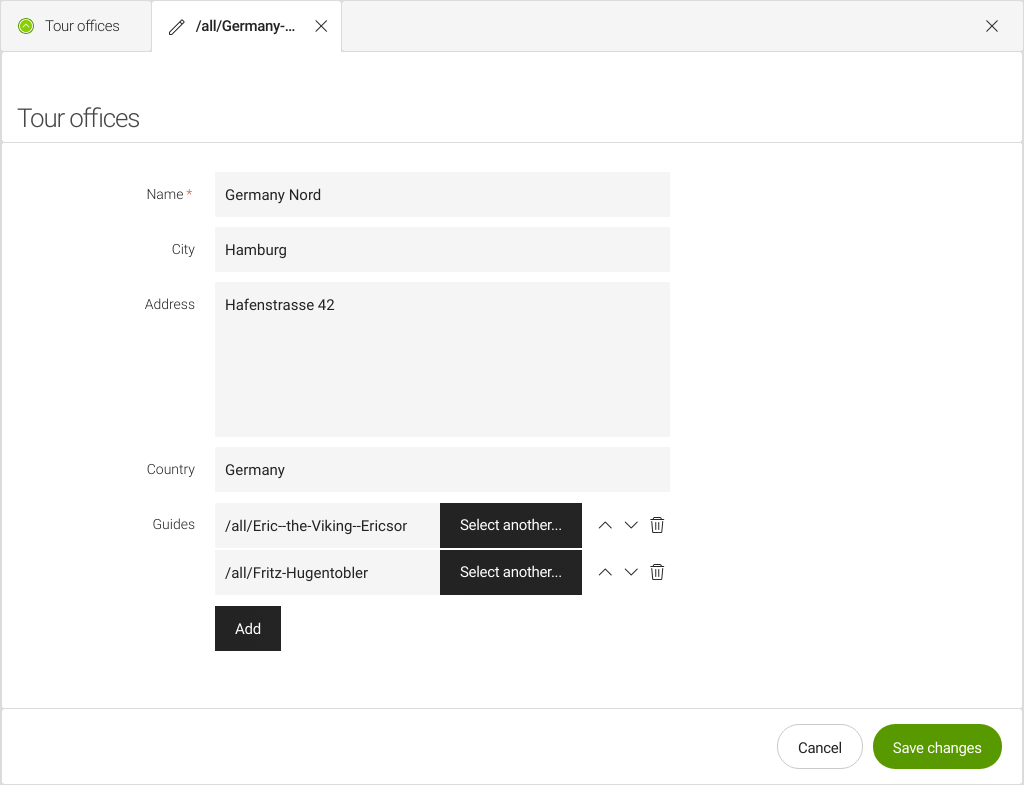
Linking tour guides to offices
An office may have more than one tour guide. Edit the model property
of the tourOffice content type:
/content-type-examples/contentTypes/tourOffice.yaml (snippet)
model:
  nodeType: mt:tourOffice
  properties:
    - name: city
    - name: address
    - name: country
    - name: tourGuides
      type: reference:tourGuide
multiple: true-
Line 14: For the property
tourGuides, we define itstypeasreference:tourGuide. This value is the name of an existing content type. -
Line 15: The
multipleproperty with the valuetruemakes it possible to add more than one tour guide.
Open the tourOffices-app app with the app launcher tile and add a tour
guide to a tour office.
Creating and linking submodels
Submodels are useful whenever you need a group of fields more than once.
A content type model definition can contain a list of submodel
definitions within the subModels property.
Submodels can be used only within the content type where they have been
defined.
A submodel definition has the same properties as a model, but a submodel cannot have additional submodels.
The default nodeType for a submodels is mgnl:contentNode.
We defined the content type for tour vehicles at the beginning of this part of the tutorial. A tour vehicle has the properties: name, vehicle type, number of seats and description.
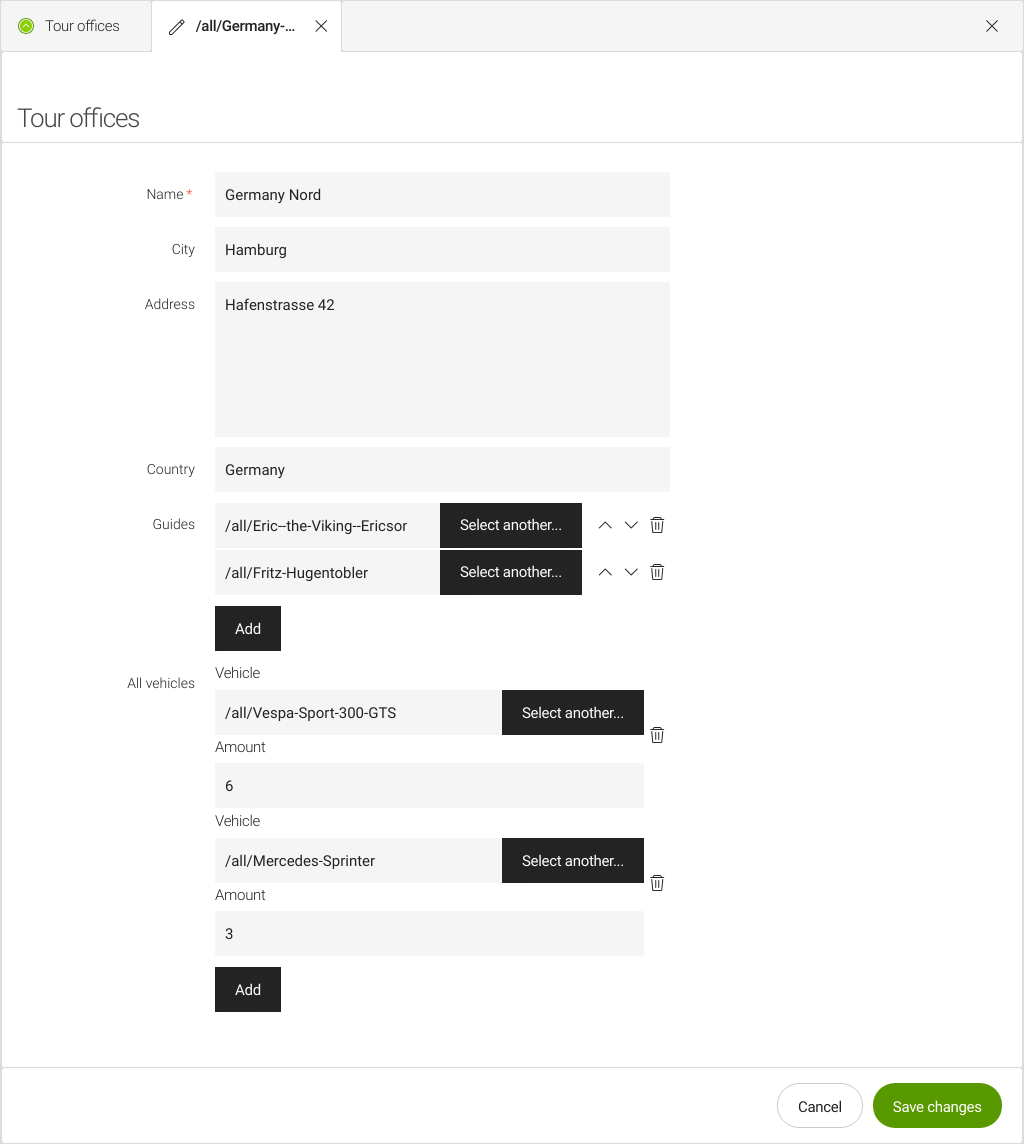
Now we will extend the tour office to make it possible to add tour vehicles to it. We need to be able to specify the number of different vehicles. For example, the tour office in Ho Chi Minh City currently owns five Yamaha Nuovo 135 bikes.
To map this case, we add a submodel to the tourOffice content type.
Defining a submodel
Keep in mind that a submodel definition is very similar to a model definition and that a model definition can contain a list of submodels.
Here is a fragment which shows a submodel:
subModels:
  - name: vehicleGroup
    properties:
      - name: vehicle
        type: reference:tourVehicle
      - name: amount
type: Double-
There is one submodel named
vehicleGroup. -
The submodel has two properties:
-
vehicle– Its type isreference:tourVehicle, which means that it is referring to thetourVehiclecontent type. -
amount– A number to indicate how many different vehicles are available.
-
Linking to the submodel from a model property
After you define the submodel, you must add a property in the model with
type: <submodel-name>.
This is the updated model of the tourOffice content type definition
with the submodel added:
/content-type-examples/contentTypes/tourOffice.yaml (snippet)
model:
  nodeType: mt:tourOffice
  properties:
    - name: city
    - name: address
    - name: country
    - name: tourGuides
      type: reference:tourGuide
      multiple: true
    - name: allVehicles
      type: vehicleGroup
      multiple: true
  subModels:
    - name: vehicleGroup
      properties:
        - name: vehicle
          type: reference:tourVehicle
        - name: amount
type: Double-
Lines 19-25: The submodel definition.
-
Line 20: The submodel’s
nameisvehicleGroup(arbitrary).
-
-
Lines 16-18: The model property
allVehicles.-
Line 17:
typehas the valuevehicleGroup, which is the name of a submodel. -
Line 18:
multipleenables you to choose more than one of the submodelvehicleGroup.
-
Now the tour offices app is ready to handle vehicles as described in the use case:
Complete tourOffice content type definition
datasource:
  workspace: touroffices
  namespaces:
    mt: https://www.magnolia-cms.com/jcr/mgnl
  autoCreate: true

model:
  nodeType: mt:tourOffice
  properties:
    - name: city
    - name: address
    - name: country
    - name: tourGuides
      type: reference:tourGuide
      multiple: true
    - name: allVehicles
      type: vehicleGroup
      multiple: true
  subModels:
    - name: vehicleGroup
      properties:
        - name: vehicle
          type: reference:tourVehicle
        - name: amount
          type: Double
Linking to items in existing content apps
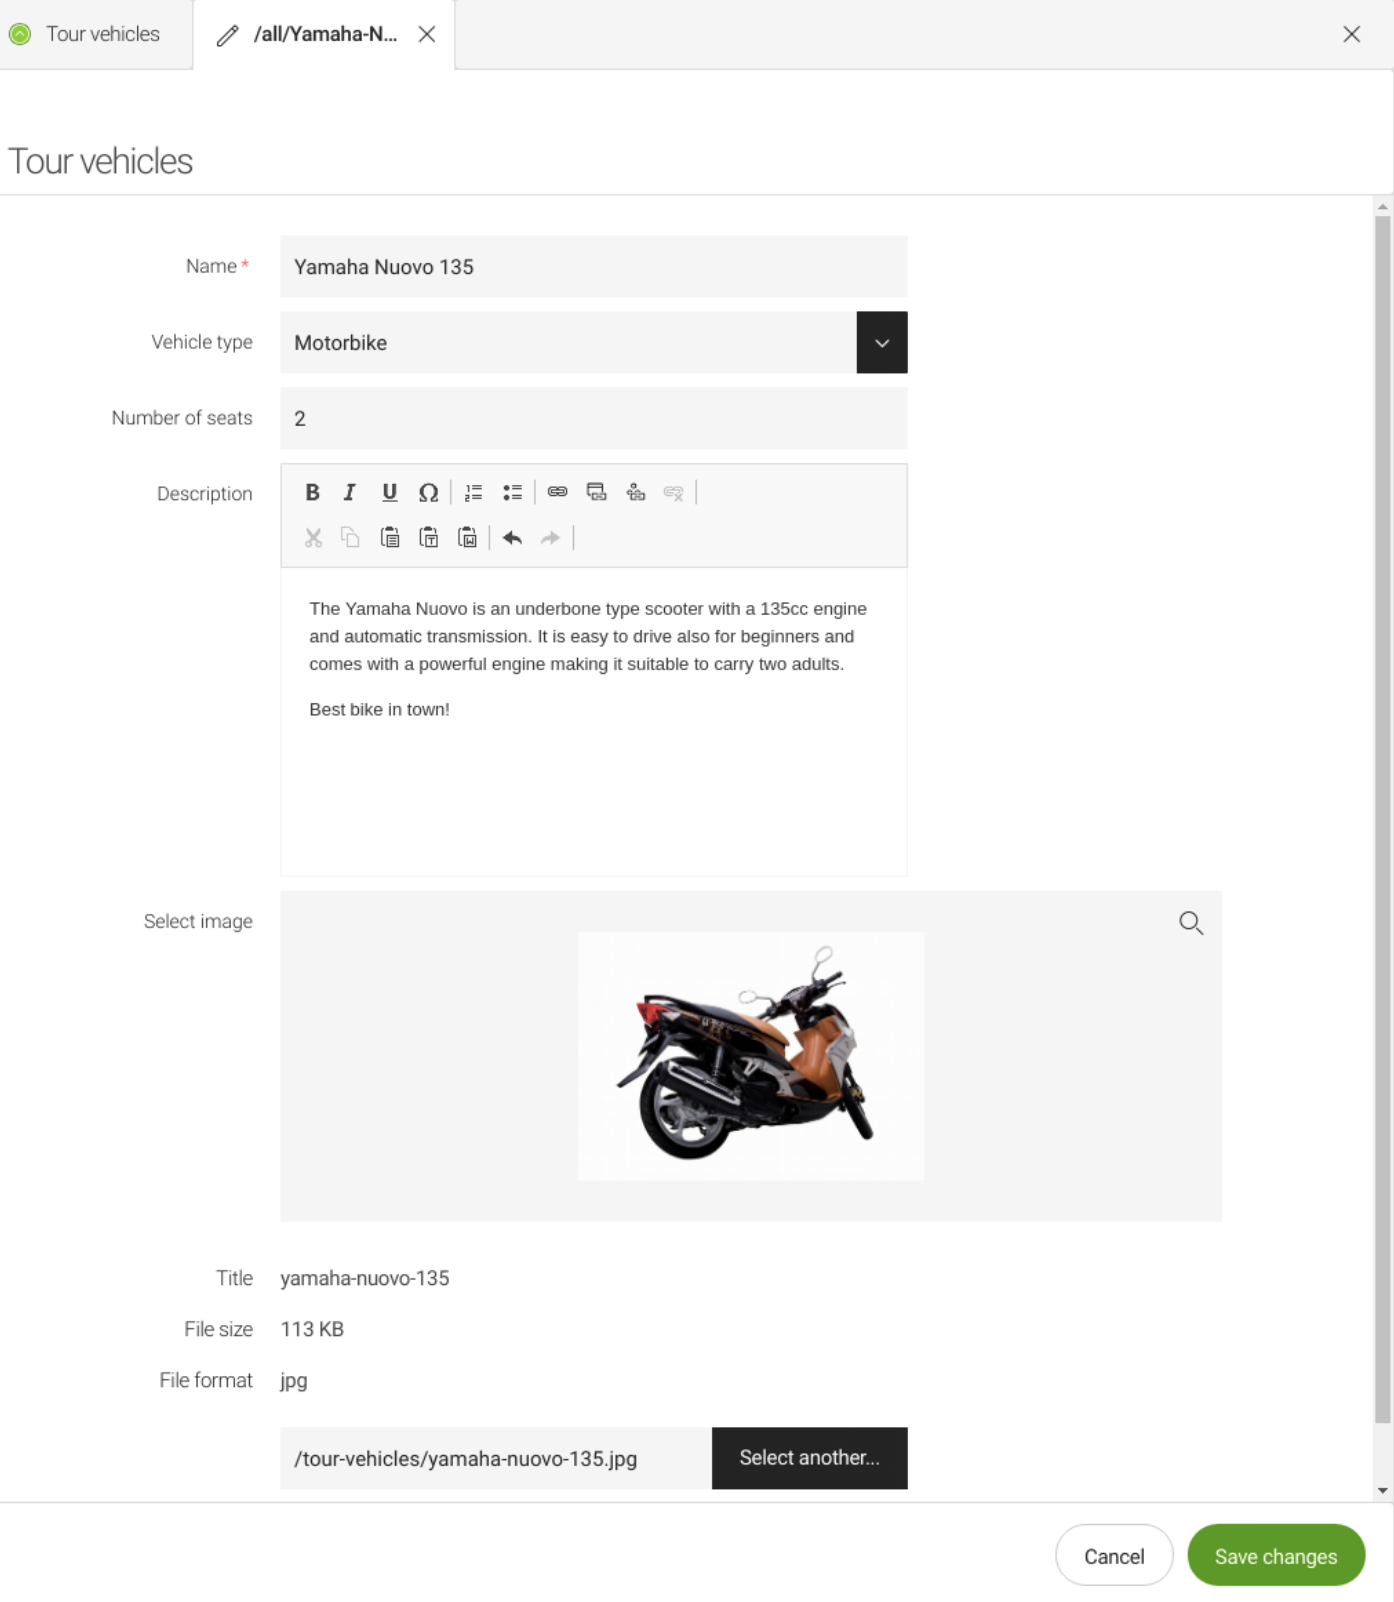
We’ve looked at how to link from one content type to another. You can also link from a content type to an already existing app such as the Magnolia Assets subapp, which is not based on a content type definition.
To demonstrate this, we will extend the tour guide content type (and its
app) with a new image property to assign an asset (an image) to a tour
guide.
To do so:
-
Add a new property to the model definition of the content type. Give it an arbitrary name. Here we use
image:model: nodeType: mt:tourVehicle properties: - name: vehicleType - name: numberOfSeats type: Double - name: description type: richText - name: image -
Override the defaults of the field that were generated for the property:
!content-type:tourVehicle
name: tourVehicles-app
#
subApps:
  detail:
    editor:
      form:
        tabs:
          default:
            fields:
              - name: image
                fieldType: link
                targetWorkspace: dam
                appName: assets
                label: Select image
                identifierToPathConverter:
                  class: info.magnolia.dam.app.assets.field.translator.AssetCompositeIdKeyTranslator
                contentPreviewDefinition:
                  contentPreviewClass: info.magnolia.dam.app.ui.field.DamFilePreviewComponent
Setting the fieldType and defining a
Link
field in the app descriptor is a feasible way to link to any content
app.
Linking to assets
To link to an asset, instead of defining the link field in the app
descriptor (as showed above) - use type: asset in the content type
definition. In this case there is no more need to override the field in
the app descriptor.
model:
  nodeType: mt:tourVehicle
  properties:
    - name: image
      type: asset
This is what the adapted tourVehicles-app looks like:
Localizing content
The properties of a content type item can be stored in multiple different languages.
|
If localization and internationalization (i18n) are completely new to you, we suggest you read the Language section of this documentation. |
Here is an overview of how you enable multilanguage content:
-
Enable multilanguage authoring.
-
Set
i18n=truein the properties of the model definition. -
Define locales in the site.
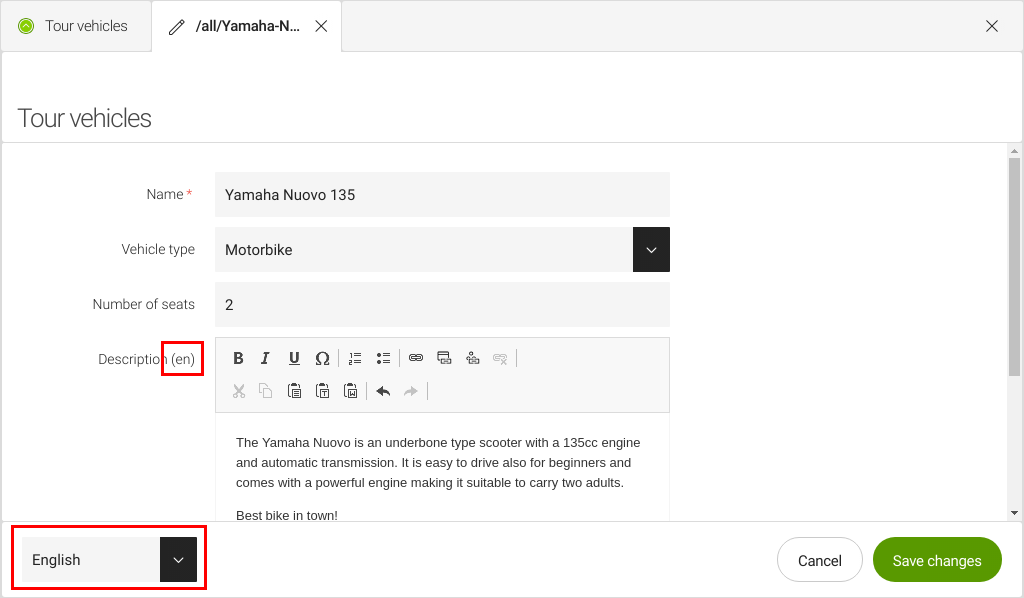
To try out this feature, change the tourVehicle content type so that
we can store the different language content for the description
property.
How to enable multilanguage authoring
Enable multilanguage authoring in /server/i18n/authoring. This allows editors to enter the same content in multiple languages.
server:
  i18n:
    authoring:
      class: info.magnolia.multisite.i18n.MultiSiteI18nAuthoringSupport
      enabled: true
| Property | Description |
|---|---|
|
required, default is Enables multilanguage content entry. |
|
required A class that implements info.magnolia.ui.api.i18n.I18NAuthoringSupport such as:
|
By default, the Magnolia instance is already
configured for the authoring property.
|
Setting the i18n property in model properties
You must enable localization of content type items for each property.
Here is an example showing only the description property enabled for
multilanguage support:
/content-type-examples/contentTypes/tourVehicle.yaml (snippet)
datasource:
# ...
model:
  nodeType: mt:tourVehicle
  properties:
    - name: vehicleType
    - name: numberOfSeats
      type: Double
    - name: description
      type: richText
      i18n: true
    - name: image
Defining locales in site
|
If you are using the |
If you have no site definition, configure a site where you define at
least its i18n node as shown below.
How to define locales in site
Define the languages that editors should be able to choose as locales in
the site definition under
<site>/i18n/locales.
Example: en, de and cs locales in an example test site definition.
test:
  i18n:
    enabled: true
    class: info.magnolia.cms.i18n.DefaultI18nContentSupport
    fallbackLocale: en
    defaultLocale: cs
    locales:
      cz:
        country: CZ
        language: cs
        enabled: true
      de:
        country: DE
        language: de
        enabled: true
Properties
| Property | Description |
|---|---|
|
optional, default is Enables support for localized content. Used to rewrite URIs and getting nodes based on the current language. |
|
required Class that implements info.magnolia.cms.i18n.I18nContentSupport such as:
|
|
optional, default is Content is served for the fallback locale if content is not available for the current locale. |
|
optional If no locale can be determined, the default locale will be set. If no default locale is defined, the fallback locale is used. |
|
required |
|
required Locale ID that consists of language and country such as |
|
optional Country code such as |
|
required Language code such as |
|
optional, default is Enables the locale. |
|
Configure locales for the fallback site
If i18n is enabled in the configuration of your content app, you need to configure locales for the fallback site or extend a site definition with locales. Then, when editing structured content, the locales of the fallback site will be used while showing the language dropdown. |
Setting up security
In this section, we look at how to set up security for content types and their apps in a production environment. We cover both JCR access security and app security.
In a local development environment, you can use the superuser user.
Superuser has the permissions required to manage the content types and
related apps that you built during this tutorial. In a production
environment, you should create users with specific roles and deactivate
the superuser account.
In this tutorial, we will create the ct-examples-editor role to edit
the content type items on the author instance.
JCR access security
The content type items are stored in the JCR.
JCR access security
JCR access security is a feature of the JCR standard (defined by JCR JSR-170 and JSR-283). JCR access is granted per workspace on path level. It can grant Read-only or Read/Write permission. Grant JCR access lists per role.
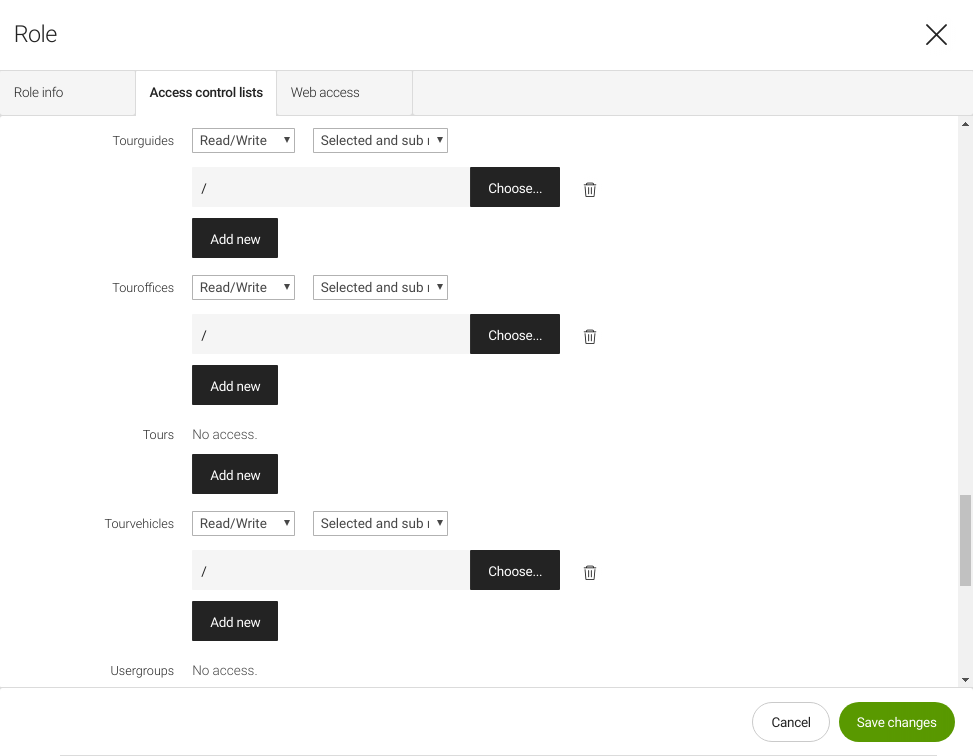
Creating the ct-examples-editor role on the author instance
Add a role with read and write permissions for the JCR workspaces:
tourguides, touroffices and tourvehicles.
-
Log in to the Magnolia author instance as a user (such as
superuser) with permission to write on theuserrolesworkspace. -
Open the Security app > Roles subapp.
-
Click Add new role.
-
Provide values for the fields in the Role info tab:
-
Role name:
ct-examples-editor -
Full name: Example role that can edit tourguides, touroffices and tourvehicles workspaces.
-
-
In the Access control lists tab, you see a list of all JCR workspaces visible to the current user.
Create an access control list (ACL) for the workspacestourguides,tourofficesandtourvehicles. with the following settings:-
Read/Write
-
Selected and subnodes
-
/ (in the last field)
-
-
Save the new role.
The system automatically creates another ACL for
the workspace userroles. This ACL makes sure that the new role can
read its own role definition on the workspace which stores the roles.
|
Here is a screenshot from the JCR ACLs for the ct-examples-editor
role:
Assigning the ct-examples-editor role to eric the editor
In a production environment, you have different users editing content such as tour guides, tour offices, tour vehicles and others. These users do not have the superuser role.
The magnolia-community-demo-webapp we are using emulates a production
environment. It already contains a user named eric that has several
roles to edit different types of content.
To assign the new ct-examples-editor role to eric the editor:
-
Log in to the Magnolia author instance as a user (such as
superuser) with permission to write on theuserrolesworkspace. -
Open the Security app > Users subapp.
-
Select
ericand click Edit user. -
Click the Roles tab. There is a Twin-column field.
-
Select the
ct-examples-editorrole in the left Other available roles column and move it using the>>button to the right Granted roles column. -
Click Save changes.
Log out and in again as the user eric with the password eric.
Eric cannot see the app launcher tiles for the apps tourGuides-app,
tourOffices-app and tourVehicles-app yet. You must enable the tour
apps for Eric; you will learn how do this in the App
security section.
Creating a role to read specific JCR data on the public instance
In a production environment, you would also create a role to grant read
access for the new workspaces tourguides, touroffices and
tourvehicles. Read only access would be assigned to the special system
user anonymous. This would make sure that anonymous website visitors
on the public instance would see content, once rendered, from those
workspaces.
How to create this role and how to render the content types item on a website are not within the scope of this tutorial.
App security
Without any further configuration, by default, only the superuser role
is granted access to an app.
The app descriptor, which defines an app, has a property named
permissions. In this property, you can add a list of roles for which
you want to grant app
access.
Add the following code snippet to the very bottom of the YAML files for
the apps tourGuides-app, tourOffices-app and tourVehicles-app:
permissions:
  roles: [ct-examples-editor]
/content-type-examples/apps/tourOffices-app.yaml
!content-type:tourOffice
name: tourOffices-app
# .-
subApps:
  detail:
    editor:
      form:
        tabs:
          default:
            fields:
              - name: address
                fieldType: text
                rows: 5
# security
permissions:
  roles: [ct-examples-editor]
Log out and in again as the user eric (you assigned the role
ct-examples-editor to Eric earlier).
Eric the editor can now use all three apps: tourGuides-app,
tourOffices-app and tourVehicles-app. He can add, edit and delete
content items in the JCR workspaces: tourguides, touroffices and
tourvehicles.
Congratulations.
You have built a complete set of content types including complex types with submodels. You have created the apps to manage the content items for these content types. You have defined relationships between content types and other, non content type-based apps. Finally, you have learned to properly adjust security settings.
Next steps
The next logical step would be to set up your Magnolia system to display the tour guides, the tour vehicles and the tour offices on your public instances for your website visitors. This could be done in different ways.
- Some suggestions
-
Headless consumption of the content types
-
Define a REST endpoint (using the Delivery API) for each of the three content types.
-
Develop a static website that renders the data via REST delivery endpoints using Angular, ReactJS or a similar JavaScript framework.
-
Develop a mobile phone app to present the data consumed from Magnolia via REST using PhoneGap, Ionic or similar frameworks.
-
Embed content type items as components into pages