My first translation
In this tutorial, you translate the user interface (UI) of a Magnolia app to another language by creating a new i18n properties file for the language and adding the file to the app. Don’t worry if you’re not a developer. You don’t need a development environment – all you need is language skills and Magnolia.
The app whose UI labels and messages you are going to translate is the Bookshelf app, created in the My first content app tutorial. The labels and messages are in English and in this tutorial you internationalize the app for Spanish-speaking users.
Prerequisites
The Bookshelf app is meant to be run as an app in Magnolia, so first you must install Magnolia. Before installing Magnolia, check that the following system components are already installed on your system.
Get Java
Magnolia needs at least a Java Runtime Environment (JRE) to run.
Check if there’s a version of Java already installed on your computer by opening the terminal or command prompt and typing java -version.
If the system reports a version number, Java is installed on your computer.
| See Certified stack page to confirm that the version installed is supported. |
On Windows, you need a Java SE Development Kit (JDK). The Java Runtime Environment (JRE) is not enough because the Tomcat application server does not recognize it.
-
JRE is for users who run Java programs on their computers.
-
JDK is for developers who write Java-based applications.
Download and install JDK.
By default, JDK is installed at C:\Program Files\Java\jdk-<version>\.
| Instructions | |||
|---|---|---|---|
Check for |
|
||
Set |
The |
For Mac, you need to download or update to Java 11 or higher.
After reviewing and agreeing to the terms of the license agreement, download the file, then double-click it to launch the installation wizard and follow the installation instructions.
The installation directory varies from one Linux system to another.
On Debian-based distributions, JREs or JDKs are usually installed in /usr/lib/jvm/.
Get node.js
Magnolia CLI is an npm package providing a command line interface (CLI) tool to set up and facilitate light development with Magnolia. The Magnolia CLI tool runs on Node.js. If you do not have Node.js installed, go to Node.js and download and install the latest LTS version.
To check the version of your node installation, run the following command in a shell:
node -vGet Magnolia CLI
Run the following command in a shell to install Magnolia CLI:
| 1 | Depending on your permissions and the location where you have installed
Node.js, you may have to execute the command above with root
permissions. Without installation permissions you will notice messages
such as npm ERR! in the shell. |
If the installation is successful, you see the following or a similar output in the shell:
/usr/bin/mgnl -> /usr/lib/node_modules/@magnolia/cli/bin/mgnl.js

> spawn-sync@1.0.15 postinstall /usr/lib/node_modules/@magnolia/cli/node_modules/spawn-sync
> node postinstall

+ @magnolia/cli@2.2.0
added 209 packages in 11.40
Once you have installed Magnolia CLI, test the installation by running the following command in the shell:
mgnl helpUsage: mgnl <command> [options] A tool to setup and facilitate light development with Magnolia CMS Options: -v, --version output the version number -h, --help output usage information Commands: jumpstart download and setup a Magnolia CMS instance for development. start start up a Magnolia CMS instance. To stop it, enter CTRL-C add-availability add component availability. build scan a node_modules folder for npm packages with the keyword "magnolia-light-module" (in package.json) and extract them to a directory of choice. create-app create an app. create-block create a block. create-component create a component and optionally add availability for it. create-content-type create a content type. create-light-module create a light module. create-page create a page template. create-virtual-uri create a virtual uri mapping. customize-local-config extract "mgnl-cli-prototypes" folder and "mgnl-cli.json" file to customize CLI configuration. install install a light module from npm to the local Magnolia instance. search search for a light module on npm. tab-completion install tab autocomplete feature for Bash, zsh or PowerShell version display mgnl and node.js versions help [cmd] display help for [cmd] mgnl: 3.1.0 node: v8.10.0 os: linux
Git
In this tutorial, you need Git to clone the
Bookshelf app from our repository into your local Magnolia installation.
You can check that Git is installed on your system by executing the
git --version command. If it is not installed, go to
https://git-scm.com/downloads page and install it.
Installing Magnolia with CLI only
Use the jumpstart command to install Magnolia. This command downloads,
unpacks and pre-configures a Magnolia bundle of your choice.
|
The |
To install Magnolia:
-
Change to the directory to where you want to install the Magnolia bundle. For example:
cd /Users/<username>/dev/
-
Execute the Magnolia CLI
jumpstartcommand:mgnl jumpstart
-
Choose the
magnolia-community-demo-webappcontaining Magnolia Community Edition bundled with the Travel Demo and a Tomcat server. It creates folders for the Tomcat server and for the light modules according to the CLI configuration.Once the setup operation is complete, you should see a message similar to this one:
info Magnolia has been successfully setup for light development!
info You can now open a new terminal tab or window and start it up with the CLI command 'mgnl start'
info Magnolia will be ready after a few seconds at localhost:8080/magnoliaAuthor. Username and password is superuser
The following files and folders are created:
dev/
├── apache-tomcat/
│ ├── bin/
│ ├── conf/
│ ├── lib/
│ ├── logs/
│ ├── temp/
│ └── webapps/
├── light-modules/
└── downloads/
Starting Magnolia with CLI mgnl start
Use the mgnl start command to start Magnoolia. In the parent directory
of light-modules, enter:
mgnl startThe command installs and starts Magnolia. This is complete when you see
a message like Server startup in 112737 ms. You can then access the UI
of the Author instance.
Log into the Author instance
Go to http://localhost:8080/magnoliaAuthor and log in to the Author
instance with:
-
Username:
superuser -
Password:
superuser
Installing the Bookshelf app
-
Go to the
dev/light-modules/directory. -
Clone the
bookshelfGit repository:git clone -b release/6.2 --single-branch https://bitbucket.org/magnolia-cms/bookshelf.git -
The app should now appear in the Apps Edit group.
-
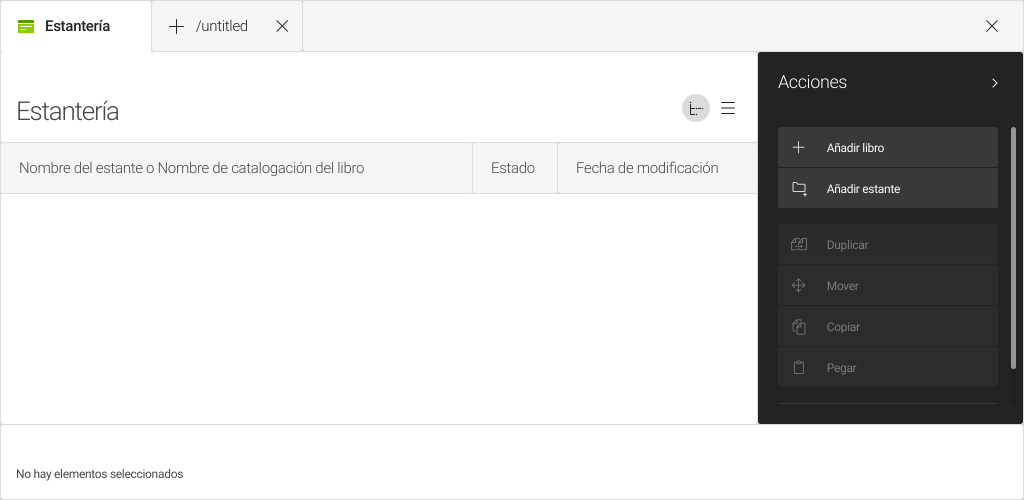
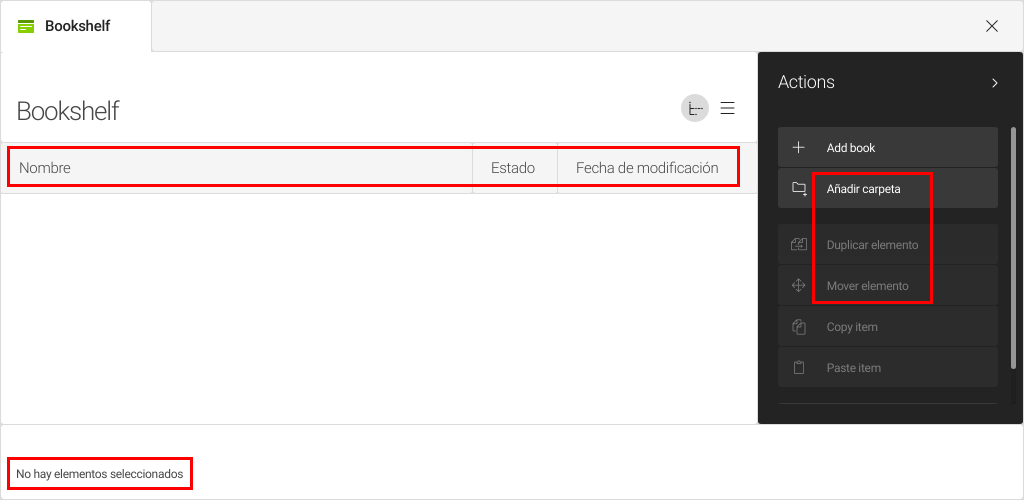
In your user profile, set the language preference to Spanish. Log out and into Magnolia again. Open the Bookshelf app. Only some of the labels are shown in Spanish. These are typically the more generic message and label keys coming from the UI framework:
Translating the app UI to Spanish
In the steps below, you add the missing Spanish translations:
-
Go to the
dev/light-modules/booshelf/i18n/subfolder. Thebookshelf-messages_en.propertiesfile contains the English values for the app labels and messages. -
Make a copy of the file and name it
bookshelf-messages_es.properties. -
In the new file, translate the values from English to Spanish and save your work.
We suggest you translate in an external text editor.
If you open the file in the internal editor of the Resource files app, the resource becomes a copy in the JCR workspace that is prioritized by Magnolia over the original file on the file system. If you make subsequent changes to the file on the file system, your changes will not be taken into account. JCR configuration overrides file system configuration.Example translation:
bookshelf-messages_es.properties
# App label
bookshelf-app=Estantería

# Book browser subapp labels.
bookshelf-app.browser.label=Navegador de libros
bookshelf-app.browser.actionbar.sections.root.label=Acciones
bookshelf-app.browser.actionbar.sections.item.label=Acciones
bookshelf-app.browser.actionbar.sections.folder.label=Acciones
bookshelf-app.browser.actionbar.sections.deletedItem.label=Acciones
bookshelf-app.browser.actionbar.sections.deletedFolder.label=Acciones
bookshelf-app.browser.actions.addItem.label=Añadir libro
bookshelf-app.browser.actions.confirmDeletion.label=Borrar
bookshelf-app.browser.actions.editItem.label=Editar
bookshelf-app.browser.actions.rename.label=Renombrar
bookshelf-app.browser.actions.addFolder.label=Añadir estante
bookshelf-app.browser.actions.confirmDeleteFolder.label=Borrar
bookshelf-app.browser.actions.editFolder.label=Renombrar
bookshelf-app.browser.actions.moveFolder=Mover
bookshelf-app.browser.actions.confirmDeleteFolder.confirmationHeader=¿Borrar {0,choice,1#estante|1< {1} estantes}?
bookshelf-app.browser.actions.confirmDeleteFolder.confirmationMessage={0,choice,1# Se borrará el estante selectionado.|1< Se borrarán los estantes selectionados.}
bookshelf-app.browser.actions.confirmDeletion.confirmationHeader=¿Borrar {0,choice,1#libro|1< {1} libros}?
bookshelf-app.browser.actions.confirmDeletion.confirmationMessage={0,choice,1#Se borrará el libro selectionado.|1< Se borrarán los libros selectionados.}
bookshelf-app.browser.actions.confirmDeleteFolder.proceedLabel=Sí, borrar
bookshelf-app.browser.actions.confirmDeleteFolder.cancelLabel=No
bookshelf-app.browser.actions.duplicate=Duplicar
bookshelf-app.browser.actions.move=Mover
bookshelf-app.browser.actions.copy=Copiar
bookshelf-app.browser.actions.paste=Pegar
bookshelf-app.browser.views.treeview.name.label=Nombre del estante o Nombre de catalogación del libro
bookshelf-app.browser.views.listview.name.label=Nombre de catalogación
bookshelf-app.browser.views.listview.path.label=Localización del libro

# Book detail subapp labels and descriptions.
bookshelf-app.bookDetailsTab.label=Detalles del libro
bookshelf-app.bookDetailsTab.name.label=Nombre de catalogación
bookshelf-app.bookDetailsTab.name.description=Éste campo es obligatorio. Su valor se utiliza para crear un nombre único de catalogación de libro, el cual será visible en la subapp NAVEGADOR DE LIBROS y almacenado en el <i>books</i> workspace.
bookshelf-app.bookDetailsTab.authors.label=Autor(es)
bookshelf-app.bookDetailsTab.ed.label=Autor(es) en función editorial
bookshelf-app.bookDetailsTab.ed.buttonLabel=
bookshelf-app.bookDetailsTab.ed.description=Marque la casilla si la función principal de "Autor(es)" es editorial.
bookshelf-app.bookDetailsTab.title.label=Título completo
bookshelf-app.bookDetailsTab.description.label=Descripción
bookshelf-app.bookDetailsTab.publisher.label=Editor
bookshelf-app.bookDetailsTab.publish_date.label=Fecha de publicación
bookshelf-app.bookDetailsTab.publish_date.description=Si solo conoce el año de publicación, introduzca la fecha en formato AAAA-01-01.
bookshelf-app.bookDetailsTab.isbn13.label=ISBN-13
bookshelf-app.bookDetailsTab.isbn13.description=Si hay un ISBN-13 disponible para el libro, introduzcalo sin guiones ni espacios.
bookshelf-app.bookDetailsTab.isbn13.validation.errorMessage=El número ISBN-13 contiene 13 caracteres. Los 12 primeros caracteres solo pueden ser númeréricos, el último carácter puede ser un número o "X". El número tiene que comenzar con 978 o 979.
bookshelf-app.detail.actions.cancel=Cancelar
bookshelf-app.detail.actions.commit=Guardar datos

# Other messages and button labels
ui-admincentral.dateField.timeZone.description=AAAA-MM-DD
ui-framework.actions.copyItem.successOneItemCopied=El elemento ha sido copiado.
ui-framework.actions.copyItem.successManyItemsCopied={0} elementos han sido copiados.
ui-framework.actions.pasteItem.success={0} {0,choice,1#elemento ha sido pegado|1< elementos han sido pegados} en {1}.
confirmation.delete.yes=Sí, borrar
confirmation.no=No
confirmation.delete.modified.message=<b>Aviso</b> <br/>Los siguientes subnodos han sido modificados pero no publicados. Si se han movido de localization, no se eliminarán correctamente de las instancias públicas. <br/> <br/> Subnodos modificados:
+
Note that the # Other messages and button labels section contains
additional Spanish message keys. These have been added because they are
defined in other Magnolia modules and affect the action, field, and
button labels in the Bookshelf app.