CKEditor 4 customization
You can customize CKEditor 4 using a JavaScript configuration file.
Magnolia’s rich text field and light rich text field use CKEditor 4 as their editor.
There are two default configurations: config-magnolia.js and config-default.js.
| If you use a custom configuration file, Magnolia ignores all the other configured properties. |
The default configuration files can be found in magnolia-ui-framework-jcr/src/main/resources/mgnl-resources/ckeditor/:
-
Magnolia configuration file: config-magnolia.js.
-
CKEditor configuration file: config-default.js.
You can locate the custom configuration file in the resources workspace, file system, or classpath (for example, /.resources/ckeditor/config-magnolia.js).
| For more information about creating different CKEditor configurations to optimize the authoring experience, see Customizing the RichText field using CKEditor. |
Magnolia configuration file
The Magnolia configuration file is a subset of the default CKEditor configuration. It includes external Magnolia functions described in the table below.

| Function | Icon | Description |
|---|---|---|
Link to Magnolia page |
|
Opens a chooser dialog where you can link to a page in the |
Link to asset |
|
Opens a chooser dialog where you can link to an asset in the |
Expand |
|
Expands the rich text field. |


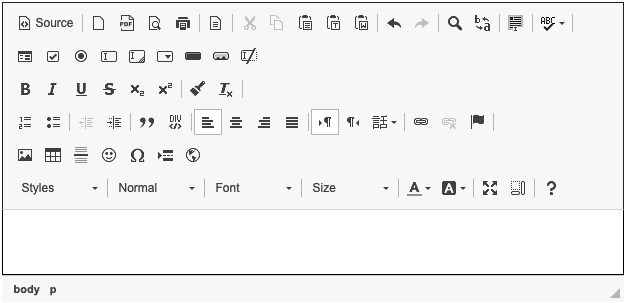
CKEditor configuration file
The CKEditor configuration includes the entire toolbar, as shown in the screenshot below.
CKEditor provides a tabbed dialog for inserting links (such as anchor tags) into rich text.
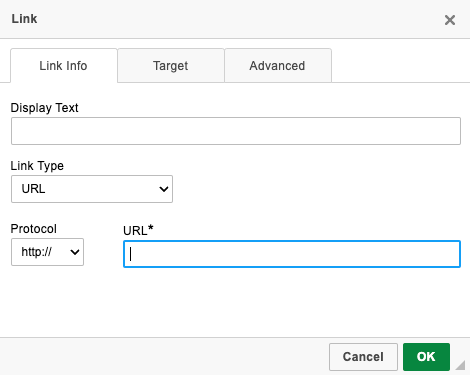
The fields of this tabbed dialog map to the following element attributes:
| Field ID | Attribute | ||
|---|---|---|---|
Id |
|
||
Name |
|
||
Language direction |
|
||
Language code |
|
||
Access key |
|
||
Tab index |
|
||
Advisory title |
|
||
Advisory content type |
|
||
Stylesheet classes |
|
||
Linked resource charset |
|
||
Relationship |
|
||
Force download |
|
| Because a rich text editor adds HTML to your content, the HTML will be indexed by search engines along with the content. |
Customizing via a configuration file
Both default configuration files contain a CKEDITOR.config section in which default settings are stored. For example, whether Latin characters are converted to HTML entities can be defined using the entities_latin setting.
config.entities_latin = false;Alternatively, you can customize how basic text styles appear in the HTML output. For example, you can implement the Bold feature in different ways: <strong>, <b>, <span style="font-weight: bold;">, or <span class="Bold">.
Use case example: Latin characters
Instructions to add the entities_latin setting to the default Magnolia configuration file and illustrations are given below.
-
Add the
config.entities_latin = false;property to the/ckeditor/config-magnolia.jscustom file.See how to do it…
-
Update the
textImage.yamlmtk2 component dialog file to reference the updated configuration file (for exampleconfigJsFile: /.resources/ckeditor/config-magnolia.js).See how to do it…
-
Create a page and add a new
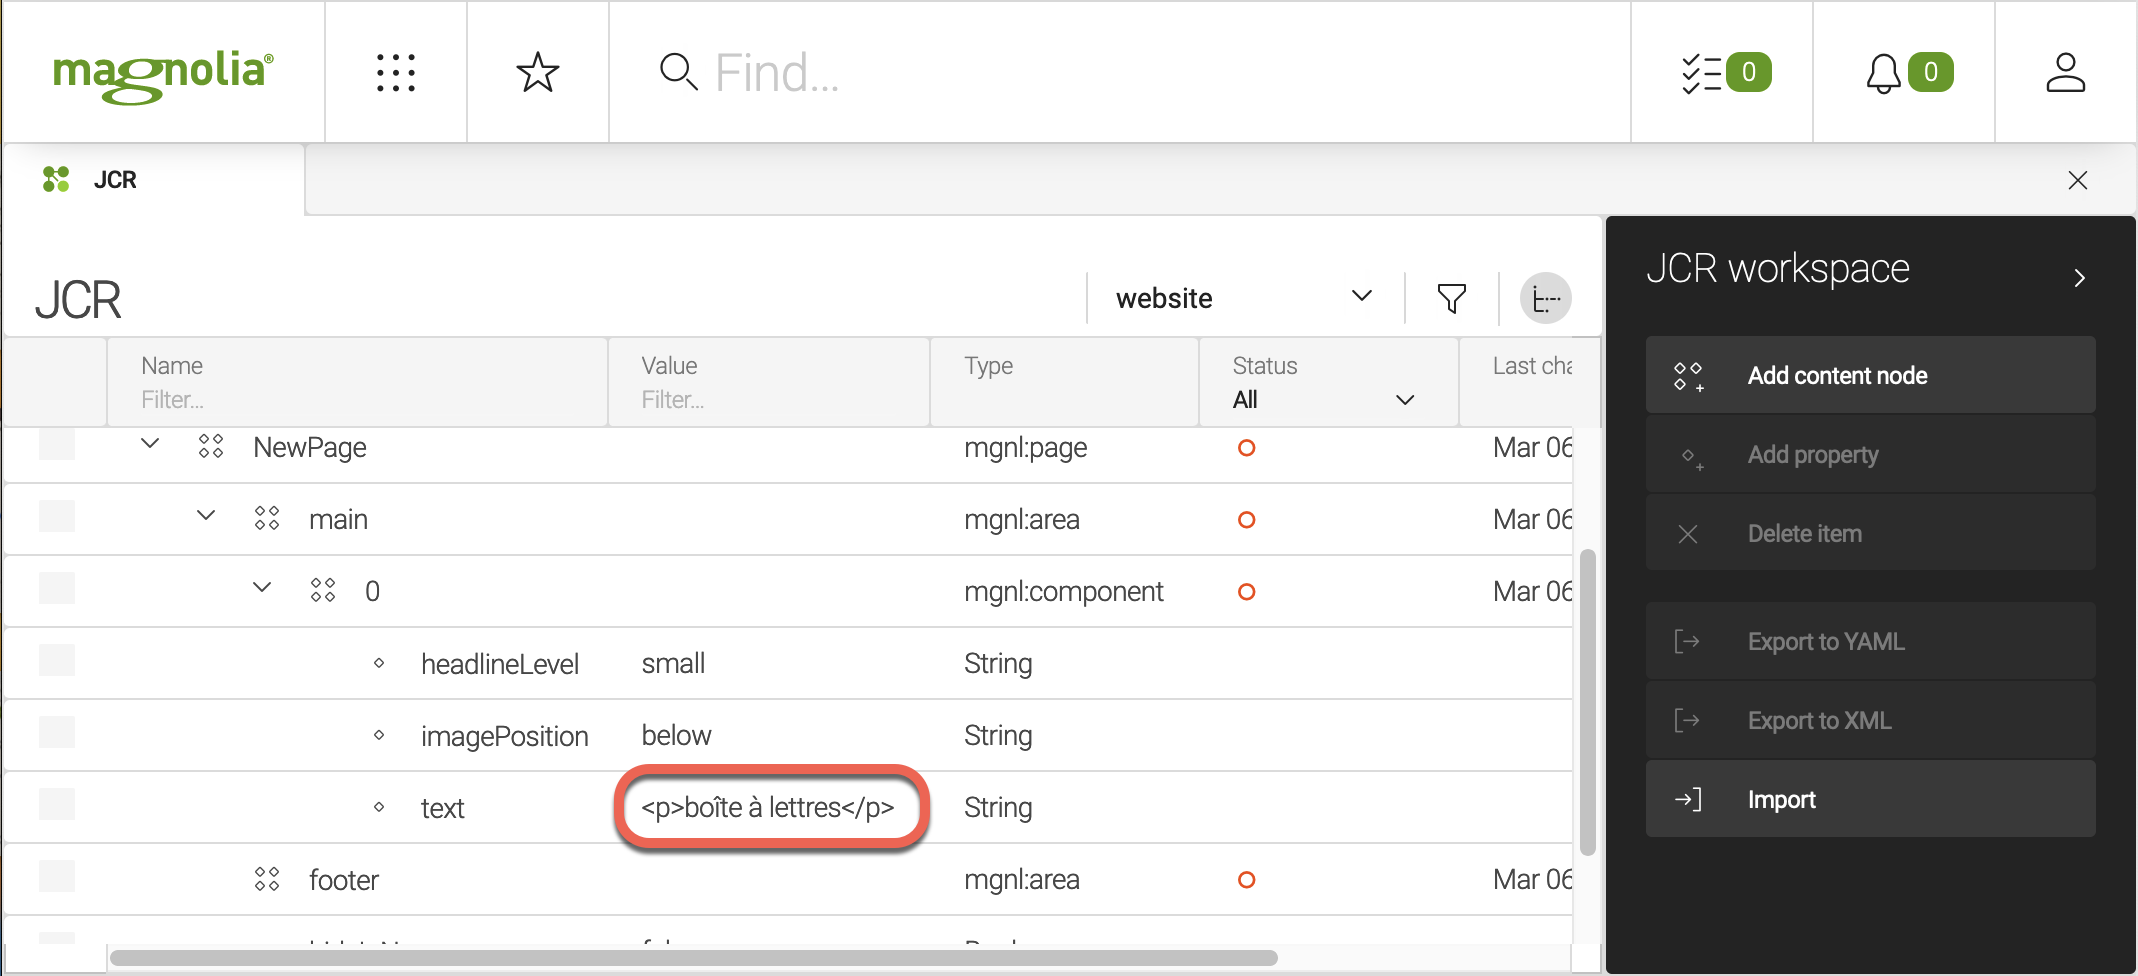
Text and imagecomponent, including Latin characters (boîte à lettres, for instance). Check that the characters are displayed properly. -
Go to the JCR app and find the page and text field you created. Check that the characters in the value field are correctly displayed.
Content appearance inside the editor
By customizing a CKEditor 4 stylesheet, you can achieve consistent styling for content both inside and outside the editor.
It is done by specifying custom styles for edited content using the config.contentsCss setting. For more information, see Classic Editor with Custom Styles.
Use case example: Custom CKEditor CSS
The default Magnolia configuration includes a basic presentation configuration for black text on a white background with minimal styling. However, it may be more beneficial for editors to see a preview closer to how their text is rendered: using the same font, for example, or styled bullet points.
| You can’t achieve this level of customization using just light modules. You must use a custom Java component instead. To handle loading from different application contexts, place the file inside a VAADIN directory in the Maven module’s resources directory. |
📁 src |
📁 main |
📁 resources |
📁 VAADIN |
From this location, you can refer to the VAADIN directory inside a JavaScript configuration. Subdirectories can be created inside the VAADIN directory. For example, a custom CSS file is inside a CSS directory.
config.contentsCss = CKEDITOR.vaadinDirUrl + <THE_CSS_FILE>;You can deploy the CSS file via the resource loading framework.
The config.js file, which contains the config.contentsCss setting, is then accessible via /.resources/<MY-MODULE>/resources/config.js
📁 src |
📁 main |
📁 resources |
📁 <MY_MODULE> |
📁 webresources |
⬩ config.js |
Adding drop-down styles to the toolbar
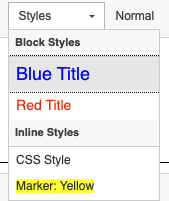
You can also introduce drop-downs in the CKEditor toolbar by adding to one of the default configurations. An example of a styles drop-down is given below. For more information, go to CKEditor Defining Styles or CKEditor Applying Block-Level Text Formats.
stylesSet within the CKEDITOR.editorConfigconfig.stylesSet = [
// Block-level styles
{ name: 'Blue Title', element: 'h2', styles: { 'color': 'Blue' } },
{ name: 'Red Title' , element: 'h3', styles: { 'color': 'Red' } },
// Inline styles
{ name: 'CSS Style', element: 'span', attributes: { 'class': 'my_style' } },
{ name: 'Marker: Yellow', element: 'span', styles: { 'background-color': 'Yellow' } }
];
Installing plugins
You can add plugins to extend the Rich text field’s functionality. Some plugins are already added in the default configurations. For example, see the Special character’s use case in this section.
For others, such as the word count plugin, you need to download the respective plugin from CKEditor and manually add it to a Java module’s VAADIN folder under src/main/resources/VAADIN/js.
| Using the CKEditor Maximize plugin may lead to display issues with the external Link to Magnolia page and Link to DAM document Magnolia functions. It is highly recommended that you use the external Expand Magnolia function instead. |
Use case example: Special characters
This section shows an example configuration customizing the special characters in CKEditor 4.
When a Rich text field is added to a dialog, it uses a configuration customized by Magnolia to include some specific plugins for linking to content and disabling some others.
The Special Characters plugin is enabled by default and provides an on-screen selection of non-standard characters an editor can add to a page.
| See the CKEditor4 source for the full collection of default characters. |
CKEditor configuration
As per the CKEditor4 documentation, the array of characters to offer authors is provided as config.specialChars.
Additionally, you can provide a label for a character by providing an array of two elements: the character and the label. Therefore, you can extend the default set and add a character using:
config.specialChars = config.specialChars.concat(['\▼']);Or add a character with a label using:
config.specialChars = config.specialChars.concat([ ['\ ','NB Space'] ]);Those examples append a character to the end of the menu presented to editors.
Bringing them to the start may make sense if you know frequently used characters.
This is achieved by reversing the concat function:
config.specialChars = ['\▼'].concat(config.specialChars);Or you may replace the large default selection of characters and only provide those you believe editors need by replacing the entire array, as shown below.
config.specialChars = [
    ['™','Trademark'],
    [' ','NB Space'],
    ['▼','Black Down-Pointing Triangle']];
CKEditor integration and definition
The modified config file can be deployed via the webresources folder of a light module.
📁 my-light-module |
📁 config |
📁 webresources |
⬩ config.js |
This file is then accessible via the path /.resources/my-light-module/webresources/config.js.
The final step is to modify the Rich text field definition and see configuration changes in the respective component dialog.
custom_richText:
  $type: richTextField
  label: Customized CKEditor
  configJsFile: /.resources/field-examples/webresources/ckeditor/config-magnolia-extended.js